snowman/transitive.go:392 consensus starting {"lastAcceptedBlock": "2qaFwDJtmCCbMKP4jRpJwH8EFws82Q2yC1HhWgAiy3tGrpGFeb"}
[09-09|17:01:46.199] INFO snowman/transitive.go:392 consensus starting {"lastAcceptedBlock": "2ofmPJuWZbdroCPEMv6aHGvZ45oa8SBp2reEm9gNxvFjnfSGFP"}
[09-09|17:01:51.628] INFO snowman/transitive.go:334 consensus starting {"lenFrontier": 1}
```
### Check Bootstrapping Progress[](#check-bootstrapping-progress "Direct link to heading")
To check if a given chain is done bootstrapping, in another terminal window call [`info.isBootstrapped`](/docs/rpcs/other/info-rpc#infoisbootstrapped) by copying and pasting the following command:
```bash
curl -X POST --data '{
"jsonrpc":"2.0",
"id" :1,
"method" :"info.isBootstrapped",
"params": {
"chain":"X"
}
}' -H 'content-type:application/json;' 127.0.0.1:9650/ext/info
```
If this returns `true`, the chain is bootstrapped; otherwise, it returns `false`. If you make other API calls to a chain that is not done bootstrapping, it will return `API call rejected because chain is not done bootstrapping`. If you are still experiencing issues please contact us on [Discord.](https://chat.avalabs.org/)
The 3 chains will bootstrap in the following order: P-chain, X-chain, C-chain.
Learn more about bootstrapping [here](/docs/nodes/maintain/bootstrapping).
## RPC
When finished bootstrapping, the X, P, and C-Chain RPC endpoints will be:
```bash
localhost:9650/ext/bc/P
localhost:9650/ext/bc/X
localhost:9650/ext/bc/C/rpc
```
if run locally, or
```bash
XXX.XX.XX.XXX:9650/ext/bc/P
XXX.XX.XX.XXX:9650/ext/bc/X
XXX.XX.XX.XXX:9650/ext/bc/C/rpc
```
if run on a cloud provider. The “XXX.XX.XX.XXX" should be replaced with the public IP of your EC2 instance.
For more information on the requests available at these endpoints, please see the [AvalancheGo API Reference](/docs/rpcs/p-chain) documentation.
## Going Further
Your Avalanche node will perform consensus on its own, but it is not yet a validator on the network. This means that the rest of the network will not query your node when sampling the network during consensus. If you want to add your node as a validator, check out [Add a Validator](/docs/primary-network/validate/node-validator) to take it a step further.
Also check out the [Maintain](/docs/nodes/maintain/bootstrapping) section to learn about how to maintain and customize your node to fit your needs.
To track an Avalanche L1 with your node, head to the [Avalanche L1 Node](/docs/nodes/run-a-node/avalanche-l1-nodes) tutorial.
# Node Setup Overview (/docs/nodes/run-a-node)
This section covers every way to get an AvalancheGo node running. Pick the path that matches your goal.
## Choose Your Path
**Not sure which you need?** Primary Network nodes validate the C-Chain, P-Chain, and X-Chain. Avalanche L1 nodes track an L1 blockchain and the P-Chain (for validator set tracking), but do not need to sync the C-Chain or X-Chain.
### Primary Network Nodes
Run a validator or API node for the Avalanche Primary Network (C/P/X chains).
Run using the official AvalancheGo Docker image, or use the interactive Console tool to generate your Docker command.
Automated script that installs AvalancheGo and configures it as a system service.
Download a release binary and run it directly.
Clone the AvalancheGo repository and compile it yourself.
Deploy on Alibaba Cloud, AWS, Google Cloud, Latitude, Microsoft Azure, or Tencent Cloud.
### Avalanche L1 Nodes
Run a node that tracks an Avalanche L1 blockchain and the P-Chain.
Build AvalancheGo from source with Subnet-EVM plugins to track an L1, or use the interactive Console tool.
## What Type of Node Should I Run?
| Type | Description | Use Case |
|------|-------------|----------|
| **Validator** | Stakes AVAX and participates in consensus | Earn rewards, secure the network |
| **API / Non-Validating** | Tracks chains and serves RPC requests | Indexing, infrastructure, dApps |
See the [Introduction](/docs/nodes) page for more on node roles, data retention modes, and validator requirements.
## Related Resources
Hardware, storage, and networking requirements for different node profiles.
Understand active vs. archival state, disk growth, and how to manage storage.
Full reference for configuration flags and options.
Keep your node healthy with upgrade procedures, monitoring, and backups.
# Using Pre-Built Binary (/docs/nodes/run-a-node/using-binary)
## Download Binary
To download a pre-built binary instead of building from source code, go to the official [AvalancheGo releases page](https://github.com/ava-labs/avalanchego/releases), and select the desired version.
Scroll down to the **Assets** section, and select the appropriate file. You can follow below rules to find out the right binary.
### For MacOS
Download the `avalanchego-macos-.zip` file and unzip using the below command:
```bash
unzip avalanchego-macos-.zip
```
The resulting folder, `avalanchego-`, contains the binaries.
### Linux (PCs or Cloud Providers)
Download the `avalanchego-linux-amd64-.tar.gz` file and unzip using the below command:
```bash
tar -xvf avalanchego-linux-amd64-.tar.gz
```
The resulting folder, `avalanchego--linux`, contains the binaries.
### Linux (Arm64)
Download the `avalanchego-linux-arm64-.tar.gz` file and unzip using the below command:
```bash
tar -xvf avalanchego-linux-arm64-.tar.gz
```
The resulting folder, `avalanchego--linux`, contains the binaries.
## Start the Node
To be able to make API calls to your node from other machines, include the argument `--http-host=` when starting the node.
### MacOS
For running a node on the Avalanche Mainnet:
```bash
./avalanchego-/build/avalanchego
```
For running a node on the Fuji Testnet:
```bash
./avalanchego-/build/avalanchego --network-id=fuji
```
### Linux
For running a node on the Avalanche Mainnet:
```bash
./avalanchego--linux/avalanchego
```
For running a node on the Fuji Testnet:
```bash
./avalanchego--linux/avalanchego --network-id=fuji
```
## Bootstrapping
A new node needs to catch up to the latest network state before it can participate in consensus and serve API calls. This process (called bootstrapping) currently takes several days for a new node connected to Mainnet, and a day or so for a new node connected to Fuji Testnet. When a given chain is done bootstrapping, it will print logs like this:
```bash
[09-09|17:01:45.295] INFO snowman/transitive.go:392 consensus starting {"lastAcceptedBlock": "2qaFwDJtmCCbMKP4jRpJwH8EFws82Q2yC1HhWgAiy3tGrpGFeb"}
[09-09|17:01:46.199] INFO snowman/transitive.go:392 consensus starting {"lastAcceptedBlock": "2ofmPJuWZbdroCPEMv6aHGvZ45oa8SBp2reEm9gNxvFjnfSGFP"}
[09-09|17:01:51.628] INFO snowman/transitive.go:334 consensus starting {"lenFrontier": 1}
```
### Check Bootstrapping Progress[](#check-bootstrapping-progress "Direct link to heading")
To check if a given chain is done bootstrapping, in another terminal window call [`info.isBootstrapped`](/docs/rpcs/other/info-rpc#infoisbootstrapped) by copying and pasting the following command:
```bash
curl -X POST --data '{
"jsonrpc":"2.0",
"id" :1,
"method" :"info.isBootstrapped",
"params": {
"chain":"X"
}
}' -H 'content-type:application/json;' 127.0.0.1:9650/ext/info
```
If this returns `true`, the chain is bootstrapped; otherwise, it returns `false`. If you make other API calls to a chain that is not done bootstrapping, it will return `API call rejected because chain is not done bootstrapping`. If you are still experiencing issues please contact us on [Discord.](https://chat.avalabs.org/)
The 3 chains will bootstrap in the following order: P-chain, X-chain, C-chain.
Learn more about bootstrapping [here](/docs/nodes/maintain/bootstrapping).
## RPC
When finished bootstrapping, the X, P, and C-Chain RPC endpoints will be:
```bash
localhost:9650/ext/bc/P
localhost:9650/ext/bc/X
localhost:9650/ext/bc/C/rpc
```
if run locally, or
```bash
XXX.XX.XX.XXX:9650/ext/bc/P
XXX.XX.XX.XXX:9650/ext/bc/X
XXX.XX.XX.XXX:9650/ext/bc/C/rpc
```
if run on a cloud provider. The “XXX.XX.XX.XXX" should be replaced with the public IP of your EC2 instance.
For more information on the requests available at these endpoints, please see the [AvalancheGo API Reference](/docs/rpcs/p-chain) documentation.
## Going Further
Your Avalanche node will perform consensus on its own, but it is not yet a validator on the network. This means that the rest of the network will not query your node when sampling the network during consensus. If you want to add your node as a validator, check out [Add a Validator](/docs/primary-network/validate/node-validator) to take it a step further.
Also check out the [Maintain](/docs/nodes/maintain/bootstrapping) section to learn about how to maintain and customize your node to fit your needs.
To track an Avalanche L1 with your node, head to the [Avalanche L1 Node](/docs/nodes/run-a-node/avalanche-l1-nodes) tutorial.
# Run AvalancheGo with Docker (/docs/nodes/run-a-node/using-docker)
For an easier way to set up and run a node, try the [Avalanche Console Node Setup Tool](/console/primary-network/node-setup).
## Prerequisites
- [Docker](https://docs.docker.com/get-docker/) installed and running
Verify your Docker installation:
```bash
docker --version
```
## Quick Start
Pull and run the latest AvalancheGo release:
```bash
docker run -d \
--name avalanchego \
-p 9650:9650 \
-p 9651:9651 \
-v ~/.avalanchego:/root/.avalanchego \
avaplatform/avalanchego:v1.14.1
```
This will start an AvalancheGo node and begin syncing with the Avalanche network.
Replace `v1.14.1` with the latest release version from the [AvalancheGo releases page](https://github.com/ava-labs/avalanchego/releases).
## What This Command Does
| Flag | Purpose |
|------|---------|
| `-d` | Runs the container in the background (detached mode) |
| `--name avalanchego` | Names the container for easy reference |
| `-p 9650:9650` | Exposes the HTTP API port |
| `-p 9651:9651` | Exposes the P2P staking port |
| `-v ~/.avalanchego:/root/.avalanchego` | Persists chain data and node configuration to your host machine |
The volume mount (`-v`) is important. Without it, chain data is lost when the container is removed and the node will need to re-sync from scratch.
## Check Node Status
Once the container is running, check that the node is bootstrapping:
```bash
curl -X POST --data '{
"jsonrpc":"2.0",
"id" :1,
"method" :"info.isBootstrapped",
"params": {
"chain": "X"
}
}' -H 'content-type:application/json;' 127.0.0.1:9650/ext/info
```
The response will show `"isBootstrapped": true` once the node has finished syncing.
## View Logs
```bash
docker logs -f avalanchego
```
## Stop and Restart
```bash
docker stop avalanchego
docker start avalanchego
```
## Upgrade to a New Version
To upgrade AvalancheGo, stop the current container, remove it, and run the new version:
```bash
docker stop avalanchego
docker rm avalanchego
docker run -d \
--name avalanchego \
-p 9650:9650 \
-p 9651:9651 \
-v ~/.avalanchego:/root/.avalanchego \
avaplatform/avalanchego:
```
Your chain data is preserved in `~/.avalanchego` on the host, so the node will resume from where it left off.
## Pass Configuration Flags
You can pass any [AvalancheGo configuration flags](/docs/nodes/configure/avalanchego-config-flags) directly after the image name:
```bash
docker run -d \
--name avalanchego \
-p 9650:9650 \
-p 9651:9651 \
-v ~/.avalanchego:/root/.avalanchego \
avaplatform/avalanchego:v1.14.1 \
--http-host=0.0.0.0 \
--public-ip-resolution-service=opendns
```
## Connect to Fuji Testnet
To run a node on the Fuji testnet instead of Mainnet:
```bash
docker run -d \
--name avalanchego-fuji \
-p 9650:9650 \
-p 9651:9651 \
-v ~/.avalanchego-fuji:/root/.avalanchego \
avaplatform/avalanchego:v1.14.1 \
--network-id=fuji
```
## Port Reference
| Port | Protocol | Purpose |
|------|----------|---------|
| `9650` | TCP | HTTP API (RPC calls) |
| `9651` | TCP | P2P networking and staking |
Ensure these ports are open in your firewall. Port `9651` must be reachable from the internet for your node to participate in the network.
# Backup and Restore (/docs/nodes/maintain/backup-restore)
Once you have your node up and running, it's time to prepare for disaster recovery. Should your machine ever have a catastrophic failure due to either hardware or software issues, or even a case of natural disaster, it's best to be prepared for such a situation by making a backup.
When running, a complete node installation along with the database can grow to be multiple gigabytes in size. Having to back up and restore such a large volume of data can be expensive, complicated and time-consuming. Luckily, there is a better way.
Instead of having to back up and restore everything, we need to back up only what is essential, that is, those files that cannot be reconstructed because they are unique to your node. For AvalancheGo node, unique files are those that identify your node on the network, in other words, files that define your NodeID.
Even if your node is a validator on the network and has multiple delegations on it, you don't need to worry about backing up anything else, because the validation and delegation transactions are also stored on the blockchain and will be restored during bootstrapping, along with the rest of the blockchain data.
The installation itself can be easily recreated by installing the node on a new machine, and all the remaining gigabytes of blockchain data can be easily recreated by the process of bootstrapping, which copies the data over from other network peers. However, if you would like to speed up the process, see the [Database Backup and Restore section](#database)
NodeID[](#nodeid "Direct link to heading")
-------------------------------------------
If more than one running nodes share the same NodeID, the communications from other nodes in the Avalanche network to this NodeID will be random to one of these nodes. If this NodeID is of a validator, it will dramatically impact the uptime calculation of the validator which will very likely disqualify the validator from receiving the staking rewards. Please make sure only one node with the same NodeID run at one time.
NodeID is a unique identifier that differentiates your node from all the other peers on the network. It's a string formatted like `NodeID-5mb46qkSBj81k9g9e4VFjGGSbaaSLFRzD`. You can look up the technical background of how the NodeID is constructed [here](/docs/rpcs/other/standards/cryptographic-primitives#tls-addresses). In essence, NodeID is defined by two files:
- `staker.crt`
- `staker.key`
NodePOP is this node's BLS key and proof of possession. Nodes must register a BLS key to act as a validator on the Primary Network. Your node's POP is logged on startup and is accessible over this endpoint.
- `publicKey` is the 48 byte hex representation of the BLS key.
- `proofOfPossession` is the 96 byte hex representation of the BLS signature.
NodePOP is defined by the `signer.key` file.
For enhanced security, you can use [CubeSigner remote signing](/docs/nodes/maintain/cube-signer-sidecar) instead of storing BLS keys locally. CubeSigner stores keys in hardware-backed enclaves and eliminates the need to back up `signer.key` files.
In the default installation, they can be found in the working directory, specifically in `~/.avalanchego/staking/`. All we need to do to recreate the node on another machine is to run a new installation with those same three files.
If `staker.key` and `staker.crt` are removed from a node, which is restarted afterwards, they will be recreated and a new node ID will be assigned.
If the `signer.key` is regenerated, the node will lose its previous BLS identity, which includes its public key and proof of possession. This change means that the node's former identity on the network will no longer be recognized, affecting its ability to participate in the consensus mechanism as before. Consequently, the node may lose its established reputation and any associated staking rewards.
If you have users defined in the keystore of your node, then you need to back up and restore those as well. [Keystore API](/docs/rpcs/other) has methods that can be used to export and import user keys. Note that Keystore API is used by developers only and not intended for use in production nodes. If you don't know what a keystore API is and have not used it, you don't need to worry about it.
### Backup[](#backup "Direct link to heading")
To back up your node, we need to store `staker.crt` and `staker.key` files somewhere safe and private, preferably to a different computer, to your private To back up your node, we need to store `staker.crt`, `staker.key` and `signer.key` files somewhere safe and private, preferably to a different computer.
If someone gets a hold of your staker files, they still cannot get to your funds, as they are controlled by the wallet private keys, not by the node. But, they could re-create your node somewhere else, and depending on the circumstances make you lose the staking rewards. So make sure your staker files are secure.
If someone gains access to your `signer.key`, they could potentially sign transactions on behalf of your node, which might disrupt the operations and integrity of your node on the network.
Let's get the files off the machine running the node.
#### From Local Node[](#from-local-node "Direct link to heading")
If you're running the node locally, on your desktop computer, just navigate to where the files are and copy them somewhere safe.
On a default Linux installation, the path to them will be `/home/USERNAME/.avalanchego/staking/`, where `USERNAME` needs to be replaced with the actual username running the node. Select and copy the files from there to a backup location. You don't need to stop the node to do that.
#### From Remote Node Using `scp`[](#from-remote-node-using-scp "Direct link to heading")
`scp` is a 'secure copy' command line program, available built-in on Linux and MacOS computers. There is also a Windows version, `pscp`, as part of the [PuTTY](https://www.chiark.greenend.org.uk/~sgtatham/putty/latest.html) package. If using `pscp`, in the following commands replace each usage of `scp` with `pscp -scp`.
To copy the files from the node, you will need to be able to remotely log into the machine. You can use account password, but the secure and recommended way is to use the SSH keys. The procedure for acquiring and setting up SSH keys is highly dependent on your cloud provider and machine configuration. You can refer to our [Amazon Web Services](/docs/nodes/run-a-node/on-third-party-services/amazon-web-services) and [Microsoft Azure](/docs/nodes/run-a-node/on-third-party-services/microsoft-azure) setup guides for those providers. Other providers will have similar procedures.
When you have means of remote login into the machine, you can copy the files over with the following command:
```bash
scp -r ubuntu@PUBLICIP:/home/ubuntu/.avalanchego/staking ~/avalanche_backup
```
This assumes the username on the machine is `ubuntu`, replace with correct username in both places if it is different. Also, replace `PUBLICIP` with the actual public IP of the machine. If `scp` doesn't automatically use your downloaded SSH key, you can point to it manually:
```bash
scp -i /path/to/the/key.pem -r ubuntu@PUBLICIP:/home/ubuntu/.avalanchego/staking ~/avalanche_backup
```
Once executed, this command will create `avalanche_backup` directory and place those three files in it. You need to store them somewhere safe.
### Restore[](#restore "Direct link to heading")
To restore your node from a backup, we need to do the reverse: restore `staker.key`, `staker.crt` and `signer.key` from the backup to the working directory of the new node.
First, we need to do the usual [installation](/docs/nodes/run-a-node/using-install-script/installing-avalanche-go) of the node. This will create a new NodeID, a new BLS key and a new BLS signature, which we need to replace. When the node is installed correctly, log into the machine where the node is running and stop it:
```bash
sudo systemctl stop avalanchego
```
We're ready to restore the node.
#### To Local Node[](#to-local-node "Direct link to heading")
If you're running the node locally, just copy the `staker.key`, `staker.crt` and `signer.key` files from the backup location into the working directory, which on the default Linux installation will be `/home/USERNAME/.avalanchego/staking/`. Replace `USERNAME` with the actual username used to run the node.
#### To Remote Node Using `scp`[](#to-remote-node-using-scp "Direct link to heading")
Again, the process is just the reverse operation. Using `scp` we need to copy the `staker.key`, `staker.crt` and `signer.key` files from the backup location into the remote working directory. Assuming the backed up files are located in the directory where the above backup procedure placed them:
```bash
scp ~/avalanche_backup/{staker.*,signer.key} ubuntu@PUBLICIP:/home/ubuntu/.avalanchego/staking
```
Or if you need to specify the path to the SSH key:
```bash
scp -i /path/to/the/key.pem ~/avalanche_backup/{staker.*,signer.key} ubuntu@PUBLICIP:/home/ubuntu/.avalanchego/staking
```
And again, replace `ubuntu` with correct username if different, and `PUBLICIP` with the actual public IP of the machine running the node, as well as the path to the SSH key if used.
#### Restart the Node and Verify[](#restart-the-node-and-verify "Direct link to heading")
Once the files have been replaced, log into the machine and start the node using:
```bash
sudo systemctl start avalanchego
```
You can now check that the node is restored with the correct NodeID and NodePOP by issuing the [getNodeID](/docs/rpcs/other/info-rpc#infogetnodeid) API call in the same console you ran the previous command:
```bash
curl -X POST --data '{
"jsonrpc":"2.0",
"id" :1,
"method" :"info.getNodeID"
}' -H 'content-type:application/json;' 127.0.0.1:9650/ext/info
```
You should see your original NodeID and NodePOP (BLS key and BLS signature). Restore process is done.
Database[](#database "Direct link to heading")
-----------------------------------------------
Normally, when starting a new node, you can just bootstrap from scratch. However, there are situations when you may prefer to reuse an existing database (ex: preserve keystore records, reduce sync time).
This tutorial will walk you through compressing your node's DB and moving it to another computer using `zip` and `scp`.
### Database Backup[](#database-backup "Direct link to heading")
First, make sure to stop AvalancheGo, run:
```bash
sudo systemctl stop avalanchego
```
You must stop the Avalanche node before you back up the database otherwise data could become corrupted.
Once the node is stopped, you can `zip` the database directory to reduce the size of the backup and speed up the transfer using `scp`:
```bash
zip -r avalanche_db_backup.zip .avalanchego/db
```
_Note: It may take > 30 minutes to zip the node's DB._
Next, you can transfer the backup to another machine:
```bash
scp -r ubuntu@PUBLICIP:/home/ubuntu/avalanche_db_backup.zip ~/avalanche_db_backup.zip
```
This assumes the username on the machine is `ubuntu`, replace with correct username in both places if it is different. Also, replace `PUBLICIP` with the actual public IP of the machine. If `scp` doesn't automatically use your downloaded SSH key, you can point to it manually:
```bash
scp -i /path/to/the/key.pem -r ubuntu@PUBLICIP:/home/ubuntu/avalanche_db_backup.zip ~/avalanche_db_backup.zip
```
Once executed, this command will create `avalanche_db_backup.zip` directory in you home directory.
### Database Restore[](#database-restore "Direct link to heading")
_This tutorial assumes you have already completed "Database Backup" and have a backup at ~/avalanche\_db\_backup.zip._
First, we need to do the usual [installation](/docs/nodes/run-a-node/using-install-script/installing-avalanche-go) of the node. When the node is installed correctly, log into the machine where the node is running and stop it:
```bash
sudo systemctl stop avalanchego
```
You must stop the Avalanche node before you restore the database otherwise data could become corrupted.
We're ready to restore the database. First, let's move the DB on the existing node (you can remove this old DB later if the restore was successful):
```bash
mv .avalanchego/db .avalanchego/db-old
```
Next, we'll unzip the backup we moved from another node (this will place the unzipped files in `~/.avalanchego/db` when the command is run in the home directory):
```bash
unzip avalanche_db_backup.zip
```
After the database has been restored on a new node, use this command to start the node:
```bash
sudo systemctl start avalanchego
```
Node should now be running from the database on the new instance. To check that everything is in order and that node is not bootstrapping from scratch (which would indicate a problem), use:
```bash
sudo journalctl -u avalanchego -f
```
The node should be catching up to the network and fetching a small number of blocks before resuming normal operation (all the ones produced from the time when the node was stopped before the backup).
Once the backup has been restored and is working as expected, the zip can be deleted:
```bash
rm avalanche_db_backup.zip
```
### Database Direct Copy[](#database-direct-copy "Direct link to heading")
You may be in a situation where you don't have enough disk space to create the archive containing the whole database, so you cannot complete the backup process as described previously.
In that case, you can still migrate your database to a new computer, by using a different approach: `direct copy`. Instead of creating the archive, moving the archive and unpacking it, we can do all of that on the fly.
To do so, you will need `ssh` access from the destination machine (where you want the database to end up) to the source machine (where the database currently is). Setting up `ssh` is the same as explained for `scp` earlier in the document.
Same as shown previously, you need to stop the node (on both machines):
```bash
sudo systemctl stop avalanchego
```
You must stop the Avalanche node before you back up the database otherwise data could become corrupted.
Then, on the destination machine, change to a directory where you would like to the put the database files, enter the following command:
```bash
ssh -i /path/to/the/key.pem ubuntu@PUBLICIP 'tar czf - .avalanchego/db' | tar xvzf - -C .
```
Make sure to replace the correct path to the key, and correct IP of the source machine. This will compress the database, but instead of writing it to a file it will pipe it over `ssh` directly to destination machine, where it will be decompressed and written to disk. The process can take a long time, make sure it completes before continuing.
After copying is done, all you need to do now is move the database to the correct location on the destination machine. Assuming there is a default AvalancheGo node installation, we remove the old database and replace it with the new one:
```bash
rm -rf ~/.avalanchego/db
mv db ~/.avalanchego/db
```
You can now start the node on the destination machine:
```bash
sudo systemctl start avalanchego
```
Node should now be running from the copied database. To check that everything is in order and that node is not bootstrapping from scratch (which would indicate a problem), use:
```bash
sudo journalctl -u avalanchego -f
```
The node should be catching up to the network and fetching a small number of blocks before resuming normal operation (all the ones produced from the time when the node was stopped before the backup).
Summary[](#summary "Direct link to heading")
---------------------------------------------
Essential part of securing your node is the backup that enables full and painless restoration of your node. Following this tutorial you can rest easy knowing that should you ever find yourself in a situation where you need to restore your node from scratch, you can easily and quickly do so.
If you have any problems following this tutorial, comments you want to share with us or just want to chat, you can reach us on our [Discord](https://chat.avalabs.org/) server.
# CubeSigner Remote BLS Signing (/docs/nodes/maintain/cube-signer-sidecar)
The CubeSigner sidecar enables AvalancheGo validators to use hardware-backed remote signing for BLS keys instead of storing them locally. This guide walks you through setting up and configuring the CubeSigner sidecar for enhanced security.
## Introduction
By default, AvalancheGo nodes store their BLS signing keys locally in a `signer.key` file. While functional, this approach has security limitations:
- Keys stored on disk are vulnerable to theft or compromise
- Lost or corrupted keys mean permanent loss of validator identity and staking rewards
- No protection against unauthorized signing operations
The CubeSigner sidecar solves these problems by delegating all BLS signing operations to [CubeSigner](https://cubist.dev/), a hardware-backed key management platform. Your BLS keys remain in secure AWS Nitro Enclaves and never touch local storage.
### Benefits
- **Hardware Security**: Keys stored in AWS Nitro Enclaves, never exposed in memory
- **Anti-Slashing Protection**: Built-in safeguards prevent double signing
- **High Availability**: 99.99% uptime with millisecond latency
- **Policy Enforcement**: Control what operations can be signed at the platform level
- **Disaster Recovery**: Keys remain safe even if validator node is compromised
## Prerequisites
Before you begin, ensure you have:
- **AvalancheGo v1.13.4 or later**: The `--staking-rpc-signer-endpoint` flag was added in the Fortuna.4 release
- **Cubist Account**: Sign up at [cubist.dev](https://cubist.dev/) for CubeSigner access
- **CubeSigner CLI**: Install the `cs` command-line tool ([installation guide](https://docs.cubist.dev/))
- **Shell Access**: Ability to configure and restart your AvalancheGo node
The CubeSigner sidecar is an advanced configuration for production validators. Make sure you understand the setup process before implementing on mainnet.
## Architecture Overview
The CubeSigner sidecar acts as a gRPC proxy between AvalancheGo and the CubeSigner API:
```
AvalancheGo Node
↓
gRPC Request (localhost:50051)
↓
CubeSigner Sidecar
↓
HTTPS Request
↓
CubeSigner API (AWS Nitro Enclaves)
↓
BLS Signature
↓
Returns to AvalancheGo
```
The sidecar implements AvalancheGo's `signer.proto` gRPC interface, translating node signing requests into CubeSigner API calls. All cryptographic operations happen inside CubeSigner's secure enclaves.
## Step 1: Set Up CubeSigner
### Create a Role
First, create a CubeSigner role for your BLS signing operations:
```bash
cs role create --role-name avalanche-bls-signer
```
This command returns a role ID. Save this ID, as you'll need it in subsequent steps.
### Generate a BLS Key
Create a new BLS key for Avalanche ICM (Interchain Messaging):
```bash
cs keys create --key-type=bls-ava-icm
```
CubeSigner uses the key type `bls-ava-icm` specifically for Avalanche BLS signing operations. This ensures the correct signing algorithm is used.
The command outputs a key ID in the format `Key#BlsAvaIcm_0x...`. Copy this key ID.
### Configure Signing Policy
Set the policy to allow raw BLS blob signing:
```bash
cs key set-policy --key-id --policy '"AllowRawBlobSigning"'
```
Replace `` with the key ID from the previous step.
The `AllowRawBlobSigning` policy is required for AvalancheGo to sign messages. Without this policy, signing requests will be rejected.
### Associate Key with Role
Link your BLS key to the role you created:
```bash
cs role add-key --role-id --key-id
```
### Generate Authentication Token
Create a token file that the sidecar will use to authenticate with CubeSigner:
```bash
cs token create --role-id > token.json
```
This creates a JSON file containing authentication credentials. Keep this file secure.
The `token.json` file grants access to your BLS signing key. Store it securely with restricted file permissions (`chmod 600 token.json`) and never commit it to version control. The sidecar refreshes this file automatically, so it must remain writable by the process.
## Step 2: Run the Sidecar
You can run the CubeSigner sidecar using Docker or as a standalone binary.
### Using Docker
Pull and run the official Docker image:
```bash
docker run -d \
--name cube-signer-sidecar \
-p 50051:50051 \
-v $(pwd)/token.json:/token.json \
-e SIGNER_ENDPOINT=https://gamma.signer.cubist.dev \
-e KEY_ID=Key#BlsAvaIcm_0x... \
-e TOKEN_FILE_PATH=/token.json \
avaplatform/cube-signer-sidecar:0.0.0-rc9 start
```
Replace the `KEY_ID` value with your actual key ID from Step 1.
Check [Docker Hub](https://hub.docker.com/r/avaplatform/cube-signer-sidecar/tags) for the latest available image tag. The `:latest` tag will be available once a stable release is published.
Do not mount `token.json` as read-only; the sidecar writes refreshed session data back to this file. The default bind mount is read/write, which is required.
The default CubeSigner endpoint for production is `https://gamma.signer.cubist.dev`. For testnet or development, CubeSigner may provide alternative endpoints.
### Running Locally
If you prefer to build from source:
```bash
# Clone the repository
git clone https://github.com/ava-labs/cube-signer-sidecar.git
cd cube-signer-sidecar
# Build the binary
go build -o cube-signer-sidecar main/main.go
# Run the sidecar
export SIGNER_ENDPOINT=https://gamma.signer.cubist.dev
export KEY_ID=Key#BlsAvaIcm_0x...
export TOKEN_FILE_PATH=./token.json
./cube-signer-sidecar start
```
### Configuration Options
The sidecar supports configuration via command-line flags, environment variables, or a JSON config file:
| Option | Environment Variable | Required | Default | Description |
|--------|---------------------|----------|---------|-------------|
| `--token-file-path` | `TOKEN_FILE_PATH` | Yes | - | Path to the token JSON file |
| `--signer-endpoint` | `SIGNER_ENDPOINT` | Yes | - | CubeSigner API endpoint URL |
| `--key-id` | `KEY_ID` | Yes | - | BLS key identifier |
| `--port` | `PORT` | No | 50051 | gRPC server listening port |
| `--config-file` | `CONFIG_FILE` | No | - | Path to JSON configuration file |
**Example JSON Configuration:**
```json
{
"token-file-path": "/path/to/token.json",
"signer-endpoint": "https://gamma.signer.cubist.dev",
"key-id": "Key#BlsAvaIcm_0x...",
"port": 50051
}
```
Use with:
```bash
./cube-signer-sidecar start --config-file config.json
```
## Step 3: Configure AvalancheGo
Once the sidecar is running, configure AvalancheGo to use it for BLS signing.
### Add the Signer Endpoint Flag
Update your AvalancheGo startup command to include the `--staking-rpc-signer-endpoint` flag:
```bash
avalanchego \
--staking-rpc-signer-endpoint=127.0.0.1:50051 \
[other flags...]
```
If your sidecar is running on a different machine, replace `127.0.0.1` with the appropriate IP address. Ensure network connectivity and firewall rules allow gRPC traffic on port 50051.
### Using a Configuration File
Alternatively, add the setting to your AvalancheGo configuration JSON:
```json
{
"staking-rpc-signer-endpoint": "127.0.0.1:50051"
}
```
### Using Systemd
If you run AvalancheGo as a systemd service, edit the service file:
```bash
sudo systemctl edit avalanchego
```
Add the flag to the `ExecStart` line or add an environment variable:
```ini
[Service]
Environment="AVALANCHEGO_STAKING_RPC_SIGNER_ENDPOINT=127.0.0.1:50051"
```
Then restart the service:
```bash
sudo systemctl daemon-reload
sudo systemctl restart avalanchego
```
## Verifying the Setup
After starting both the sidecar and AvalancheGo, verify the configuration is working correctly.
### Check Sidecar Logs
If running via Docker:
```bash
docker logs cube-signer-sidecar
```
You should see log messages indicating the gRPC server is running and receiving requests from AvalancheGo.
### Verify Node BLS Key
Call the AvalancheGo Info API to confirm your node is using the CubeSigner BLS key:
```bash
curl -X POST --data '{
"jsonrpc":"2.0",
"id" :1,
"method" :"info.getNodeID"
}' -H 'content-type:application/json;' 127.0.0.1:9650/ext/info
```
The response should include your NodeID and NodePOP (BLS public key and proof of possession):
```json
{
"jsonrpc": "2.0",
"result": {
"nodeID": "NodeID-...",
"nodePOP": {
"publicKey": "0x...",
"proofOfPossession": "0x..."
}
},
"id": 1
}
```
The `publicKey` value should match the BLS key you created in CubeSigner.
### Monitor Node Logs
Check AvalancheGo logs to ensure there are no signing errors:
```bash
sudo journalctl -u avalanchego -f
```
Look for successful connection messages to the RPC signer endpoint. Any signing failures will appear as errors in these logs.
## Security Considerations
When using the CubeSigner sidecar, follow these security best practices:
### Token Management
- **Restrict File Permissions**: Set `token.json` to read-only for the user running the sidecar:
```bash
chmod 600 token.json
chown avalanchego:avalanchego token.json
```
- **Never Commit Tokens**: Add `token.json` to `.gitignore` to prevent accidental commits
- **Rotate Regularly**: Generate new tokens periodically and update your configuration
- **Monitor Usage**: Check CubeSigner logs for unauthorized signing attempts
### Network Security
- **Isolate the Sidecar**: Run the sidecar on the same machine as AvalancheGo or on a private network
- **Firewall Rules**: Restrict access to port 50051 to only the AvalancheGo process
- **TLS for Remote Connections**: The sidecar serves plaintext gRPC only; if you need TLS, place it behind a terminating reverse proxy or tunnel traffic over a private/secure network.
### Key Management
- **One Key Per Validator**: Each validator node should have its own unique BLS key
- **Backup Policies**: Document your CubeSigner role and key IDs for disaster recovery
- **Test First**: Always test the configuration on a testnet validator before deploying to mainnet
If someone gains access to your `token.json` file, they can sign messages on behalf of your validator. Treat this file with the same security as you would a private key.
## Troubleshooting
### Connection Refused Errors
**Problem**: AvalancheGo logs show "connection refused" when trying to reach the sidecar.
**Solution**:
- Verify the sidecar is running: `docker ps` or check the process
- Confirm the sidecar is listening on the correct port: `netstat -tlnp | grep 50051`
- Check firewall rules allow connections on port 50051
### Invalid Token Errors
**Problem**: Sidecar logs show authentication failures or invalid token errors.
**Solution**:
- Verify `token.json` contains valid JSON
- Ensure the token hasn't expired (tokens have a limited lifetime)
- Regenerate the token with `cs token create` and restart the sidecar
### Key Not Found Errors
**Problem**: Sidecar reports the key ID doesn't exist or isn't accessible.
**Solution**:
- Double-check the `KEY_ID` matches exactly what `cs keys create` returned
- Verify the key is associated with the role: `cs role keys --role-id `
- Ensure the key has the `AllowRawBlobSigning` policy set
### Signing Policy Errors
**Problem**: Signing requests are rejected with policy errors.
**Solution**:
- Confirm the key policy allows raw blob signing:
```bash
cs key set-policy --key-id --policy '"AllowRawBlobSigning"'
```
- Restart the sidecar after policy changes
### AvalancheGo Won't Start
**Problem**: AvalancheGo fails to start after adding the `--staking-rpc-signer-endpoint` flag.
**Solution**:
- Verify you're running AvalancheGo v1.13.4 or later: `avalanchego --version`
- Remove any existing `signer.key` file (it conflicts with remote signing)
- Check the sidecar is reachable before starting AvalancheGo
## Migration from Local BLS Keys
If you're migrating an existing validator from local `signer.key` to CubeSigner, you have two options:
### Option 1: New BLS Key (Recommended for Testnet)
Generate a new BLS key in CubeSigner and update your validator registration. This is the cleanest approach but requires re-registering your validator.
### Option 2: Import Existing Key (Production Validators)
Importing existing BLS keys into CubeSigner requires coordination with the CubeSigner team. This is typically only done for production validators with active stake. Contact [CubeSigner support](https://cubist.dev/contact) for assistance.
## Alternative: Local BLS Key Backup
If CubeSigner's remote signing doesn't fit your needs, consider traditional backup approaches for local BLS keys. See the [Backup and Restore](/docs/nodes/maintain/backup-restore) guide for instructions on backing up your `signer.key` file.
Traditional backups are simpler but lack the security benefits of hardware-backed signing.
## Next Steps
- [Monitor your node](/docs/nodes/maintain/monitoring) to ensure signing operations are working correctly
- [Upgrade AvalancheGo](/docs/nodes/maintain/upgrade) when new versions are released
- [Learn about Avalanche L1 validators](/docs/avalanche-l1s) if you're validating additional Subnets
## Resources
- [CubeSigner Documentation](https://docs.cubist.dev/)
- [CubeSigner for Validators](https://cubist.dev/cubesigner-hardware-backed-remote-signing-for-validator-infrastructure)
- [cube-signer-sidecar GitHub Repository](https://github.com/ava-labs/cube-signer-sidecar)
- [AvalancheGo Release Notes (v1.13.4)](https://github.com/ava-labs/avalanchego/releases/tag/v1.13.4)
# Enroll in Avalanche Notify (/docs/nodes/maintain/enroll-in-avalanche-notify)
To receive email alerts if a validator becomes unresponsive or out-of-date, sign up with the Avalanche Notify tool: [http://notify.avax.network](http://notify.avax.network/).
Avalanche Notify is an active monitoring system that checks a validator's responsiveness each minute.
An email alert is sent if a validator is down for 5 consecutive checks and when a validator recovers (is responsive for 5 checks in a row).
} >
When signing up for email alerts, consider using a new, alias, or auto-forwarding email address to protect your privacy. Otherwise, it will be possible to link your NodeID to your email.
This tool is currently in BETA and validator alerts may erroneously be triggered, not triggered, or delayed. The best way to maximize the likelihood of earning staking rewards is to run redundant monitoring/alerting.
# Monitoring (/docs/nodes/maintain/monitoring)
This tutorial demonstrates how to set up infrastructure to monitor an instance of [AvalancheGo](https://github.com/ava-labs/avalanchego). We will use:
- [Prometheus](https://prometheus.io/) to gather and store data
- [`node_exporter`](https://github.com/prometheus/node_exporter) to get information about the machine,
- AvalancheGo's [Metrics API](/docs/api-reference/metrics-api) to get information about the node
- [Grafana](https://grafana.com/) to visualize data on a dashboard.
- A set of pre-made [Avalanche dashboards](https://github.com/ava-labs/avalanche-monitoring/tree/main/grafana/dashboards)
This page covers how to *collect* metrics. Once you're set up, see [Key Metrics & Alerts](/docs/nodes/maintain/recommended-metrics) for *which* metrics matter most and the recommended healthy ranges and alert thresholds.
## Prerequisites:
- A running AvalancheGo node
- Shell access to the machine running the node
- Administrator privileges on the machine
This tutorial assumes you have Ubuntu 20.04 or later running on your node. Other Linux flavors that use `systemd` for running services and `apt-get` for package management might work but have not been tested. Community members have reported it works on Debian 10 and later versions.
### Caveat: Security
The system as described here **should not** be opened to the public internet. Neither Prometheus nor Grafana as shown here is hardened against unauthorized access. Make sure that both of them are accessible only over a secured proxy, local network, or VPN. Setting that up is beyond the scope of this tutorial, but exercise caution. Bad security practices could lead to attackers gaining control over your node! It is your responsibility to follow proper security practices.
Monitoring Installer Script[](#monitoring-installer-script "Direct link to heading")
-------------------------------------------------------------------------------------
In order to make node monitoring easier to install, we have made a script that does most of the work for you. To download and run the script, log into the machine the node runs on with a user that has administrator privileges and enter the following command:
```bash
wget -nd -m https://raw.githubusercontent.com/ava-labs/avalanche-monitoring/main/grafana/monitoring-installer.sh ;\
chmod 755 monitoring-installer.sh;
```
This will download the script and make it executable.
Script itself is run multiple times with different arguments, each installing a different tool or part of the environment. To make sure it downloaded and set up correctly, begin by running:
```bash
./monitoring-installer.sh --help
```
It should display:
```bash
Usage: ./monitoring-installer.sh [--1|--2|--3|--4|--5|--help]
Options:
--help Shows this message
--1 Step 1: Installs Prometheus
--2 Step 2: Installs Grafana
--3 Step 3: Installs node_exporter
--4 Step 4: Installs AvalancheGo Grafana dashboards
--5 Step 5: (Optional) Installs additional dashboards
Run without any options, script will download and install latest version of AvalancheGo dashboards.
```
Let's get to it.
Step 1: Set up Prometheus [](#step-1-set-up-prometheus- "Direct link to heading")
----------------------------------------------------------------------------------
Run the script to execute the first step:
```bash
./monitoring-installer.sh --1
```
It should produce output something like this:
```bash
AvalancheGo monitoring installer
--------------------------------
STEP 1: Installing Prometheus
Checking environment...
Found arm64 architecture...
Prometheus install archive found:
https://github.com/prometheus/prometheus/releases/download/v3.x.x/prometheus-3.x.x.linux-arm64.tar.gz
Attempting to download...
prometheus.tar.gz 100%[=========================>] 70.2M 120MB/s in 0.6s
...
```
The script automatically downloads the latest Prometheus release for your architecture.
You may be prompted to confirm additional package installs, do that if asked. Script run should end with instructions on how to check that Prometheus installed correctly. Let's do that, run:
```bash
sudo systemctl status prometheus
```
It should output something like:
```bash
● prometheus.service - Prometheus
Loaded: loaded (/etc/systemd/system/prometheus.service; enabled; vendor preset: enabled)
Active: active (running) since Fri 2021-11-12 11:38:32 UTC; 17min ago
Docs: https://prometheus.io/docs/introduction/overview/
Main PID: 548 (prometheus)
Tasks: 10 (limit: 9300)
Memory: 95.6M
CGroup: /system.slice/prometheus.service
└─548 /usr/local/bin/prometheus --config.file=/etc/prometheus/prometheus.yml --storage.tsdb.path=/var/lib/prometheus --web.console.templates=/etc/prometheus/con>
Nov 12 11:38:33 ip-172-31-36-200 prometheus[548]: ts=2021-11-12T11:38:33.644Z caller=head.go:590 level=info component=tsdb msg="WAL segment loaded" segment=81 maxSegment=84
Nov 12 11:38:33 ip-172-31-36-200 prometheus[548]: ts=2021-11-12T11:38:33.773Z caller=head.go:590 level=info component=tsdb msg="WAL segment loaded" segment=82 maxSegment=84
```
Note the `active (running)` status (press `q` to exit). You can also check Prometheus web interface, available on `http://your-node-host-ip:9090/`
You may need to do `sudo ufw allow 9090/tcp` if the firewall is on, and/or adjust the security settings to allow connections to port 9090 if the node is running on a cloud instance. For AWS, you can look it up [here](/docs/nodes/run-a-node/on-third-party-services/amazon-web-services#create-a-security-group). If on public internet, make sure to only allow your IP to connect!
If everything is OK, let's move on.
Step 2: Install Grafana [](#step-2-install-grafana- "Direct link to heading")
------------------------------------------------------------------------------
Run the script to execute the second step:
```bash
./monitoring-installer.sh --2
```
It should produce output something like this:
```bash
AvalancheGo monitoring installer
--------------------------------
STEP 2: Installing Grafana
OK
deb https://packages.grafana.com/oss/deb stable main
Hit:1 http://us-east-2.ec2.ports.ubuntu.com/ubuntu-ports focal InRelease
Get:2 http://us-east-2.ec2.ports.ubuntu.com/ubuntu-ports focal-updates InRelease [114 kB]
Get:3 http://us-east-2.ec2.ports.ubuntu.com/ubuntu-ports focal-backports InRelease [101 kB]
Hit:4 http://ppa.launchpad.net/longsleep/golang-backports/ubuntu focal InRelease
Get:5 http://ports.ubuntu.com/ubuntu-ports focal-security InRelease [114 kB]
Get:6 https://packages.grafana.com/oss/deb stable InRelease [12.1 kB]
...
```
To make sure it's running properly:
```bash
sudo systemctl status grafana-server
```
which should again show Grafana as `active`. Grafana should now be available at `http://your-node-host-ip:3000/` from your browser. Log in with username: admin, password: admin, and you will be prompted to set up a new, secure password. Do that.
You may need to do `sudo ufw allow 3000/tcp` if the firewall is on, and/or adjust the cloud instance settings to allow connections to port 3000. If on public internet, make sure to only allow your IP to connect!
Prometheus and Grafana are now installed, we're ready for the next step.
Step 3: Set up `node_exporter` [](#step-3-set-up-node_exporter- "Direct link to heading")
------------------------------------------------------------------------------------------
In addition to metrics from AvalancheGo, let's set up monitoring of the machine itself, so we can check CPU, memory, network and disk usage and be aware of any anomalies. For that, we will use `node_exporter`, a Prometheus plugin.
Run the script to execute the third step:
```bash
./monitoring-installer.sh --3
```
The output should look something like this:
```bash
AvalancheGo monitoring installer
--------------------------------
STEP 3: Installing node_exporter
Checking environment...
Found arm64 architecture...
Downloading archive...
https://github.com/prometheus/node_exporter/releases/download/v1.x.x/node_exporter-1.x.x.linux-arm64.tar.gz
node_exporter.tar.gz 100%[=========================>] 10.2M --.-KB/s in 0.1s
...
```
The script automatically downloads the latest node_exporter release for your architecture.
Again, we check that the service is running correctly:
```bash
sudo systemctl status node_exporter
```
If the service is running, Prometheus, Grafana and `node_exporter` should all work together now. To check, in your browser visit Prometheus web interface on `http://your-node-host-ip:9090/targets`. You should see three targets enabled:
- Prometheus
- AvalancheGo
- `avalanchego-machine`
Make sure that all of them have `State` as `UP`.
If you run your AvalancheGo node with TLS enabled on your API port, you will need to manually edit the `/etc/prometheus/prometheus.yml` file and change the `avalanchego` job to look like this:
```yml
- job_name: "avalanchego"
metrics_path: "/ext/metrics"
scheme: "https"
tls_config:
insecure_skip_verify: true
static_configs:
- targets: ["localhost:9650"]
```
Mind the spacing (leading spaces too)! You will need admin privileges to do that (use `sudo`). Restart Prometheus service afterwards with `sudo systemctl restart prometheus`.
All that's left to do now is to provision the data source and install the actual dashboards that will show us the data.
Step 4: Dashboards [](#step-4-dashboards- "Direct link to heading")
--------------------------------------------------------------------
Run the script to install the dashboards:
```bash
./monitoring-installer.sh --4
```
It will produce output showing download progress for each dashboard:
```bash
AvalancheGo monitoring installer
--------------------------------
Downloading...
c_chain.json 100%[=========================>] ...
database.json 100%[=========================>] ...
machine.json 100%[=========================>] ...
main.json 100%[=========================>] ...
network.json 100%[=========================>] ...
p_chain.json 100%[=========================>] ...
x_chain.json 100%[=========================>] ...
...
```
The script downloads the following core dashboards:
- **Avalanche Main Dashboard** - Overview of key node metrics
- **C-Chain** - C-Chain specific metrics and performance
- **Database** - Database operations and performance metrics
- **Machine Metrics** - System metrics (CPU, memory, disk, network)
- **Network** - Network connectivity and peer metrics
- **P-Chain** - P-Chain specific metrics
- **X-Chain** - X-Chain specific metrics
This will download the latest versions of the dashboards from GitHub and provision Grafana to load them, as well as defining Prometheus as a data source. It may take up to 30 seconds for the dashboards to show up. In your browser, go to: `http://your-node-host-ip:3000/dashboards`. You should see 7 Avalanche dashboards:

After completing Step 5 (optional), you will have 8 dashboards including the Avalanche L1s dashboard.
Select 'Avalanche Main Dashboard' by clicking its title. It should load, and look similar to this:

Some graphs may take some time to populate fully, as they need a series of data points in order to render correctly.
You can bookmark the main dashboard as it shows the most important information about the node at a glance. Every dashboard has a link to all the others as the first row, so you can move between them easily.
Step 5: Additional Dashboards (Optional)[](#step-5-additional-dashboards-optional "Direct link to heading")
------------------------------------------------------------------------------------------------------------
Step 4 installs the basic set of dashboards that make sense to have on any node. Step 5 is for installing additional dashboards that may not be useful for every installation.
Currently, there is only one additional dashboard: Avalanche L1s. If your node is running any Avalanche L1s, you may want to add this as well. Do:
```bash
./monitoring-installer.sh --5
```
This will add the Avalanche L1s dashboard. It allows you to monitor operational data for any Avalanche L1 that is synced on the node. There is an Avalanche L1 switcher that allows you to switch between different Avalanche L1s. As there are many Avalanche L1s and not every node will have all of them, by default, it comes populated only with Spaces and WAGMI Avalanche L1s that exist on Fuji testnet:

To configure the dashboard and add any Layer 1s that your node is syncing, you will need to edit the dashboard. Select the `dashboard settings` icon (image of a cog) in the upper right corner of the dashboard display and switch to `Variables` section and select the `subnet` variable. It should look something like this:

The variable format is:
```bash
L1 name:
```
and the separator between entries is a comma. Entries for Spaces and WAGMI look like:
```bash
Spaces (Fuji) : 2ebCneCbwthjQ1rYT41nhd7M76Hc6YmosMAQrTFhBq8qeqh6tt, WAGMI (Fuji) : 2AM3vsuLoJdGBGqX2ibE8RGEq4Lg7g4bot6BT1Z7B9dH5corUD
```
The dashboard variable is still named `subnet` for backward compatibility, but it represents Avalanche L1 blockchains.
After editing the values, press `Update` and then click `Save dashboard` button and confirm. Press the back arrow in the upper left corner to return to the dashboard. New values should now be selectable from the dropdown and data for the selected Avalanche L1 will be shown in the panels.
Updating[](#updating "Direct link to heading")
-----------------------------------------------
Available node metrics are updated constantly, new ones are added and obsolete removed, so it is good a practice to update the dashboards from time to time, especially if you notice any missing data in panels. Updating the dashboards is easy, just run the script with no arguments, and it will refresh the dashboards with the latest available versions. Allow up to 30s for dashboards to update in Grafana.
```bash
./monitoring-installer.sh
```
If you added the optional extra dashboards (step 5), they will be updated as well.
If you're experiencing broken or missing metrics in your dashboards, running an update is the recommended first step. The dashboards are regularly updated with new metrics and fixes. Recent updates include MeterVM metrics for C-Chain, improved trie operation metrics, and consolidated chain dashboards.
Advanced Dashboards[](#advanced-dashboards "Direct link to heading")
---------------------------------------------------------------------
The [avalanche-monitoring repository](https://github.com/ava-labs/avalanche-monitoring/tree/main/grafana/dashboards) contains additional dashboards that are not installed by the script but can be manually imported into Grafana:
### C-Chain Load Dashboard
The `c_chain_load.json` dashboard is designed for load testing and monitoring C-Chain transaction throughput. It tracks:
- Issued transactions
- Confirmed transactions
- Failed transactions
- In-flight transactions (pending confirmation)
To install, download the dashboard JSON from the repository and import it via Grafana's dashboard import feature (Dashboards → Import → Upload JSON file).
### Logs Dashboard (Requires Loki)
The `logs.json` dashboard provides log aggregation and visualization using [Loki](https://grafana.com/oss/loki/). This dashboard requires a separate Loki installation and configuration.
Features include:
- Real-time log search
- Timeline visualization of log volume
- Ad-hoc filtering capabilities
To use this dashboard, you must:
1. Install and configure Loki to collect AvalancheGo logs
2. Add Loki as a data source in Grafana
3. Import the `logs.json` dashboard from the repository
Summary[](#summary "Direct link to heading")
---------------------------------------------
Using the script to install node monitoring is easy, and it gives you insight into how your node is behaving and what's going on under the hood. Also, pretty graphs!
Now that data is flowing, head to [Key Metrics & Alerts](/docs/nodes/maintain/recommended-metrics) to set up alerts on the metrics that matter most for L1 health.
If you have feedback on this tutorial, problems with the script or following the steps, send us a message on [Discord](https://chat.avalabs.org/).
# Key Metrics & Alerts (/docs/nodes/maintain/recommended-metrics)
Once you have [monitoring set up](/docs/nodes/maintain/monitoring), the question is *what to actually alert on*. AvalancheGo exposes hundreds of Prometheus metrics. The **query failure rate** is the single most sensitive indicator of consensus health and the right primary alert — but it is not a catch-all. Three failures do not reliably show up in it and need their own alerts:
- **Disk filling up** — the node keeps participating in consensus until it runs out of space and shuts down.
- **Bad blocks** — your node's VM can reject proposed blocks while still answering queries from other validators normally, so a correctness divergence can accumulate without the failure rate moving.
- **L1 validator balance running out** — an L1 validator pays a continuous fee from a prepaid balance; when it empties, the validator goes inactive. AvalancheGo exposes no per-validator balance metric, so this must be tracked over RPC.
The metrics below are ordered by importance. Start with the first four — the failure rate plus its three blind spots — and use the rest mainly to diagnose *why* the failure rate moved.
Thresholds are guidelines — most of the values below reflect operational policy, not hard limits in the code. Validate them against your own chain's baseline before paging. Throughout, `` is your L1's blockchain ID (or its primary alias), which appears as the `chain` label on per-chain metrics.
## Query failure rate
The single most sensitive indicator of L1 health. A *poll* is a round of voting where the node asks a sample of validators whether they prefer a block; it succeeds when enough validators respond in time. Because each validator carries a share of stake, the success rate drops by roughly an offline validator's stake share whenever one stops responding — so this one number catches networking faults, down validators, and finalization problems together.
| | |
|---|---|
| **Healthy** | ~100% successful |
| **Warning** | < 95% successful |
| **Paging** | < 90% successful |
As it falls, finalization slows. Once a node's connected stake drops below `AlphaConfidence/K` (75% at the defaults), it stops sending queries and the chain stalls for that node. AvalancheGo does not expose a success *percentage* directly — compute it from the Snowman poll counters (`polls_successful`, `polls_failed`):
```text
rate(avalanche_snowman_polls_successful{chain=""}[5m])
/
(
rate(avalanche_snowman_polls_successful{chain=""}[5m])
+ rate(avalanche_snowman_polls_failed{chain=""}[5m])
)
```
When this degrades, check the diagnostic metrics further down to find the cause.
## Disk space remaining
A completely independent failure. The node keeps participating in consensus — with the query failure rate looking perfectly healthy — right up until it runs out of disk and shuts itself down. The failure rate gives you *no warning* of a disk problem, which is exactly why disk needs its own alert.
| | |
|---|---|
| **Healthy** | > 20% free |
| **Warning** | < 20% free |
| **Paging** | < 10% free |
```text
avalanche_resource_tracker_disk_available_percentage
```
AvalancheGo tracks free space on its database volume natively and self-governs on it: by default it reports itself **unhealthy below 10% free** and performs a **fatal shutdown below 3% free** (`--system-tracker-disk-warning-available-space-percentage` defaults to 10, `--system-tracker-disk-required-available-space-percentage` defaults to 3). Page at the 10% mark — the point the node itself flags unhealthy — so you have runway to add storage or prune well before the 3% shutdown. If you run in Kubernetes or on a managed host, alert on the equivalent volume-usage metric too, since the node's own metric stops reporting once the process is down.
## Bad blocks (EVM L1s)
| | |
|---|---|
| **Metric** | `avalanche_subnetevm_vm_eth_chain_block_bad_count{chain=""}` |
| **Healthy** | 0 |
| **Paging** | any sustained increase |
Blocks that failed validation (state-root mismatch, invalid transactions). A rising count means this node is diverging from the network. It is an independent signal: the VM can reject proposed blocks while the node still answers queries from other validators normally, so bad blocks can accumulate without the failure rate moving — which is exactly why this gets its own alert.
The metric is namespaced by VM. A Subnet-EVM L1 runs the VM as an out-of-process plugin, so its metric carries a `vm_` segment: `avalanche_subnetevm_vm_eth_chain_block_bad_count`. The in-process C-Chain (Coreth) has no `vm_` segment: `avalanche_evm_eth_chain_block_bad_count{chain="C"}`. There is no built-in alert threshold — `badBlockLimit` (10) in the source is just an in-memory cache size, so alert on any sustained increase rather than a fixed count.
## L1 validator balance (RPC)
| | |
|---|---|
| **Source** | `platform.getCurrentValidators` or `platform.getL1Validator` → `balance` (nAVAX) |
| **Healthy** | ample runway at your current burn rate |
| **Paging** | projected depletion within your top-up window |
Each L1 validator pays a continuous fee out of a prepaid AVAX balance; when that balance reaches `0` the validator becomes **inactive** and stops counting toward consensus. There is no Prometheus metric for an individual validator's remaining balance — the P-Chain exposes only network-wide aggregates — so poll the P-Chain RPC instead. One call returns every validator of your L1:
```bash
curl -s -X POST -H 'content-type:application/json' --data '{
"jsonrpc": "2.0", "id": 1,
"method": "platform.getCurrentValidators",
"params": {"subnetID": ""}
}' https://api.avax.network/ext/bc/P
```
Each validator in the reply carries a `balance` field in nAVAX — for example `"balance": "5251734528"` is ~5.25 AVAX of remaining runway. To watch a single validator, `platform.getL1Validator` with its `validationID` returns the same field. (Note: `getCurrentValidators` only includes `balance` for subnets that have been converted to L1s; a legacy permissioned subnet returns the old staker format without it.)
Because the fee accrues at a predictable rate, alert on *runway*, not a fixed number: track the balance's slope and page when projected depletion falls inside your top-up turnaround time. If enough of an L1's stake goes inactive the chain stalls and the query failure rate rises — but by then the affected validators are already offline, so monitoring balance directly is what gives you advance warning.
## Connected stake
| | |
|---|---|
| **Metric** | `avalanche_stake_percent_connected{chain=""}` |
| **Healthy** | ≥ 0.8 (80%) |
| **Paging** | < 0.8 (80%) |
The fraction of total validator stake the node has live connections to. Note this is a fraction in `[0, 1]`, not a 0–100 value — compare against `0.8`, or multiply by 100 to display a percentage. When it falls, the node cannot reach enough stake to complete polls — a direct cause of failure-rate drops. The node's own health check fails below ~80% (`alpha/k` plus a buffer, at the defaults); query sending stops below 75% (`AlphaConfidence/K`).
## Processing blocks
| | |
|---|---|
| **Metric** | `avalanche_snowman_blks_processing{chain=""}` |
| **Healthy** | low and stable |
| **Warning** | sustained climb (e.g. > 6 over 5 min) |
| **Paging** | sustained spike (e.g. > 15 over 5 min) |
Blocks in consensus but not yet finalized. A sustained climb usually means finalization is stalling. The thresholds above are operational policy, not code defaults — AvalancheGo's own consensus health check trips on `MaxOutstandingItems` (256) and `MaxItemProcessingTime` (30s), so tune the numbers to your chain's block rate and watch the *trend*. To confirm whether the chain is genuinely stuck (versus just busy), check that `avalanche_snowman_last_accepted_height{chain=""}` is still increasing.
## Benched validators
| | |
|---|---|
| **Metric** | `avalanche_benchlist_benched_num{chain=""}` |
| **Healthy** | 0 |
| **Paging** | > 1 over 10 min |
The *count* of peers the node has temporarily stopped querying because they keep failing. A non-zero value means at least one validator is unreachable, but the gauge doesn't name which one — you'll need the node's logs to identify it. Also note benchlisting is capped by stake: a high-stake validator can keep failing without ever being benched, so `0` doesn't guarantee every validator is healthy.
## Number of validators
| | |
|---|---|
| **Metric** | `avalanche_stake_num_validators{chain=""}` |
| **Healthy** | your expected validator count |
| **Paging** | < 1 |
The size of the validator set the node currently sees. Dropping to 0 means it has lost its view of the set entirely (a P-Chain or L1 manager problem). With continuous staking, an L1's validators no longer expire together the way a legacy Subnet's validator periods could lapse and halt the chain, so a shrinking *count* matters less than it once did. The equivalent continuous-staking risk is individual validators going inactive when their balance runs out — monitor that directly (see [L1 validator balance](#l1-validator-balance-rpc) above).
## Health check failures
| | |
|---|---|
| **Metric** | `avalanche_health_checks_failing{check="health",tag="all"}` |
| **Healthy** | 0 |
| **Paging** | > 0 (sustained) |
A catch-all gauge of how many checks are *currently* failing in the node's health endpoint (networking, router, database, disk, BLS key, pending upgrades, bootstrap status, validation). It carries two labels: `check` (one of `health`, `liveness`, `readiness`) and `tag` (`all`, `application`, or a specific subnet ID). Use `tag="all"` for the complete rollup — `tag="application"` covers only node-wide checks and excludes per-subnet ones, so it is not a true catch-all. To watch one L1 specifically, select that subnet's ID as the `tag`. Because the gauge reports the current count rather than an event total, **any non-zero value already means the node is unhealthy** — page on `> 0`, optionally requiring it to persist a minute or two to avoid flapping on transient checks.
## CPU usage
| | |
|---|---|
| **Metric** | `avalanche_resource_tracker_cpu_usage` (and host/container CPU) |
| **Healthy** | well below your core count |
| **Paging** | sustained saturation |
AvalancheGo exposes its own CPU usage as `avalanche_resource_tracker_cpu_usage`, measured in **cores** (a value of `2.0` means two full cores), not a percentage. Watch this alongside host- or container-level CPU (which comes from your infrastructure, not AvalancheGo). Sustained saturation slows block verification and message handling, which shows up downstream as a higher failure rate.
---
## Summary
| Metric | Page when |
|---|---|
| Query failure rate (`polls_successful` / `polls_failed`) | < 90% successful |
| Disk space remaining (`disk_available_percentage`) | < 10% free |
| Bad blocks (`subnetevm_vm_eth_chain_block_bad_count`) | any sustained increase |
| L1 validator balance (RPC `getCurrentValidators` → `balance`) | runway below your top-up window |
| Connected stake (`stake_percent_connected`) | < 0.8 |
| Processing blocks (`blks_processing`) | sustained spike |
| Benched validators (`benchlist_benched_num`) | > 1 / 10 min |
| Number of validators (`stake_num_validators`) | < 1 |
| Health check failures (`health_checks_failing`) | > 0 sustained |
| CPU usage (`resource_tracker_cpu_usage`) | sustained saturation |
Start with the query failure rate and disk alerts, add the bad-blocks alert, and — for L1s — poll each validator's balance over RPC. Put the remaining metrics on your dashboards so you can quickly find the cause when the failure rate moves.
# Run Avalanche Node in Background (/docs/nodes/maintain/run-as-background-service)
This page demonstrates how to set up a `avalanchego.service` file to enable a manually deployed validator node to run in the background of a server instead of in the terminal directly.
Make sure that AvalancheGo is already installed on your machine.
Steps[](#steps "Direct link to heading")
-----------------------------------------
### Fuji Testnet Config[](#fuji-testnet-config "Direct link to heading")
Run this command in your terminal to create the `avalanchego.service` file
```bash
sudo nano /etc/systemd/system/avalanchego.service
```
Paste the following configuration into the `avalanchego.service` file
Remember to modify the values of:
- _**user=**_
- _**group=**_
- _**WorkingDirectory=**_
- _**ExecStart=**_
For those that you have configured on your Server:
```toml
[Unit]
Description=Avalanche Node service
After=network.target
[Service]
User='YourUserHere'
Group='YourUserHere'
Restart=always
PrivateTmp=true
TimeoutStopSec=60s
TimeoutStartSec=10s
StartLimitInterval=120s
StartLimitBurst=5
WorkingDirectory=/Your/Path/To/avalanchego
ExecStart=/Your/Path/To/avalanchego/./avalanchego \
--network-id=fuji \
--api-metrics-enabled=true
[Install]
WantedBy=multi-user.target
```
Press **Ctrl + X** then **Y** then **Enter** to save and exit.
Now, run:
```bash
sudo systemctl daemon-reload
```
### Mainnet Config[](#mainnet-config "Direct link to heading")
Run this command in your terminal to create the `avalanchego.service` file
```bash
sudo nano /etc/systemd/system/avalanchego.service
```
Paste the following configuration into the `avalanchego.service` file
```toml
[Unit]
Description=Avalanche Node service
After=network.target
[Service]
User='YourUserHere'
Group='YourUserHere'
Restart=always
PrivateTmp=true
TimeoutStopSec=60s
TimeoutStartSec=10s
StartLimitInterval=120s
StartLimitBurst=5
WorkingDirectory=/Your/Path/To/avalanchego
ExecStart=/Your/Path/To/avalanchego/./avalanchego \
--api-metrics-enabled=true
[Install]
WantedBy=multi-user.target
```
Press **Ctrl + X** then **Y** then **Enter** to save and exit.
Now, run:
```bash
sudo systemctl daemon-reload
```
Start the Node[](#start-the-node "Direct link to heading")
-----------------------------------------------------------
This command makes your node start automatically in case of a reboot, run it:
```bash
sudo systemctl enable avalanchego
```
To start the node, run:
```bash
sudo systemctl start avalanchego
sudo systemctl status avalanchego
```
Output:
```bash
socopower@avalanche-node-01:~$ sudo systemctl status avalanchego
● avalanchego.service - Avalanche Node service
Loaded: loaded (/etc/systemd/system/avalanchego.service; enabled; vendor p>
Active: active (running) since Tue 2023-08-29 23:14:45 UTC; 5h 46min ago
Main PID: 2226 (avalanchego)
Tasks: 27 (limit: 38489)
Memory: 8.7G
CPU: 5h 50min 31.165s
CGroup: /system.slice/avalanchego.service
└─2226 /usr/local/bin/avalanchego/./avalanchego --network-id=fuji
Aug 30 03:02:50 avalanche-node-01 avalanchego[2226]: INFO [08-30|03:02:50.685] >
Aug 30 03:02:51 avalanche-node-01 avalanchego[2226]: INFO [08-30|03:02:51.185] >
Aug 30 03:03:09 avalanche-node-01 avalanchego[2226]: [08-30|03:03:09.380] INFO >
Aug 30 03:03:23 avalanche-node-01 avalanchego[2226]: [08-30|03:03:23.983] INFO >
Aug 30 03:05:15 avalanche-node-01 avalanchego[2226]: [08-30|03:05:15.192] INFO >
Aug 30 03:05:15 avalanche-node-01 avalanchego[2226]: [08-30|03:05:15.237] INFO >
Aug 30 03:05:15 avalanche-node-01 avalanchego[2226]: [08-30|03:05:15.238] INFO >
Aug 30 03:05:19 avalanche-node-01 avalanchego[2226]: [08-30|03:05:19.809] INFO >
Aug 30 05:00:47 avalanche-node-01 avalanchego[2226]: [08-30|05:00:47.001] INFO
```
To see the synchronization process, you can run the following command:
```bash
sudo journalctl -fu avalanchego
```
# Upgrade Your AvalancheGo Node (/docs/nodes/maintain/upgrade)
Never miss a mandatory AvalancheGo upgrade again. Set up [Validator Alerts](/validator-alerts) on Builders Hub to receive email notifications when new versions are released, when your uptime drops, or when your stake is about to expire.
Backup Your Node[](#backup-your-node "Direct link to heading")
---------------------------------------------------------------
Before upgrading your node, it is recommended you backup your staker files which are used to identify your node on the network. In the default installation, you can copy them by running following commands:
```bash
cd
cp ~/.avalanchego/staking/staker.crt .
cp ~/.avalanchego/staking/staker.key .
```
Then download `staker.crt` and `staker.key` files and keep them somewhere safe and private. If anything happens to your node or the machine node runs on, these files can be used to fully recreate your node.
If you use your node for development purposes and have keystore users on your node, you should back up those too.
Node Installed Using the Installer Script[](#node-installed-using-the-installer-script "Direct link to heading")
-----------------------------------------------------------------------------------------------------------------
If you installed your node using the [installer script](/docs/nodes/run-a-node/using-install-script/installing-avalanche-go), to upgrade your node, just run the installer script again.
```bash
./avalanchego-installer.sh
```
It will detect that you already have AvalancheGo installed:
```bash
AvalancheGo installer
---------------------
Preparing environment...
Found 64bit Intel/AMD architecture...
Found AvalancheGo systemd service already installed, switching to upgrade mode.
Stopping service...
```
It will then upgrade your node to the latest version, and after it's done, start the node back up, and print out the information about the latest version:
```bash
Node upgraded, starting service...
New node version:
avalanche/1.1.1 [network=mainnet, database=v1.0.0, commit=f76f1fd5f99736cf468413bbac158d6626f712d2]
Done!
```
And that is it, your node is upgraded to the latest version.
If you installed your node manually, proceed with the rest of the tutorial.
Stop the Old Node Version[](#stop-the-old-node-version "Direct link to heading")
---------------------------------------------------------------------------------
After the backup is secured, you may start upgrading your node. Begin by stopping the currently running version.
### Node Running from Terminal[](#node-running-from-terminal "Direct link to heading")
If your node is running in a terminal stop it by pressing `ctrl+c`.
### Node Running as a Service[](#node-running-as-a-service "Direct link to heading")
If your node is running as a service, stop it by entering: `sudo systemctl stop avalanchego.service`
(your service may be named differently, `avalanche.service`, or similar)
### Node Running in Background[](#node-running-in-background "Direct link to heading")
If your node is running in the background (by running with `nohup`, for example) then find the process running the node by running `ps aux | grep avalanche`. This will produce output like:
```bash
ubuntu 6834 0.0 0.0 2828 676 pts/1 S+ 19:54 0:00 grep avalanche
ubuntu 2630 26.1 9.4 2459236 753316 ? Sl Dec02 1220:52 /home/ubuntu/build/avalanchego
```
In this example, second line shows information about your node. Note the process id, in this case, `2630`. Stop the node by running `kill -2 2630`.
Now we are ready to download the new version of the node. You can either download the source code and then build the binary program, or you can download the pre-built binary. You don't need to do both.
Downloading pre-built binary is easier and recommended if you're just looking to run your own node and stake on it.
Building the node [from source](/docs/nodes/maintain/upgrade#build-from-source) is recommended if you're a developer looking to experiment and build on Avalanche.
Download Pre-Built Binary[](#download-pre-built-binary "Direct link to heading")
---------------------------------------------------------------------------------
If you want to download a pre-built binary instead of building it yourself, go to our [releases page](https://github.com/ava-labs/avalanchego/releases), and select the release you want (probably the latest one.)
If you have a node, you can subscribe to the [avalanche notify service](/docs/nodes/maintain/enroll-in-avalanche-notify) with your node ID to be notified about new releases.
In addition, or if you don't have a node ID, you can get release notifications from github. To do so, you can go to our [repository](https://github.com/ava-labs/avalanchego) and look on the top-right corner for the **Watch** option. After you click on it, select **Custom**, and then **Releases**. Press **Apply** and it is done.
Under `Assets`, select the appropriate file.
For MacOS:
Download: `avalanchego-macos-.zip`
Unzip: `unzip avalanchego-macos-.zip`
The resulting folder, `avalanchego-`, contains the binaries.
For Linux on PCs or cloud providers:
Download: `avalanchego-linux-amd64-.tar.gz`
Unzip: `tar -xvf avalanchego-linux-amd64-.tar.gz`
The resulting folder, `avalanchego--linux`, contains the binaries.
For Linux on Arm64-based computers:
Download: `avalanchego-linux-arm64-.tar.gz`
Unzip: `tar -xvf avalanchego-linux-arm64-.tar.gz`
The resulting folder, `avalanchego--linux`, contains the binaries.
You are now ready to run the new version of the node.
### Running the Node from Terminal[](#running-the-node-from-terminal "Direct link to heading")
If you are using the pre-built binaries on MacOS:
```bash
./avalanchego-/build/avalanchego
```
If you are using the pre-built binaries on Linux:
```bash
./avalanchego--linux/avalanchego
```
Add `nohup` at the start of the command if you want to run the node in the background.
### Running the Node as a Service[](#running-the-node-as-a-service "Direct link to heading")
If you're running the node as a service, you need to replace the old binaries with the new ones.
```bash
cp -r avalanchego--linux/*
```
and then restart the service with: `sudo systemctl start avalanchego.service`.
Build from Source[](#build-from-source "Direct link to heading")
-----------------------------------------------------------------
First clone our GitHub repo (you can skip this step if you've done this before):
```bash
git clone https://github.com/ava-labs/avalanchego.git
```
The repository cloning method used is HTTPS, but SSH can be used too:
`git clone git@github.com:ava-labs/avalanchego.git`
You can find more about SSH and how to use it [here](https://docs.github.com/en/authentication/connecting-to-github-with-ssh/about-ssh).
Then move to the AvalancheGo directory:
```bash
cd avalanchego
```
Pull the latest code:
```bash
git pull
```
If the master branch has not been updated with the latest release tag, you can get to it directly via first running `git fetch --all --tags` and then `git checkout --force tags/` (where `` is the latest release tag; for example `v1.3.2`) instead of `git pull`.
Note that your local copy will be in a 'detached HEAD' state, which is not an issue if you do not make changes to the source that you want push back to the repository (in which case you should check out to a branch and to the ordinary merges).
Note also that the `--force` flag will disregard any local changes you might have.
Check that your local code is up to date. Do:
```bash
git rev-parse HEAD
```
and check that the first 7 characters printed match the Latest commit field on our [GitHub](https://github.com/ava-labs/avalanchego).
If you used the `git checkout tags/` then these first 7 characters should match commit hash of that tag.
Now build the binary:
```bash
./scripts/build.sh
```
This should print: `Build Successful`
You can check what version you're running by doing:
```bash
./build/avalanchego --version
```
You can run your node with:
```bash
./build/avalanchego
```
# AI & LLM Integration (/docs/tooling/ai-llm)
The Builder Hub provides AI-friendly access to documentation through standardized formats. Whether you're building a chatbot, using Claude/ChatGPT, or integrating with AI development tools, we offer multiple ways to access our docs.
## Endpoints Overview
| Endpoint | Purpose | Best For |
| :------- | :------ | :------- |
| [`/llms.txt`](/docs/tooling/ai-llm/llms-txt#llmstxt) | Structured index of all docs | Content discovery |
| [`/llms-full.txt`](/docs/tooling/ai-llm/llms-txt#llms-fulltxt) | Complete docs in one file | Full context loading |
| [`/{path}.md`](/docs/tooling/ai-llm/llms-txt#individual-pages) | Markdown for any page | Single page retrieval |
| [`/api/mcp`](/docs/tooling/ai-llm/mcp-server) | MCP server for search & retrieval | Dynamic AI tool access |
## Quick Start
The fastest way to get started depends on your use case:
Static endpoints for sitemap, full docs, and individual pages
Dynamic search and retrieval via Model Context Protocol
Rate limits, CORS policy, and privacy information
## Standards
- [llms.txt](https://llmstxt.org/) - AI sitemap standard
- [Model Context Protocol](https://modelcontextprotocol.io/) - Anthropic's standard for AI tool access
- [JSON-RPC 2.0](https://www.jsonrpc.org/specification) - MCP server protocol
# llms.txt Endpoints (/docs/tooling/ai-llm/llms-txt)
## llms.txt
A structured markdown index following the [llms.txt standard](https://llmstxt.org/). Use this for content discovery.
```
https://build.avax.network/llms.txt
```
Returns organized sections (Documentation, Academy, Integrations, Blog) with links and descriptions.
## llms-full.txt
All documentation content in a single markdown file for one-time context loading.
```
https://build.avax.network/llms-full.txt
```
Contains 1300+ pages. For models with limited context, use the [MCP server](/docs/tooling/ai-llm/mcp-server) or individual page endpoint instead.
## Individual Pages
Append `.md` to any page URL to get processed markdown:
```
https://build.avax.network/docs/primary-network/overview.md
https://build.avax.network/academy/blockchain-fundamentals/blockchain-intro.md
https://build.avax.network/blog/your-first-l1.md
https://build.avax.network/integrations/chainlink.md
```
Works with `/docs/`, `/academy/`, `/integrations/`, and `/blog/` paths. Returns clean markdown with JSX components stripped for optimal AI consumption.
# MCP Server (/docs/tooling/ai-llm/mcp-server)
The Avalanche MCP server gives AI clients a read-only interface to Builders Hub knowledge and public Avalanche tooling context.
**Endpoint:** `https://build.avax.network/api/mcp`
## Scope
| Surface | Tools |
| :--- | :--- |
| Documentation | `docs_search`, `docs_fetch`, `docs_list_sections` |
| Task lookup | `cli_lookup_command`, `rpc_lookup_method`, `acp_lookup`, `acp_list` |
| GitHub | `github_search_code`, `github_get_file`, `github_list_repositories` |
| Public blockchain lookup | `blockchain_get_native_balance`, `blockchain_get_contract_info`, `blockchain_lookup_*` |
| P-Chain RPC | `platform_get_*` |
| Info API | `info_get_*`, `info_is_bootstrapped`, `info_peers`, `info_acps` |
`docs_search` searches body-level chunks across documentation, academy courses, integrations, and blog posts. Results include source URLs, chunk numbers, and matching excerpts.
The older `avalanche_docs_search`, `avalanche_docs_fetch`, and `avalanche_docs_list_sections` names remain available as compatibility aliases. Prefer the shorter canonical names for new clients.
## GitHub Coverage
The GitHub tools cover these repositories:
- `ava-labs/avalanchego`
- `ava-labs/subnet-evm`
- `ava-labs/coreth`
- `ava-labs/avalanche-cli`
- `ava-labs/platform-cli`
- `ava-labs/icm-services`
- `ava-labs/avalanche-network-runner`
- `ava-labs/icm-contracts`
- `ava-labs/hypersdk`
- `ava-labs/libevm`
- `ava-labs/builders-hub`
## Resources
| Resource | Purpose |
| :--- | :--- |
| `docs://index` | All documentation pages |
| `academy://index` | Academy pages |
| `integrations://index` | Integration pages |
| `blog://index` | Blog posts |
| `rpcs://index` | RPC method and API docs |
| `cli://index` | Avalanche CLI, Platform CLI, and tmpnet docs |
| `acps://index` | ACP docs |
## Claude Code Setup
```bash
claude mcp add avalanche-mcp --transport http https://build.avax.network/api/mcp
```
Or add it to `.claude/settings.json`:
```json
{
"mcpServers": {
"avalanche-mcp": {
"transport": {
"type": "http",
"url": "https://build.avax.network/api/mcp"
}
}
}
}
```
## Claude Desktop Setup
Add this to `~/Library/Application Support/Claude/claude_desktop_config.json`:
```json
{
"mcpServers": {
"avalanche-mcp": {
"command": "npx",
"args": ["-y", "mcp-remote", "https://build.avax.network/api/mcp"]
}
}
}
```
Claude Desktop uses stdio transport and does not support HTTP MCP servers natively. [`mcp-remote`](https://www.npmjs.com/package/mcp-remote) acts as a bridge from stdio to the HTTP endpoint. Node.js must be installed for `npx` to work.
## JSON-RPC Examples
Search docs:
```bash
curl -X POST https://build.avax.network/api/mcp \
-H "Content-Type: application/json" \
-d '{
"jsonrpc": "2.0",
"id": 1,
"method": "tools/call",
"params": {
"name": "docs_search",
"arguments": {
"query": "create an L1 with a custom precompile",
"limit": 5
}
}
}'
```
Look up a CLI task:
```bash
curl -X POST https://build.avax.network/api/mcp \
-H "Content-Type: application/json" \
-d '{
"jsonrpc": "2.0",
"id": 2,
"method": "tools/call",
"params": {
"name": "cli_lookup_command",
"arguments": {
"query": "add validator",
"cli": "avalanche-cli"
}
}
}'
```
Look up an RPC method:
```bash
curl -X POST https://build.avax.network/api/mcp \
-H "Content-Type: application/json" \
-d '{
"jsonrpc": "2.0",
"id": 3,
"method": "tools/call",
"params": {
"name": "rpc_lookup_method",
"arguments": {
"query": "platform_getCurrentValidators",
"chain": "p-chain"
}
}
}'
```
Look up a specific ACP and list activated standards-track ACPs:
```bash
# Structured lookup of ACP-77 with full table fields
curl -X POST https://build.avax.network/api/mcp \
-H "Content-Type: application/json" \
-d '{
"jsonrpc": "2.0",
"id": 4,
"method": "tools/call",
"params": {
"name": "acp_lookup",
"arguments": { "number": 77 }
}
}'
# All Activated ACPs on the Standards track
curl -X POST https://build.avax.network/api/mcp \
-H "Content-Type: application/json" \
-d '{
"jsonrpc": "2.0",
"id": 5,
"method": "tools/call",
"params": {
"name": "acp_list",
"arguments": { "status": "Activated", "track": "Standards" }
}
}'
```
Search code:
```bash
curl -X POST https://build.avax.network/api/mcp \
-H "Content-Type: application/json" \
-d '{
"jsonrpc": "2.0",
"id": 6,
"method": "tools/call",
"params": {
"name": "github_search_code",
"arguments": {
"query": "TransformSubnetTx",
"repo": "avalanchego",
"language": "go"
}
}
}'
```
List server tools:
```bash
curl -X POST https://build.avax.network/api/mcp \
-H "Content-Type: application/json" \
-d '{"jsonrpc":"2.0","id":7,"method":"tools/list"}'
```
## Safety Boundary
The hosted MCP server is read-only. It does not execute local shell commands, run Avalanche CLI commands, modify node state, or access private files. Local/operator execution is tracked separately in the public roadmap issue: [ava-labs/builders-hub#4070](https://github.com/ava-labs/builders-hub/issues/4070).
For AvaCloud and Chainkit API surfaces, use companion MCP servers alongside this hosted server:
```bash
claude mcp add avalanche-mcp --transport http https://build.avax.network/api/mcp
claude mcp add avalanche-chainkit --command "npx -y @avalanche-sdk/chainkit mcp-server"
claude mcp add avalanche-avacloud --command "npx -y @avalabs/avacloud-sdk mcp-server --apikey $AVACLOUD_API_KEY"
```
# Security & Limits (/docs/tooling/ai-llm/security)
## Rate Limiting
- **60 requests per minute** per client (identified by origin or IP address)
- 429 status code with Retry-After header when exceeded
- RateLimit headers included in responses (Limit, Remaining, Reset)
## CORS Policy
Browser requests must originate from:
- `https://claude.ai`
- `https://build.avax.network`
- `http://localhost:3000` (development only)
Non-browser MCP clients (no Origin header) are always allowed.
## Privacy
We collect anonymized usage metrics including:
- Tool names and invocation counts
- Search result counts (not full query text)
- Latency measurements
- Client names (e.g., "claude-desktop")
We do NOT log:
- Full query text (truncated to 100 characters)
- Document content
- Raw IP addresses (hashed for rate limiting)
## Abuse Reporting
Report security issues or abuse to: **security@avalabs.org**
# CLI Commands (/docs/tooling/avalanche-cli/cli-commands)
## avalanche blockchain
The blockchain command suite provides a collection of tools for developing
and deploying Blockchains.
To get started, use the blockchain create command wizard to walk through the
configuration of your very first Blockchain. Then, go ahead and deploy it
with the blockchain deploy command. You can use the rest of the commands to
manage your Blockchain configurations and live deployments.
**Usage:**
```bash
avalanche blockchain [subcommand] [flags]
```
**Subcommands:**
- [`addValidator`](#avalanche-blockchain-addvalidator): The blockchain addValidator command adds a node as a validator to
an L1 of the user provided deployed network. If the network is proof of
authority, the owner of the validator manager contract must sign the
transaction. If the network is proof of stake, the node must stake the L1's
staking token. Both processes will issue a RegisterL1ValidatorTx on the P-Chain.
This command currently only works on Blockchains deployed to either the Fuji
Testnet or Mainnet.
- [`changeOwner`](#avalanche-blockchain-changeowner): The blockchain changeOwner changes the owner of the deployed Blockchain.
- [`changeWeight`](#avalanche-blockchain-changeweight): The blockchain changeWeight command changes the weight of a L1 Validator.
The L1 has to be a Proof of Authority L1.
- [`configure`](#avalanche-blockchain-configure): AvalancheGo nodes support several different configuration files.
Each network (a Subnet or an L1) has their own config which applies to all blockchains/VMs in the network (see https://build.avax.network/docs/nodes/configure/avalanche-l1-configs)
Each blockchain within the network can have its own chain config (see https://build.avax.network/docs/nodes/chain-configs/primary-network/c-chain https://github.com/ava-labs/avalanchego/blob/master/graft/subnet-evm/plugin/evm/config/config.go for subnet-evm options).
A chain can also have special requirements for the AvalancheGo node configuration itself (see https://build.avax.network/docs/nodes/configure/configs-flags).
This command allows you to set all those files.
- [`create`](#avalanche-blockchain-create): The blockchain create command builds a new genesis file to configure your Blockchain.
By default, the command runs an interactive wizard. It walks you through
all the steps you need to create your first Blockchain.
The tool supports deploying Subnet-EVM, and custom VMs. You
can create a custom, user-generated genesis with a custom VM by providing
the path to your genesis and VM binaries with the --genesis and --vm flags.
By default, running the command with a blockchainName that already exists
causes the command to fail. If you'd like to overwrite an existing
configuration, pass the -f flag.
- [`delete`](#avalanche-blockchain-delete): The blockchain delete command deletes an existing blockchain configuration.
- [`deploy`](#avalanche-blockchain-deploy): The blockchain deploy command deploys your Blockchain configuration locally, to Fuji Testnet, or to Mainnet.
At the end of the call, the command prints the RPC URL you can use to interact with the Subnet.
Avalanche-CLI only supports deploying an individual Blockchain once per network. Subsequent
attempts to deploy the same Blockchain to the same network (local, Fuji, Mainnet) aren't
allowed. If you'd like to redeploy a Blockchain locally for testing, you must first call
avalanche network clean to reset all deployed chain state. Subsequent local deploys
redeploy the chain with fresh state. You can deploy the same Blockchain to multiple networks,
so you can take your locally tested Blockchain and deploy it on Fuji or Mainnet.
- [`describe`](#avalanche-blockchain-describe): The blockchain describe command prints the details of a Blockchain configuration to the console.
By default, the command prints a summary of the configuration. By providing the --genesis
flag, the command instead prints out the raw genesis file.
- [`export`](#avalanche-blockchain-export): The blockchain export command write the details of an existing Blockchain deploy to a file.
The command prompts for an output path. You can also provide one with
the --output flag.
- [`import`](#avalanche-blockchain-import): Import blockchain configurations into avalanche-cli.
This command suite supports importing from a file created on another computer,
or importing from blockchains running public networks
(e.g. created manually or with the deprecated subnet-cli)
- [`join`](#avalanche-blockchain-join): The blockchain join command configures your validator node to begin validating a new Blockchain.
To complete this process, you must have access to the machine running your validator. If the
CLI is running on the same machine as your validator, it can generate or update your node's
config file automatically. Alternatively, the command can print the necessary instructions
to update your node manually. To complete the validation process, the Blockchain's admins must add
the NodeID of your validator to the Blockchain's allow list by calling addValidator with your
NodeID.
After you update your validator's config, you need to restart your validator manually. If
you provide the --avalanchego-config flag, this command attempts to edit the config file
at that path.
This command currently only supports Blockchains deployed on the Fuji Testnet and Mainnet.
- [`list`](#avalanche-blockchain-list): The blockchain list command prints the names of all created Blockchain configurations. Without any flags,
it prints some general, static information about the Blockchain. With the --deployed flag, the command
shows additional information including the VMID, BlockchainID and SubnetID.
- [`publish`](#avalanche-blockchain-publish): The blockchain publish command publishes the Blockchain's VM to a repository.
- [`removeValidator`](#avalanche-blockchain-removevalidator): The blockchain removeValidator command stops a whitelisted blockchain network validator from
validating your deployed Blockchain.
To remove the validator from the Subnet's allow list, provide the validator's unique NodeID. You can bypass
these prompts by providing the values with flags.
- [`stats`](#avalanche-blockchain-stats): The blockchain stats command prints validator statistics for the given Blockchain.
- [`upgrade`](#avalanche-blockchain-upgrade): The blockchain upgrade command suite provides a collection of tools for
updating your developmental and deployed Blockchains.
- [`validators`](#avalanche-blockchain-validators): The blockchain validators command lists the validators of a blockchain and provides
several statistics about them.
- [`vmid`](#avalanche-blockchain-vmid): The blockchain vmid command prints the virtual machine ID (VMID) for the given Blockchain.
**Flags:**
```bash
-h, --help help for blockchain
--config string config file (default is $HOME/.avalanche-cli/config.json)
--log-level string log level for the application (default "ERROR")
--skip-update-check skip check for new versions
```
### addValidator
The blockchain addValidator command adds a node as a validator to
an L1 of the user provided deployed network. If the network is proof of
authority, the owner of the validator manager contract must sign the
transaction. If the network is proof of stake, the node must stake the L1's
staking token. Both processes will issue a RegisterL1ValidatorTx on the P-Chain.
This command currently only works on Blockchains deployed to either the Fuji
Testnet or Mainnet.
**Usage:**
```bash
avalanche blockchain addValidator [subcommand] [flags]
```
**Flags:**
```bash
--aggregator-allow-private-peers allow the signature aggregator to connect to peers with private IP (default true)
--aggregator-extra-endpoints strings endpoints for extra nodes that are needed in signature aggregation
--aggregator-log-level string log level to use with signature aggregator (default "Debug")
--aggregator-log-to-stdout use stdout for signature aggregator logs
--balance float set the AVAX balance of the validator that will be used for continuous fee on P-Chain
--blockchain-genesis-key use genesis allocated key to pay fees for completing the validator's registration (blockchain gas token)
--blockchain-key string CLI stored key to use to pay fees for completing the validator's registration (blockchain gas token)
--blockchain-private-key string private key to use to pay fees for completing the validator's registration (blockchain gas token)
--bls-proof-of-possession string set the BLS proof of possession of the validator to add
--bls-public-key string set the BLS public key of the validator to add
--cluster string operate on the given cluster
--create-local-validator create additional local validator and add it to existing running local node
--default-duration (for Subnets, not L1s) set duration so as to validate until primary validator ends its period
--default-start-time (for Subnets, not L1s) use default start time for subnet validator (5 minutes later for fuji & mainnet, 30 seconds later for devnet)
--default-validator-params (for Subnets, not L1s) use default weight/start/duration params for subnet validator
--delegation-fee uint16 (PoS only) delegation fee (in bips) (default 100)
--devnet operate on a devnet network
--disable-owner string P-Chain address that will able to disable the validator with a P-Chain transaction
--endpoint string use the given endpoint for network operations
-e, --ewoq use ewoq key [fuji/devnet only]
-f, --fuji testnet operate on fuji (alias to testnet
-h, --help help for addValidator
-k, --key string select the key to use [fuji/devnet only]
-g, --ledger use ledger instead of key (always true on mainnet, defaults to false on fuji/devnet)
--ledger-addrs strings use the given ledger addresses
-l, --local operate on a local network
-m, --mainnet operate on mainnet
--node-endpoint string gather node id/bls from publicly available avalanchego apis on the given endpoint
--node-id string node-id of the validator to add
--output-tx-path string (for Subnets, not L1s) file path of the add validator tx
--partial-sync set primary network partial sync for new validators (default true)
--remaining-balance-owner string P-Chain address that will receive any leftover AVAX from the validator when it is removed from Subnet
--rpc string connect to validator manager at the given rpc endpoint
--stake-amount uint (PoS only) amount of tokens to stake
--staking-period duration how long this validator will be staking
--start-time string (for Subnets, not L1s) UTC start time when this validator starts validating, in 'YYYY-MM-DD HH:MM:SS' format
--subnet-auth-keys strings (for Subnets, not L1s) control keys that will be used to authenticate add validator tx
-t, --testnet fuji operate on testnet (alias to fuji)
--wait-for-tx-acceptance (for Subnets, not L1s) just issue the add validator tx, without waiting for its acceptance (default true)
--weight uint set the staking weight of the validator to add (default 20)
--config string config file (default is $HOME/.avalanche-cli/config.json)
--log-level string log level for the application (default "ERROR")
--skip-update-check skip check for new versions
```
### changeOwner
The blockchain changeOwner changes the owner of the deployed Blockchain.
**Usage:**
```bash
avalanche blockchain changeOwner [subcommand] [flags]
```
**Flags:**
```bash
--auth-keys strings control keys that will be used to authenticate transfer blockchain ownership tx
--cluster string operate on the given cluster
--control-keys strings addresses that may make blockchain changes
--devnet operate on a devnet network
--endpoint string use the given endpoint for network operations
-e, --ewoq use ewoq key [fuji/devnet]
-f, --fuji testnet operate on fuji (alias to testnet
-h, --help help for changeOwner
-k, --key string select the key to use [fuji/devnet]
-g, --ledger use ledger instead of key (always true on mainnet, defaults to false on fuji/devnet)
--ledger-addrs strings use the given ledger addresses
-l, --local operate on a local network
-m, --mainnet operate on mainnet
--output-tx-path string file path of the transfer blockchain ownership tx
-s, --same-control-key use the fee-paying key as control key
-t, --testnet fuji operate on testnet (alias to fuji)
--threshold uint32 required number of control key signatures to make blockchain changes
--config string config file (default is $HOME/.avalanche-cli/config.json)
--log-level string log level for the application (default "ERROR")
--skip-update-check skip check for new versions
```
### changeWeight
The blockchain changeWeight command changes the weight of a L1 Validator.
The L1 has to be a Proof of Authority L1.
**Usage:**
```bash
avalanche blockchain changeWeight [subcommand] [flags]
```
**Flags:**
```bash
--cluster string operate on the given cluster
--devnet operate on a devnet network
--endpoint string use the given endpoint for network operations
-e, --ewoq use ewoq key [fuji/devnet only]
-f, --fuji testnet operate on fuji (alias to testnet
-h, --help help for changeWeight
-k, --key string select the key to use [fuji/devnet only]
-g, --ledger use ledger instead of key (always true on mainnet, defaults to false on fuji/devnet)
--ledger-addrs strings use the given ledger addresses
-l, --local operate on a local network
-m, --mainnet operate on mainnet
--node-endpoint string gather node id/bls from publicly available avalanchego apis on the given endpoint
--node-id string node-id of the validator
-t, --testnet fuji operate on testnet (alias to fuji)
--weight uint set the new staking weight of the validator
--config string config file (default is $HOME/.avalanche-cli/config.json)
--log-level string log level for the application (default "ERROR")
--skip-update-check skip check for new versions
```
### configure
AvalancheGo nodes support several different configuration files.
Each network (a Subnet or an L1) has their own config which applies to all blockchains/VMs in the network (see https://build.avax.network/docs/nodes/configure/avalanche-l1-configs)
Each blockchain within the network can have its own chain config (see https://build.avax.network/docs/nodes/chain-configs/primary-network/c-chain https://github.com/ava-labs/avalanchego/blob/master/graft/subnet-evm/plugin/evm/config/config.go for subnet-evm options).
A chain can also have special requirements for the AvalancheGo node configuration itself (see https://build.avax.network/docs/nodes/configure/configs-flags).
This command allows you to set all those files.
**Usage:**
```bash
avalanche blockchain configure [subcommand] [flags]
```
**Flags:**
```bash
--chain-config string path to the chain configuration
-h, --help help for configure
--node-config string path to avalanchego node configuration
--per-node-chain-config string path to per node chain configuration for local network
--subnet-config string path to the subnet configuration
--config string config file (default is $HOME/.avalanche-cli/config.json)
--log-level string log level for the application (default "ERROR")
--skip-update-check skip check for new versions
```
### create
The blockchain create command builds a new genesis file to configure your Blockchain.
By default, the command runs an interactive wizard. It walks you through
all the steps you need to create your first Blockchain.
The tool supports deploying Subnet-EVM, and custom VMs. You
can create a custom, user-generated genesis with a custom VM by providing
the path to your genesis and VM binaries with the --genesis and --vm flags.
By default, running the command with a blockchainName that already exists
causes the command to fail. If you'd like to overwrite an existing
configuration, pass the -f flag.
**Usage:**
```bash
avalanche blockchain create [subcommand] [flags]
```
**Flags:**
```bash
--custom use a custom VM template
--custom-vm-branch string custom vm branch or commit
--custom-vm-build-script string custom vm build-script
--custom-vm-path string file path of custom vm to use
--custom-vm-repo-url string custom vm repository url
--debug enable blockchain debugging (default true)
--evm use the Subnet-EVM as the base template
--evm-chain-id uint chain ID to use with Subnet-EVM
--evm-defaults deprecation notice: use '--production-defaults'
--evm-token string token symbol to use with Subnet-EVM
--external-gas-token use a gas token from another blockchain
-f, --force overwrite the existing configuration if one exists
--from-github-repo generate custom VM binary from github repository
--genesis string file path of genesis to use
-h, --help help for create
--icm interoperate with other blockchains using ICM
--icm-registry-at-genesis setup ICM registry smart contract on genesis [experimental]
--latest use latest Subnet-EVM released version, takes precedence over --vm-version
--pre-release use latest Subnet-EVM pre-released version, takes precedence over --vm-version
--production-defaults use default production settings for your blockchain
--proof-of-authority use proof of authority(PoA) for validator management
--proof-of-stake use proof of stake(PoS) for validator management
--proxy-contract-owner string EVM address that controls ProxyAdmin for TransparentProxy of ValidatorManager contract
--reward-basis-points uint (PoS only) reward basis points for PoS Reward Calculator (default 100)
--sovereign set to false if creating non-sovereign blockchain (default true)
--teleporter interoperate with other blockchains using ICM
--test-defaults use default test settings for your blockchain
--validator-manager-owner string EVM address that controls Validator Manager Owner
--vm string file path of custom vm to use. alias to custom-vm-path
--vm-version string version of Subnet-EVM template to use
--warp generate a vm with warp support (needed for ICM) (default true)
--config string config file (default is $HOME/.avalanche-cli/config.json)
--log-level string log level for the application (default "ERROR")
--skip-update-check skip check for new versions
```
### delete
The blockchain delete command deletes an existing blockchain configuration.
**Usage:**
```bash
avalanche blockchain delete [subcommand] [flags]
```
**Flags:**
```bash
-h, --help help for delete
--config string config file (default is $HOME/.avalanche-cli/config.json)
--log-level string log level for the application (default "ERROR")
--skip-update-check skip check for new versions
```
### deploy
The blockchain deploy command deploys your Blockchain configuration to Local Network, to Fuji Testnet, DevNet or to Mainnet.
At the end of the call, the command prints the RPC URL you can use to interact with the L1 / Subnet.
When deploying an L1, Avalanche-CLI lets you use your local machine as a bootstrap validator, so you don't need to run separate Avalanche nodes.
This is controlled by the --use-local-machine flag (enabled by default on Local Network).
If --use-local-machine is set to true:
- Avalanche-CLI will call CreateSubnetTx, CreateChainTx, ConvertSubnetToL1Tx, followed by syncing the local machine bootstrap validator to the L1 and initialize
Validator Manager Contract on the L1
If using your own Avalanche Nodes as bootstrap validators:
- Avalanche-CLI will call CreateSubnetTx, CreateChainTx, ConvertSubnetToL1Tx
- You will have to sync your bootstrap validators to the L1
- Next, Initialize Validator Manager contract on the L1 using avalanche contract initValidatorManager [L1_Name]
Avalanche-CLI only supports deploying an individual Blockchain once per network. Subsequent
attempts to deploy the same Blockchain to the same network (Local Network, Fuji, Mainnet) aren't
allowed. If you'd like to redeploy a Blockchain locally for testing, you must first call
avalanche network clean to reset all deployed chain state. Subsequent local deploys
redeploy the chain with fresh state. You can deploy the same Blockchain to multiple networks,
so you can take your locally tested Blockchain and deploy it on Fuji or Mainnet.
**Usage:**
```bash
avalanche blockchain deploy [subcommand] [flags]
```
**Flags:**
```bash
--convert-only avoid node track, restart and poa manager setup
-e, --ewoq use ewoq key [local/devnet deploy only]
-h, --help help for deploy
-k, --key string select the key to use [fuji/devnet deploy only]
-g, --ledger use ledger instead of key
--ledger-addrs strings use the given ledger addresses
--mainnet-chain-id uint32 use different ChainID for mainnet deployment
--output-tx-path string file path of the blockchain creation tx (for multi-sig signing)
-u, --subnet-id string do not create a subnet, deploy the blockchain into the given subnet id
--subnet-only command stops after CreateSubnetTx and returns SubnetID
Network Flags (Select One):
--cluster string operate on the given cluster
--devnet operate on a devnet network
--endpoint string use the given endpoint for network operations
--fuji operate on fuji (alias to `testnet`)
--local operate on a local network
--mainnet operate on mainnet
--testnet operate on testnet (alias to `fuji`)
Bootstrap Validators Flags:
--balance float64 set the AVAX balance of each bootstrap validator that will be used for continuous fee on P-Chain (setting balance=1 equals to 1 AVAX for each bootstrap validator)
--bootstrap-endpoints stringSlice take validator node info from the given endpoints
--bootstrap-filepath string JSON file path that provides details about bootstrap validators
--change-owner-address string address that will receive change if node is no longer L1 validator
--generate-node-id set to true to generate Node IDs for bootstrap validators when none are set up. Use these Node IDs to set up your Avalanche Nodes.
--num-bootstrap-validators int number of bootstrap validators to set up in sovereign L1 validator)
Local Machine Flags (Use Local Machine as Bootstrap Validator):
--avalanchego-path string use this avalanchego binary path
--avalanchego-version string use this version of avalanchego (ex: v1.17.12)
--http-port uintSlice http port for node(s)
--partial-sync set primary network partial sync for new validators
--staking-cert-key-path stringSlice path to provided staking cert key for node(s)
--staking-port uintSlice staking port for node(s)
--staking-signer-key-path stringSlice path to provided staking signer key for node(s)
--staking-tls-key-path stringSlice path to provided staking TLS key for node(s)
--use-local-machine use local machine as a blockchain validator
Local Network Flags:
--avalanchego-path string use this avalanchego binary path
--avalanchego-version string use this version of avalanchego (ex: v1.17.12)
--num-nodes uint32 number of nodes to be created on local network deploy
Non Subnet-Only-Validators (Non-SOV) Flags:
--auth-keys stringSlice control keys that will be used to authenticate chain creation
--control-keys stringSlice addresses that may make blockchain changes
--same-control-key use the fee-paying key as control key
--threshold uint32 required number of control key signatures to make blockchain changes
ICM Flags:
--cchain-funding-key string key to be used to fund relayer account on cchain
--cchain-icm-key string key to be used to pay for ICM deploys on C-Chain
--icm-key string key to be used to pay for ICM deploys
--icm-version string ICM version to deploy
--relay-cchain relay C-Chain as source and destination
--relayer-allow-private-ips allow relayer to connec to private ips
--relayer-amount float64 automatically fund relayer fee payments with the given amount
--relayer-key string key to be used by default both for rewards and to pay fees
--relayer-log-level string log level to be used for relayer logs
--relayer-path string relayer binary to use
--relayer-version string relayer version to deploy
--skip-icm-deploy Skip automatic ICM deploy
--skip-relayer skip relayer deploy
--teleporter-messenger-contract-address-path string path to an ICM Messenger contract address file
--teleporter-messenger-deployer-address-path string path to an ICM Messenger deployer address file
--teleporter-messenger-deployer-tx-path string path to an ICM Messenger deployer tx file
--teleporter-registry-bytecode-path string path to an ICM Registry bytecode file
Proof Of Stake Flags:
--pos-maximum-stake-amount uint64 maximum stake amount
--pos-maximum-stake-multiplier uint8 maximum stake multiplier
--pos-minimum-delegation-fee uint16 minimum delegation fee
--pos-minimum-stake-amount uint64 minimum stake amount
--pos-minimum-stake-duration uint64 minimum stake duration (in seconds)
--pos-weight-to-value-factor uint64 weight to value factor
Signature Aggregator Flags:
--aggregator-log-level string log level to use with signature aggregator
--aggregator-log-to-stdout use stdout for signature aggregator logs
```
### describe
The blockchain describe command prints the details of a Blockchain configuration to the console.
By default, the command prints a summary of the configuration. By providing the --genesis
flag, the command instead prints out the raw genesis file.
**Usage:**
```bash
avalanche blockchain describe [subcommand] [flags]
```
**Flags:**
```bash
-g, --genesis Print the genesis to the console directly instead of the summary
-h, --help help for describe
--config string config file (default is $HOME/.avalanche-cli/config.json)
--log-level string log level for the application (default "ERROR")
--skip-update-check skip check for new versions
```
### export
The blockchain export command write the details of an existing Blockchain deploy to a file.
The command prompts for an output path. You can also provide one with
the --output flag.
**Usage:**
```bash
avalanche blockchain export [subcommand] [flags]
```
**Flags:**
```bash
--custom-vm-branch string custom vm branch
--custom-vm-build-script string custom vm build-script
--custom-vm-repo-url string custom vm repository url
-h, --help help for export
-o, --output string write the export data to the provided file path
--config string config file (default is $HOME/.avalanche-cli/config.json)
--log-level string log level for the application (default "ERROR")
--skip-update-check skip check for new versions
```
### import
Import blockchain configurations into avalanche-cli.
This command suite supports importing from a file created on another computer,
or importing from blockchains running public networks
(e.g. created manually or with the deprecated subnet-cli)
**Usage:**
```bash
avalanche blockchain import [subcommand] [flags]
```
**Subcommands:**
- [`file`](#avalanche-blockchain-import-file): The blockchain import command will import a blockchain configuration from a file or a git repository.
To import from a file, you can optionally provide the path as a command-line argument.
Alternatively, running the command without any arguments triggers an interactive wizard.
To import from a repository, go through the wizard. By default, an imported Blockchain doesn't
overwrite an existing Blockchain with the same name. To allow overwrites, provide the --force
flag.
- [`public`](#avalanche-blockchain-import-public): The blockchain import public command imports a Blockchain configuration from a running network.
By default, an imported Blockchain
doesn't overwrite an existing Blockchain with the same name. To allow overwrites, provide the --force
flag.
**Flags:**
```bash
-h, --help help for import
--config string config file (default is $HOME/.avalanche-cli/config.json)
--log-level string log level for the application (default "ERROR")
--skip-update-check skip check for new versions
```
#### import file
The blockchain import command will import a blockchain configuration from a file or a git repository.
To import from a file, you can optionally provide the path as a command-line argument.
Alternatively, running the command without any arguments triggers an interactive wizard.
To import from a repository, go through the wizard. By default, an imported Blockchain doesn't
overwrite an existing Blockchain with the same name. To allow overwrites, provide the --force
flag.
**Usage:**
```bash
avalanche blockchain import file [subcommand] [flags]
```
**Flags:**
```bash
--blockchain string the blockchain configuration to import from the provided repo
--branch string the repo branch to use if downloading a new repo
-f, --force overwrite the existing configuration if one exists
-h, --help help for file
--repo string the repo to import (ex: ava-labs/avalanche-plugins-core) or url to download the repo from
--config string config file (default is $HOME/.avalanche-cli/config.json)
--log-level string log level for the application (default "ERROR")
--skip-update-check skip check for new versions
```
#### import public
The blockchain import public command imports a Blockchain configuration from a running network.
By default, an imported Blockchain
doesn't overwrite an existing Blockchain with the same name. To allow overwrites, provide the --force
flag.
**Usage:**
```bash
avalanche blockchain import public [subcommand] [flags]
```
**Flags:**
```bash
--blockchain-id string the blockchain ID
--cluster string operate on the given cluster
--custom use a custom VM template
--devnet operate on a devnet network
--endpoint string use the given endpoint for network operations
--evm import a subnet-evm
--force overwrite the existing configuration if one exists
-f, --fuji testnet operate on fuji (alias to testnet
-h, --help help for public
-l, --local operate on a local network
-m, --mainnet operate on mainnet
--node-url string [optional] URL of an already running validator
-t, --testnet fuji operate on testnet (alias to fuji)
--config string config file (default is $HOME/.avalanche-cli/config.json)
--log-level string log level for the application (default "ERROR")
--skip-update-check skip check for new versions
```
### join
The blockchain join command configures your validator node to begin validating a new Blockchain.
To complete this process, you must have access to the machine running your validator. If the
CLI is running on the same machine as your validator, it can generate or update your node's
config file automatically. Alternatively, the command can print the necessary instructions
to update your node manually. To complete the validation process, the Blockchain's admins must add
the NodeID of your validator to the Blockchain's allow list by calling addValidator with your
NodeID.
After you update your validator's config, you need to restart your validator manually. If
you provide the --avalanchego-config flag, this command attempts to edit the config file
at that path.
This command currently only supports Blockchains deployed on the Fuji Testnet and Mainnet.
**Usage:**
```bash
avalanche blockchain join [subcommand] [flags]
```
**Flags:**
```bash
--avalanchego-config string file path of the avalanchego config file
--cluster string operate on the given cluster
--data-dir string path of avalanchego's data dir directory
--devnet operate on a devnet network
--endpoint string use the given endpoint for network operations
--force-write if true, skip to prompt to overwrite the config file
-f, --fuji testnet operate on fuji (alias to testnet
-h, --help help for join
-k, --key string select the key to use [fuji only]
-g, --ledger use ledger instead of key (always true on mainnet, defaults to false on fuji)
--ledger-addrs strings use the given ledger addresses
-l, --local operate on a local network
-m, --mainnet operate on mainnet
--node-id string set the NodeID of the validator to check
--plugin-dir string file path of avalanchego's plugin directory
--print if true, print the manual config without prompting
--stake-amount uint amount of tokens to stake on validator
--staking-period duration how long validator validates for after start time
--start-time string start time that validator starts validating
-t, --testnet fuji operate on testnet (alias to fuji)
--config string config file (default is $HOME/.avalanche-cli/config.json)
--log-level string log level for the application (default "ERROR")
--skip-update-check skip check for new versions
```
### list
The blockchain list command prints the names of all created Blockchain configurations. Without any flags,
it prints some general, static information about the Blockchain. With the --deployed flag, the command
shows additional information including the VMID, BlockchainID and SubnetID.
**Usage:**
```bash
avalanche blockchain list [subcommand] [flags]
```
**Flags:**
```bash
--deployed show additional deploy information
-h, --help help for list
--config string config file (default is $HOME/.avalanche-cli/config.json)
--log-level string log level for the application (default "ERROR")
--skip-update-check skip check for new versions
```
### publish
The blockchain publish command publishes the Blockchain's VM to a repository.
**Usage:**
```bash
avalanche blockchain publish [subcommand] [flags]
```
**Flags:**
```bash
--alias string We publish to a remote repo, but identify the repo locally under a user-provided alias (e.g. myrepo).
--force If true, ignores if the blockchain has been published in the past, and attempts a forced publish.
-h, --help help for publish
--no-repo-path string Do not let the tool manage file publishing, but have it only generate the files and put them in the location given by this flag.
--repo-url string The URL of the repo where we are publishing
--subnet-file-path string Path to the Blockchain description file. If not given, a prompting sequence will be initiated.
--vm-file-path string Path to the VM description file. If not given, a prompting sequence will be initiated.
--config string config file (default is $HOME/.avalanche-cli/config.json)
--log-level string log level for the application (default "ERROR")
--skip-update-check skip check for new versions
```
### removeValidator
The blockchain removeValidator command stops a whitelisted blockchain network validator from
validating your deployed Blockchain.
To remove the validator from the Subnet's allow list, provide the validator's unique NodeID. You can bypass
these prompts by providing the values with flags.
**Usage:**
```bash
avalanche blockchain removeValidator [subcommand] [flags]
```
**Flags:**
```bash
--aggregator-allow-private-peers allow the signature aggregator to connect to peers with private IP (default true)
--aggregator-extra-endpoints strings endpoints for extra nodes that are needed in signature aggregation
--aggregator-log-level string log level to use with signature aggregator (default "Debug")
--aggregator-log-to-stdout use stdout for signature aggregator logs
--auth-keys strings (for non-SOV blockchain only) control keys that will be used to authenticate the removeValidator tx
--blockchain-genesis-key use genesis allocated key to pay fees for completing the validator's removal (blockchain gas token)
--blockchain-key string CLI stored key to use to pay fees for completing the validator's removal (blockchain gas token)
--blockchain-private-key string private key to use to pay fees for completing the validator's removal (blockchain gas token)
--cluster string operate on the given cluster
--devnet operate on a devnet network
--endpoint string use the given endpoint for network operations
--force force validator removal even if it's not getting rewarded
-f, --fuji testnet operate on fuji (alias to testnet
-h, --help help for removeValidator
-k, --key string select the key to use [fuji deploy only]
-g, --ledger use ledger instead of key (always true on mainnet, defaults to false on fuji)
--ledger-addrs strings use the given ledger addresses
-l, --local operate on a local network
-m, --mainnet operate on mainnet
--node-endpoint string remove validator that responds to the given endpoint
--node-id string node-id of the validator
--output-tx-path string (for non-SOV blockchain only) file path of the removeValidator tx
--rpc string connect to validator manager at the given rpc endpoint
-t, --testnet fuji operate on testnet (alias to fuji)
--uptime uint validator's uptime in seconds. If not provided, it will be automatically calculated
--config string config file (default is $HOME/.avalanche-cli/config.json)
--log-level string log level for the application (default "ERROR")
--skip-update-check skip check for new versions
```
### stats
The blockchain stats command prints validator statistics for the given Blockchain.
**Usage:**
```bash
avalanche blockchain stats [subcommand] [flags]
```
**Flags:**
```bash
--cluster string operate on the given cluster
--devnet operate on a devnet network
--endpoint string use the given endpoint for network operations
-f, --fuji testnet operate on fuji (alias to testnet
-h, --help help for stats
-l, --local operate on a local network
-m, --mainnet operate on mainnet
-t, --testnet fuji operate on testnet (alias to fuji)
--config string config file (default is $HOME/.avalanche-cli/config.json)
--log-level string log level for the application (default "ERROR")
--skip-update-check skip check for new versions
```
### upgrade
The blockchain upgrade command suite provides a collection of tools for
updating your developmental and deployed Blockchains.
**Usage:**
```bash
avalanche blockchain upgrade [subcommand] [flags]
```
**Subcommands:**
- [`apply`](#avalanche-blockchain-upgrade-apply): Apply generated upgrade bytes to running Blockchain nodes to trigger a network upgrade.
For public networks (Fuji Testnet or Mainnet), to complete this process,
you must have access to the machine running your validator.
If the CLI is running on the same machine as your validator, it can manipulate your node's
configuration automatically. Alternatively, the command can print the necessary instructions
to upgrade your node manually.
After you update your validator's configuration, you need to restart your validator manually.
If you provide the --avalanchego-chain-config-dir flag, this command attempts to write the upgrade file at that path.
Refer to https://docs.avax.network/nodes/maintain/chain-config-flags#subnet-chain-configs for related documentation.
- [`export`](#avalanche-blockchain-upgrade-export): Export the upgrade bytes file to a location of choice on disk
- [`generate`](#avalanche-blockchain-upgrade-generate): The blockchain upgrade generate command builds a new upgrade.json file to customize your Blockchain. It
guides the user through the process using an interactive wizard.
- [`import`](#avalanche-blockchain-upgrade-import): Import the upgrade bytes file into the local environment
- [`print`](#avalanche-blockchain-upgrade-print): Print the upgrade.json file content
- [`vm`](#avalanche-blockchain-upgrade-vm): The blockchain upgrade vm command enables the user to upgrade their Blockchain's VM binary. The command
can upgrade both local Blockchains and publicly deployed Blockchains on Fuji and Mainnet.
The command walks the user through an interactive wizard. The user can skip the wizard by providing
command line flags.
**Flags:**
```bash
-h, --help help for upgrade
--config string config file (default is $HOME/.avalanche-cli/config.json)
--log-level string log level for the application (default "ERROR")
--skip-update-check skip check for new versions
```
#### upgrade apply
Apply generated upgrade bytes to running Blockchain nodes to trigger a network upgrade.
For public networks (Fuji Testnet or Mainnet), to complete this process,
you must have access to the machine running your validator.
If the CLI is running on the same machine as your validator, it can manipulate your node's
configuration automatically. Alternatively, the command can print the necessary instructions
to upgrade your node manually.
After you update your validator's configuration, you need to restart your validator manually.
If you provide the --avalanchego-chain-config-dir flag, this command attempts to write the upgrade file at that path.
Refer to https://docs.avax.network/nodes/maintain/chain-config-flags#subnet-chain-configs for related documentation.
**Usage:**
```bash
avalanche blockchain upgrade apply [subcommand] [flags]
```
**Flags:**
```bash
--avalanchego-chain-config-dir string avalanchego's chain config file directory (default "/home/runner/.avalanchego/chains")
--config create upgrade config for future subnet deployments (same as generate)
--force If true, don't prompt for confirmation of timestamps in the past
--fuji fuji apply upgrade existing fuji deployment (alias for `testnet`)
-h, --help help for apply
--local local apply upgrade existing local deployment
--mainnet mainnet apply upgrade existing mainnet deployment
--print if true, print the manual config without prompting (for public networks only)
--testnet testnet apply upgrade existing testnet deployment (alias for `fuji`)
--log-level string log level for the application (default "ERROR")
--skip-update-check skip check for new versions
```
#### upgrade export
Export the upgrade bytes file to a location of choice on disk
**Usage:**
```bash
avalanche blockchain upgrade export [subcommand] [flags]
```
**Flags:**
```bash
--force If true, overwrite a possibly existing file without prompting
-h, --help help for export
--upgrade-filepath string Export upgrade bytes file to location of choice on disk
--config string config file (default is $HOME/.avalanche-cli/config.json)
--log-level string log level for the application (default "ERROR")
--skip-update-check skip check for new versions
```
#### upgrade generate
The blockchain upgrade generate command builds a new upgrade.json file to customize your Blockchain. It
guides the user through the process using an interactive wizard.
**Usage:**
```bash
avalanche blockchain upgrade generate [subcommand] [flags]
```
**Flags:**
```bash
-h, --help help for generate
--config string config file (default is $HOME/.avalanche-cli/config.json)
--log-level string log level for the application (default "ERROR")
--skip-update-check skip check for new versions
```
#### upgrade import
Import the upgrade bytes file into the local environment
**Usage:**
```bash
avalanche blockchain upgrade import [subcommand] [flags]
```
**Flags:**
```bash
-h, --help help for import
--upgrade-filepath string Import upgrade bytes file into local environment
--config string config file (default is $HOME/.avalanche-cli/config.json)
--log-level string log level for the application (default "ERROR")
--skip-update-check skip check for new versions
```
#### upgrade print
Print the upgrade.json file content
**Usage:**
```bash
avalanche blockchain upgrade print [subcommand] [flags]
```
**Flags:**
```bash
-h, --help help for print
--config string config file (default is $HOME/.avalanche-cli/config.json)
--log-level string log level for the application (default "ERROR")
--skip-update-check skip check for new versions
```
#### upgrade vm
The blockchain upgrade vm command enables the user to upgrade their Blockchain's VM binary. The command
can upgrade both local Blockchains and publicly deployed Blockchains on Fuji and Mainnet.
The command walks the user through an interactive wizard. The user can skip the wizard by providing
command line flags.
**Usage:**
```bash
avalanche blockchain upgrade vm [subcommand] [flags]
```
**Flags:**
```bash
--binary string Upgrade to custom binary
--config upgrade config for future subnet deployments
--fuji fuji upgrade existing fuji deployment (alias for `testnet`)
-h, --help help for vm
--latest upgrade to latest version
--local local upgrade existing local deployment
--mainnet mainnet upgrade existing mainnet deployment
--plugin-dir string plugin directory to automatically upgrade VM
--print print instructions for upgrading
--testnet testnet upgrade existing testnet deployment (alias for `fuji`)
--version string Upgrade to custom version
--log-level string log level for the application (default "ERROR")
--skip-update-check skip check for new versions
```
### validators
The blockchain validators command lists the validators of a blockchain and provides
several statistics about them.
**Usage:**
```bash
avalanche blockchain validators [subcommand] [flags]
```
**Flags:**
```bash
--cluster string operate on the given cluster
--devnet operate on a devnet network
--endpoint string use the given endpoint for network operations
-f, --fuji testnet operate on fuji (alias to testnet
-h, --help help for validators
-l, --local operate on a local network
-m, --mainnet operate on mainnet
-t, --testnet fuji operate on testnet (alias to fuji)
--config string config file (default is $HOME/.avalanche-cli/config.json)
--log-level string log level for the application (default "ERROR")
--skip-update-check skip check for new versions
```
### vmid
The blockchain vmid command prints the virtual machine ID (VMID) for the given Blockchain.
**Usage:**
```bash
avalanche blockchain vmid [subcommand] [flags]
```
**Flags:**
```bash
-h, --help help for vmid
--config string config file (default is $HOME/.avalanche-cli/config.json)
--log-level string log level for the application (default "ERROR")
--skip-update-check skip check for new versions
```
## avalanche config
Customize configuration for Avalanche-CLI
**Usage:**
```bash
avalanche config [subcommand] [flags]
```
**Subcommands:**
- [`authorize-cloud-access`](#avalanche-config-authorize-cloud-access): set preferences to authorize access to cloud resources
- [`metrics`](#avalanche-config-metrics): set user metrics collection preferences
- [`migrate`](#avalanche-config-migrate): migrate command migrates old ~/.avalanche-cli.json and ~/.avalanche-cli/config to /.avalanche-cli/config.json..
- [`snapshotsAutoSave`](#avalanche-config-snapshotsautosave): set user preference between auto saving local network snapshots or not
- [`update`](#avalanche-config-update): set user preference between update check or not
**Flags:**
```bash
-h, --help help for config
--config string config file (default is $HOME/.avalanche-cli/config.json)
--log-level string log level for the application (default "ERROR")
--skip-update-check skip check for new versions
```
### authorize-cloud-access
set preferences to authorize access to cloud resources
**Usage:**
```bash
avalanche config authorize-cloud-access [subcommand] [flags]
```
**Flags:**
```bash
-h, --help help for authorize-cloud-access
--config string config file (default is $HOME/.avalanche-cli/config.json)
--log-level string log level for the application (default "ERROR")
--skip-update-check skip check for new versions
```
### metrics
set user metrics collection preferences
**Usage:**
```bash
avalanche config metrics [subcommand] [flags]
```
**Flags:**
```bash
-h, --help help for metrics
--config string config file (default is $HOME/.avalanche-cli/config.json)
--log-level string log level for the application (default "ERROR")
--skip-update-check skip check for new versions
```
### migrate
migrate command migrates old ~/.avalanche-cli.json and ~/.avalanche-cli/config to /.avalanche-cli/config.json..
**Usage:**
```bash
avalanche config migrate [subcommand] [flags]
```
**Flags:**
```bash
-h, --help help for migrate
--config string config file (default is $HOME/.avalanche-cli/config.json)
--log-level string log level for the application (default "ERROR")
--skip-update-check skip check for new versions
```
### snapshotsAutoSave
set user preference between auto saving local network snapshots or not
**Usage:**
```bash
avalanche config snapshotsAutoSave [subcommand] [flags]
```
**Flags:**
```bash
-h, --help help for snapshotsAutoSave
--config string config file (default is $HOME/.avalanche-cli/config.json)
--log-level string log level for the application (default "ERROR")
--skip-update-check skip check for new versions
```
### update
set user preference between update check or not
**Usage:**
```bash
avalanche config update [subcommand] [flags]
```
**Flags:**
```bash
-h, --help help for update
--config string config file (default is $HOME/.avalanche-cli/config.json)
--log-level string log level for the application (default "ERROR")
--skip-update-check skip check for new versions
```
## avalanche contract
The contract command suite provides a collection of tools for deploying
and interacting with smart contracts.
**Usage:**
```bash
avalanche contract [subcommand] [flags]
```
**Subcommands:**
- [`deploy`](#avalanche-contract-deploy): The contract command suite provides a collection of tools for deploying
smart contracts.
- [`initValidatorManager`](#avalanche-contract-initvalidatormanager): Initializes Proof of Authority(PoA) or Proof of Stake(PoS)Validator Manager contract on a Blockchain and sets up initial validator set on the Blockchain. For more info on Validator Manager, please head to https://github.com/ava-labs/icm-services/tree/main/icm-contracts/avalanche/validator-manager
**Flags:**
```bash
-h, --help help for contract
--config string config file (default is $HOME/.avalanche-cli/config.json)
--log-level string log level for the application (default "ERROR")
--skip-update-check skip check for new versions
```
### deploy
The contract command suite provides a collection of tools for deploying
smart contracts.
**Usage:**
```bash
avalanche contract deploy [subcommand] [flags]
```
**Subcommands:**
- [`erc20`](#avalanche-contract-deploy-erc20): Deploy an ERC20 token into a given Network and Blockchain
**Flags:**
```bash
-h, --help help for deploy
--config string config file (default is $HOME/.avalanche-cli/config.json)
--log-level string log level for the application (default "ERROR")
--skip-update-check skip check for new versions
```
#### deploy erc20
Deploy an ERC20 token into a given Network and Blockchain
**Usage:**
```bash
avalanche contract deploy erc20 [subcommand] [flags]
```
**Flags:**
```bash
--blockchain string deploy the ERC20 contract into the given CLI blockchain
--blockchain-id string deploy the ERC20 contract into the given blockchain ID/Alias
--c-chain deploy the ERC20 contract into C-Chain
--cluster string operate on the given cluster
--devnet operate on a devnet network
--endpoint string use the given endpoint for network operations
-f, --fuji testnet operate on fuji (alias to testnet
--funded string set the funded address
--genesis-key use genesis allocated key as contract deployer
-h, --help help for erc20
--key string CLI stored key to use as contract deployer
-l, --local operate on a local network
-m, --mainnet operate on mainnet
--private-key string private key to use as contract deployer
--rpc string deploy the contract into the given rpc endpoint
--supply uint set the token supply
--symbol string set the token symbol
-t, --testnet fuji operate on testnet (alias to fuji)
--config string config file (default is $HOME/.avalanche-cli/config.json)
--log-level string log level for the application (default "ERROR")
--skip-update-check skip check for new versions
```
### initValidatorManager
Initializes Proof of Authority(PoA) or Proof of Stake(PoS)Validator Manager contract on a Blockchain and sets up initial validator set on the Blockchain. For more info on Validator Manager, please head to https://github.com/ava-labs/icm-services/tree/main/icm-contracts/avalanche/validator-manager
**Usage:**
```bash
avalanche contract initValidatorManager [subcommand] [flags]
```
**Flags:**
```bash
--aggregator-allow-private-peers allow the signature aggregator to connect to peers with private IP (default true)
--aggregator-extra-endpoints strings endpoints for extra nodes that are needed in signature aggregation
--aggregator-log-level string log level to use with signature aggregator (default "Debug")
--aggregator-log-to-stdout dump signature aggregator logs to stdout
--cluster string operate on the given cluster
--devnet operate on a devnet network
--endpoint string use the given endpoint for network operations
-f, --fuji testnet operate on fuji (alias to testnet
--genesis-key use genesis allocated key as contract deployer
-h, --help help for initValidatorManager
--key string CLI stored key to use as contract deployer
-l, --local operate on a local network
-m, --mainnet operate on mainnet
--pos-maximum-stake-amount uint (PoS only) maximum stake amount (default 1000)
--pos-maximum-stake-multiplier uint8 (PoS only )maximum stake multiplier (default 1)
--pos-minimum-delegation-fee uint16 (PoS only) minimum delegation fee (default 1)
--pos-minimum-stake-amount uint (PoS only) minimum stake amount (default 1)
--pos-minimum-stake-duration uint (PoS only) minimum stake duration (in seconds) (default 100)
--pos-reward-calculator-address string (PoS only) initialize the ValidatorManager with reward calculator address
--pos-weight-to-value-factor uint (PoS only) weight to value factor (default 1)
--private-key string private key to use as contract deployer
--rpc string deploy the contract into the given rpc endpoint
-t, --testnet fuji operate on testnet (alias to fuji)
--config string config file (default is $HOME/.avalanche-cli/config.json)
--log-level string log level for the application (default "ERROR")
--skip-update-check skip check for new versions
```
## avalanche help
Help provides help for any command in the application.
Simply type avalanche help [path to command] for full details.
**Usage:**
```bash
avalanche help [subcommand] [flags]
```
**Flags:**
```bash
-h, --help help for help
--config string config file (default is $HOME/.avalanche-cli/config.json)
--log-level string log level for the application (default "ERROR")
--skip-update-check skip check for new versions
```
## avalanche icm
The messenger command suite provides a collection of tools for interacting
with ICM messenger contracts.
**Usage:**
```bash
avalanche icm [subcommand] [flags]
```
**Subcommands:**
- [`deploy`](#avalanche-icm-deploy): Deploys ICM Messenger and Registry into a given L1.
- [`sendMsg`](#avalanche-icm-sendmsg): Sends and wait reception for a ICM msg between two blockchains.
**Flags:**
```bash
-h, --help help for icm
--config string config file (default is $HOME/.avalanche-cli/config.json)
--log-level string log level for the application (default "ERROR")
--skip-update-check skip check for new versions
```
### deploy
Deploys ICM Messenger and Registry into a given L1.
For Local Networks, it also deploys into C-Chain.
**Usage:**
```bash
avalanche icm deploy [subcommand] [flags]
```
**Flags:**
```bash
--blockchain string deploy ICM into the given CLI blockchain
--blockchain-id string deploy ICM into the given blockchain ID/Alias
--c-chain deploy ICM into C-Chain
--cchain-key string key to be used to pay fees to deploy ICM to C-Chain
--cluster string operate on the given cluster
--deploy-messenger deploy ICM Messenger (default true)
--deploy-registry deploy ICM Registry (default true)
--devnet operate on a devnet network
--endpoint string use the given endpoint for network operations
--force-registry-deploy deploy ICM Registry even if Messenger has already been deployed
-f, --fuji testnet operate on fuji (alias to testnet
--genesis-key use genesis allocated key to fund ICM deploy
-h, --help help for deploy
--include-cchain deploy ICM also to C-Chain
--key string CLI stored key to use to fund ICM deploy
-l, --local operate on a local network
-m, --mainnet operate on mainnet
--messenger-contract-address-path string path to a messenger contract address file
--messenger-deployer-address-path string path to a messenger deployer address file
--messenger-deployer-tx-path string path to a messenger deployer tx file
--private-key string private key to use to fund ICM deploy
--registry-bytecode-path string path to a registry bytecode file
--rpc-url string use the given RPC URL to connect to the subnet
-t, --testnet fuji operate on testnet (alias to fuji)
--version string version to deploy (default "latest")
--config string config file (default is $HOME/.avalanche-cli/config.json)
--log-level string log level for the application (default "ERROR")
--skip-update-check skip check for new versions
```
### sendMsg
Sends and wait reception for a ICM msg between two blockchains.
**Usage:**
```bash
avalanche icm sendMsg [subcommand] [flags]
```
**Flags:**
```bash
--cluster string operate on the given cluster
--dest-rpc string use the given destination blockchain rpc endpoint
--destination-address string deliver the message to the given contract destination address
--devnet operate on a devnet network
--endpoint string use the given endpoint for network operations
-f, --fuji testnet operate on fuji (alias to testnet
--genesis-key use genesis allocated key as message originator and to pay source blockchain fees
-h, --help help for sendMsg
--hex-encoded given message is hex encoded
--key string CLI stored key to use as message originator and to pay source blockchain fees
-l, --local operate on a local network
-m, --mainnet operate on mainnet
--private-key string private key to use as message originator and to pay source blockchain fees
--source-rpc string use the given source blockchain rpc endpoint
-t, --testnet fuji operate on testnet (alias to fuji)
--config string config file (default is $HOME/.avalanche-cli/config.json)
--log-level string log level for the application (default "ERROR")
--skip-update-check skip check for new versions
```
## avalanche ictt
The ictt command suite provides tools to deploy and manage Interchain Token Transferrers.
**Usage:**
```bash
avalanche ictt [subcommand] [flags]
```
**Subcommands:**
- [`deploy`](#avalanche-ictt-deploy): Deploys a Token Transferrer into a given Network and Subnets
**Flags:**
```bash
-h, --help help for ictt
--config string config file (default is $HOME/.avalanche-cli/config.json)
--log-level string log level for the application (default "ERROR")
--skip-update-check skip check for new versions
```
### deploy
Deploys a Token Transferrer into a given Network and Subnets
**Usage:**
```bash
avalanche ictt deploy [subcommand] [flags]
```
**Flags:**
```bash
--c-chain-home set the Transferrer's Home Chain into C-Chain
--c-chain-remote set the Transferrer's Remote Chain into C-Chain
--cluster string operate on the given cluster
--deploy-erc20-home string deploy a Transferrer Home for the given Chain's ERC20 Token
--deploy-native-home deploy a Transferrer Home for the Chain's Native Token
--deploy-native-remote deploy a Transferrer Remote for the Chain's Native Token
--devnet operate on a devnet network
--endpoint string use the given endpoint for network operations
-f, --fuji testnet operate on fuji (alias to testnet
-h, --help help for deploy
--home-blockchain string set the Transferrer's Home Chain into the given CLI blockchain
--home-genesis-key use genesis allocated key to deploy Transferrer Home
--home-key string CLI stored key to use to deploy Transferrer Home
--home-private-key string private key to use to deploy Transferrer Home
--home-rpc string use the given RPC URL to connect to the home blockchain
-l, --local operate on a local network
-m, --mainnet operate on mainnet
--remote-blockchain string set the Transferrer's Remote Chain into the given CLI blockchain
--remote-genesis-key use genesis allocated key to deploy Transferrer Remote
--remote-key string CLI stored key to use to deploy Transferrer Remote
--remote-private-key string private key to use to deploy Transferrer Remote
--remote-rpc string use the given RPC URL to connect to the remote blockchain
--remote-token-decimals uint8 use the given number of token decimals for the Transferrer Remote [defaults to token home's decimals (18 for a new wrapped native home token)]
--remove-minter-admin remove the native minter precompile admin found on remote blockchain genesis
-t, --testnet fuji operate on testnet (alias to fuji)
--use-home string use the given Transferrer's Home Address
--version string tag/branch/commit of Avalanche Interchain Token Transfer (ICTT) to be used (defaults to main branch)
--config string config file (default is $HOME/.avalanche-cli/config.json)
--log-level string log level for the application (default "ERROR")
--skip-update-check skip check for new versions
```
## avalanche interchain
The interchain command suite provides a collection of tools to
set and manage interoperability between blockchains.
**Usage:**
```bash
avalanche interchain [subcommand] [flags]
```
**Subcommands:**
- [`messenger`](#avalanche-interchain-messenger): The messenger command suite provides a collection of tools for interacting
with ICM messenger contracts.
- [`relayer`](#avalanche-interchain-relayer): The relayer command suite provides a collection of tools for deploying
and configuring an ICM relayers.
- [`tokenTransferrer`](#avalanche-interchain-tokentransferrer): The tokenTransfer command suite provides tools to deploy and manage Token Transferrers.
**Flags:**
```bash
-h, --help help for interchain
--config string config file (default is $HOME/.avalanche-cli/config.json)
--log-level string log level for the application (default "ERROR")
--skip-update-check skip check for new versions
```
### messenger
The messenger command suite provides a collection of tools for interacting
with ICM messenger contracts.
**Usage:**
```bash
avalanche interchain messenger [subcommand] [flags]
```
**Subcommands:**
- [`deploy`](#avalanche-interchain-messenger-deploy): Deploys ICM Messenger and Registry into a given L1.
- [`sendMsg`](#avalanche-interchain-messenger-sendmsg): Sends and wait reception for a ICM msg between two blockchains.
**Flags:**
```bash
-h, --help help for messenger
--config string config file (default is $HOME/.avalanche-cli/config.json)
--log-level string log level for the application (default "ERROR")
--skip-update-check skip check for new versions
```
#### messenger deploy
Deploys ICM Messenger and Registry into a given L1.
For Local Networks, it also deploys into C-Chain.
**Usage:**
```bash
avalanche interchain messenger deploy [subcommand] [flags]
```
**Flags:**
```bash
--blockchain string deploy ICM into the given CLI blockchain
--blockchain-id string deploy ICM into the given blockchain ID/Alias
--c-chain deploy ICM into C-Chain
--cchain-key string key to be used to pay fees to deploy ICM to C-Chain
--cluster string operate on the given cluster
--deploy-messenger deploy ICM Messenger (default true)
--deploy-registry deploy ICM Registry (default true)
--devnet operate on a devnet network
--endpoint string use the given endpoint for network operations
--force-registry-deploy deploy ICM Registry even if Messenger has already been deployed
-f, --fuji testnet operate on fuji (alias to testnet
--genesis-key use genesis allocated key to fund ICM deploy
-h, --help help for deploy
--include-cchain deploy ICM also to C-Chain
--key string CLI stored key to use to fund ICM deploy
-l, --local operate on a local network
-m, --mainnet operate on mainnet
--messenger-contract-address-path string path to a messenger contract address file
--messenger-deployer-address-path string path to a messenger deployer address file
--messenger-deployer-tx-path string path to a messenger deployer tx file
--private-key string private key to use to fund ICM deploy
--registry-bytecode-path string path to a registry bytecode file
--rpc-url string use the given RPC URL to connect to the subnet
-t, --testnet fuji operate on testnet (alias to fuji)
--version string version to deploy (default "latest")
--config string config file (default is $HOME/.avalanche-cli/config.json)
--log-level string log level for the application (default "ERROR")
--skip-update-check skip check for new versions
```
#### messenger sendMsg
Sends and wait reception for a ICM msg between two blockchains.
**Usage:**
```bash
avalanche interchain messenger sendMsg [subcommand] [flags]
```
**Flags:**
```bash
--cluster string operate on the given cluster
--dest-rpc string use the given destination blockchain rpc endpoint
--destination-address string deliver the message to the given contract destination address
--devnet operate on a devnet network
--endpoint string use the given endpoint for network operations
-f, --fuji testnet operate on fuji (alias to testnet
--genesis-key use genesis allocated key as message originator and to pay source blockchain fees
-h, --help help for sendMsg
--hex-encoded given message is hex encoded
--key string CLI stored key to use as message originator and to pay source blockchain fees
-l, --local operate on a local network
-m, --mainnet operate on mainnet
--private-key string private key to use as message originator and to pay source blockchain fees
--source-rpc string use the given source blockchain rpc endpoint
-t, --testnet fuji operate on testnet (alias to fuji)
--config string config file (default is $HOME/.avalanche-cli/config.json)
--log-level string log level for the application (default "ERROR")
--skip-update-check skip check for new versions
```
### relayer
The relayer command suite provides a collection of tools for deploying
and configuring an ICM relayers.
**Usage:**
```bash
avalanche interchain relayer [subcommand] [flags]
```
**Subcommands:**
- [`deploy`](#avalanche-interchain-relayer-deploy): Deploys an ICM Relayer for the given Network.
- [`logs`](#avalanche-interchain-relayer-logs): Shows pretty formatted AWM relayer logs
- [`start`](#avalanche-interchain-relayer-start): Starts AWM relayer on the specified network (Currently only for local network).
- [`stop`](#avalanche-interchain-relayer-stop): Stops AWM relayer on the specified network (Currently only for local network, cluster).
**Flags:**
```bash
-h, --help help for relayer
--config string config file (default is $HOME/.avalanche-cli/config.json)
--log-level string log level for the application (default "ERROR")
--skip-update-check skip check for new versions
```
#### relayer deploy
Deploys an ICM Relayer for the given Network.
**Usage:**
```bash
avalanche interchain relayer deploy [subcommand] [flags]
```
**Flags:**
```bash
--allow-private-ips allow relayer to connec to private ips (default true)
--amount float automatically fund l1s fee payments with the given amount
--bin-path string use the given relayer binary
--blockchain-funding-key string key to be used to fund relayer account on all l1s
--blockchains strings blockchains to relay as source and destination
--cchain relay C-Chain as source and destination
--cchain-amount float automatically fund cchain fee payments with the given amount
--cchain-funding-key string key to be used to fund relayer account on cchain
--cluster string operate on the given cluster
--devnet operate on a devnet network
--endpoint string use the given endpoint for network operations
-f, --fuji testnet operate on fuji (alias to testnet
-h, --help help for deploy
--key string key to be used by default both for rewards and to pay fees
-l, --local operate on a local network
--log-level string log level to use for relayer logs
-t, --testnet fuji operate on testnet (alias to fuji)
--version string version to deploy (default "latest-prerelease")
--config string config file (default is $HOME/.avalanche-cli/config.json)
--skip-update-check skip check for new versions
```
#### relayer logs
Shows pretty formatted AWM relayer logs
**Usage:**
```bash
avalanche interchain relayer logs [subcommand] [flags]
```
**Flags:**
```bash
--endpoint string use the given endpoint for network operations
--first uint output first N log lines
-f, --fuji testnet operate on fuji (alias to testnet
-h, --help help for logs
--last uint output last N log lines
-l, --local operate on a local network
--raw raw logs output
-t, --testnet fuji operate on testnet (alias to fuji)
--config string config file (default is $HOME/.avalanche-cli/config.json)
--log-level string log level for the application (default "ERROR")
--skip-update-check skip check for new versions
```
#### relayer start
Starts AWM relayer on the specified network (Currently only for local network).
**Usage:**
```bash
avalanche interchain relayer start [subcommand] [flags]
```
**Flags:**
```bash
--bin-path string use the given relayer binary
--cluster string operate on the given cluster
--endpoint string use the given endpoint for network operations
-f, --fuji testnet operate on fuji (alias to testnet
-h, --help help for start
-l, --local operate on a local network
-t, --testnet fuji operate on testnet (alias to fuji)
--version string version to use (default "latest-prerelease")
--config string config file (default is $HOME/.avalanche-cli/config.json)
--log-level string log level for the application (default "ERROR")
--skip-update-check skip check for new versions
```
#### relayer stop
Stops AWM relayer on the specified network (Currently only for local network, cluster).
**Usage:**
```bash
avalanche interchain relayer stop [subcommand] [flags]
```
**Flags:**
```bash
--cluster string operate on the given cluster
--endpoint string use the given endpoint for network operations
-f, --fuji testnet operate on fuji (alias to testnet
-h, --help help for stop
-l, --local operate on a local network
-t, --testnet fuji operate on testnet (alias to fuji)
--config string config file (default is $HOME/.avalanche-cli/config.json)
--log-level string log level for the application (default "ERROR")
--skip-update-check skip check for new versions
```
### tokenTransferrer
The tokenTransfer command suite provides tools to deploy and manage Token Transferrers.
**Usage:**
```bash
avalanche interchain tokenTransferrer [subcommand] [flags]
```
**Subcommands:**
- [`deploy`](#avalanche-interchain-tokentransferrer-deploy): Deploys a Token Transferrer into a given Network and Subnets
**Flags:**
```bash
-h, --help help for tokenTransferrer
--config string config file (default is $HOME/.avalanche-cli/config.json)
--log-level string log level for the application (default "ERROR")
--skip-update-check skip check for new versions
```
#### tokenTransferrer deploy
Deploys a Token Transferrer into a given Network and Subnets
**Usage:**
```bash
avalanche interchain tokenTransferrer deploy [subcommand] [flags]
```
**Flags:**
```bash
--c-chain-home set the Transferrer's Home Chain into C-Chain
--c-chain-remote set the Transferrer's Remote Chain into C-Chain
--cluster string operate on the given cluster
--deploy-erc20-home string deploy a Transferrer Home for the given Chain's ERC20 Token
--deploy-native-home deploy a Transferrer Home for the Chain's Native Token
--deploy-native-remote deploy a Transferrer Remote for the Chain's Native Token
--devnet operate on a devnet network
--endpoint string use the given endpoint for network operations
-f, --fuji testnet operate on fuji (alias to testnet
-h, --help help for deploy
--home-blockchain string set the Transferrer's Home Chain into the given CLI blockchain
--home-genesis-key use genesis allocated key to deploy Transferrer Home
--home-key string CLI stored key to use to deploy Transferrer Home
--home-private-key string private key to use to deploy Transferrer Home
--home-rpc string use the given RPC URL to connect to the home blockchain
-l, --local operate on a local network
-m, --mainnet operate on mainnet
--remote-blockchain string set the Transferrer's Remote Chain into the given CLI blockchain
--remote-genesis-key use genesis allocated key to deploy Transferrer Remote
--remote-key string CLI stored key to use to deploy Transferrer Remote
--remote-private-key string private key to use to deploy Transferrer Remote
--remote-rpc string use the given RPC URL to connect to the remote blockchain
--remote-token-decimals uint8 use the given number of token decimals for the Transferrer Remote [defaults to token home's decimals (18 for a new wrapped native home token)]
--remove-minter-admin remove the native minter precompile admin found on remote blockchain genesis
-t, --testnet fuji operate on testnet (alias to fuji)
--use-home string use the given Transferrer's Home Address
--version string tag/branch/commit of Avalanche Interchain Token Transfer (ICTT) to be used (defaults to main branch)
--config string config file (default is $HOME/.avalanche-cli/config.json)
--log-level string log level for the application (default "ERROR")
--skip-update-check skip check for new versions
```
## avalanche key
The key command suite provides a collection of tools for creating and managing
signing keys. You can use these keys to deploy Subnets to the Fuji Testnet,
but these keys are NOT suitable to use in production environments. DO NOT use
these keys on Mainnet.
To get started, use the key create command.
**Usage:**
```bash
avalanche key [subcommand] [flags]
```
**Subcommands:**
- [`create`](#avalanche-key-create): The key create command generates a new private key to use for creating and controlling
test Subnets. Keys generated by this command are NOT cryptographically secure enough to
use in production environments. DO NOT use these keys on Mainnet.
The command works by generating a secp256 key and storing it with the provided keyName. You
can use this key in other commands by providing this keyName.
If you'd like to import an existing key instead of generating one from scratch, provide the
--file flag.
- [`delete`](#avalanche-key-delete): The key delete command deletes an existing signing key.
To delete a key, provide the keyName. The command prompts for confirmation
before deleting the key. To skip the confirmation, provide the --force flag.
- [`export`](#avalanche-key-export): The key export command exports a created signing key. You can use an exported key in other
applications or import it into another instance of Avalanche-CLI.
By default, the tool writes the hex encoded key to stdout. If you provide the --output
flag, the command writes the key to a file of your choosing.
- [`list`](#avalanche-key-list): The key list command prints information for all stored signing
keys or for the ledger addresses associated to certain indices.
- [`transfer`](#avalanche-key-transfer): The key transfer command allows to transfer funds between stored keys or ledger addresses.
**Flags:**
```bash
-h, --help help for key
--config string config file (default is $HOME/.avalanche-cli/config.json)
--log-level string log level for the application (default "ERROR")
--skip-update-check skip check for new versions
```
### create
The key create command generates a new private key to use for creating and controlling
test Subnets. Keys generated by this command are NOT cryptographically secure enough to
use in production environments. DO NOT use these keys on Mainnet.
The command works by generating a secp256 key and storing it with the provided keyName. You
can use this key in other commands by providing this keyName.
If you'd like to import an existing key instead of generating one from scratch, provide the
--file flag.
**Usage:**
```bash
avalanche key create [subcommand] [flags]
```
**Flags:**
```bash
--file string import the key from an existing key file
-f, --force overwrite an existing key with the same name
-h, --help help for create
--skip-balances do not query public network balances for an imported key
--config string config file (default is $HOME/.avalanche-cli/config.json)
--log-level string log level for the application (default "ERROR")
--skip-update-check skip check for new versions
```
### delete
The key delete command deletes an existing signing key.
To delete a key, provide the keyName. The command prompts for confirmation
before deleting the key. To skip the confirmation, provide the --force flag.
**Usage:**
```bash
avalanche key delete [subcommand] [flags]
```
**Flags:**
```bash
-f, --force delete the key without confirmation
-h, --help help for delete
--config string config file (default is $HOME/.avalanche-cli/config.json)
--log-level string log level for the application (default "ERROR")
--skip-update-check skip check for new versions
```
### export
The key export command exports a created signing key. You can use an exported key in other
applications or import it into another instance of Avalanche-CLI.
By default, the tool writes the hex encoded key to stdout. If you provide the --output
flag, the command writes the key to a file of your choosing.
**Usage:**
```bash
avalanche key export [subcommand] [flags]
```
**Flags:**
```bash
-h, --help help for export
-o, --output string write the key to the provided file path
--config string config file (default is $HOME/.avalanche-cli/config.json)
--log-level string log level for the application (default "ERROR")
--skip-update-check skip check for new versions
```
### list
The key list command prints information for all stored signing
keys or for the ledger addresses associated to certain indices.
**Usage:**
```bash
avalanche key list [subcommand] [flags]
```
**Flags:**
```bash
-a, --all-networks list all network addresses
--blockchains strings blockchains to show information about (p=p-chain, x=x-chain, c=c-chain, and blockchain names) (default p,x,c)
-c, --cchain list C-Chain addresses (default true)
--cluster string operate on the given cluster
--devnet operate on a devnet network
--endpoint string use the given endpoint for network operations
-f, --fuji testnet operate on fuji (alias to testnet
-h, --help help for list
--keys strings list addresses for the given keys
-g, --ledger uints list ledger addresses for the given indices (default [])
-l, --local operate on a local network
-m, --mainnet operate on mainnet
--pchain list P-Chain addresses (default true)
--subnets strings subnets to show information about (p=p-chain, x=x-chain, c=c-chain, and blockchain names) (default p,x,c)
-t, --testnet fuji operate on testnet (alias to fuji)
--tokens strings provide balance information for the given token contract addresses (Evm only) (default [Native])
--use-gwei use gwei for EVM balances
-n, --use-nano-avax use nano Avax for balances
--xchain list X-Chain addresses (default true)
--config string config file (default is $HOME/.avalanche-cli/config.json)
--log-level string log level for the application (default "ERROR")
--skip-update-check skip check for new versions
```
### transfer
The key transfer command allows to transfer funds between stored keys or ledger addresses.
**Usage:**
```bash
avalanche key transfer [subcommand] [flags]
```
**Flags:**
```bash
-o, --amount float amount to send or receive (AVAX or TOKEN units)
--c-chain-receiver receive at C-Chain
--c-chain-sender send from C-Chain
--cluster string operate on the given cluster
-a, --destination-addr string destination address
--destination-key string key associated to a destination address
--destination-subnet string subnet where the funds will be sent (token transferrer experimental)
--destination-transferrer-address string token transferrer address at the destination subnet (token transferrer experimental)
--devnet operate on a devnet network
--endpoint string use the given endpoint for network operations
-f, --fuji testnet operate on fuji (alias to testnet
-h, --help help for transfer
-k, --key string key associated to the sender or receiver address
-i, --ledger uint32 ledger index associated to the sender or receiver address (default 32768)
-l, --local operate on a local network
-m, --mainnet operate on mainnet
--origin-subnet string subnet where the funds belong (token transferrer experimental)
--origin-transferrer-address string token transferrer address at the origin subnet (token transferrer experimental)
--p-chain-receiver receive at P-Chain
--p-chain-sender send from P-Chain
--receiver-blockchain string receive at the given CLI blockchain
--receiver-blockchain-id string receive at the given blockchain ID/Alias
--sender-blockchain string send from the given CLI blockchain
--sender-blockchain-id string send from the given blockchain ID/Alias
-t, --testnet fuji operate on testnet (alias to fuji)
--x-chain-receiver receive at X-Chain
--x-chain-sender send from X-Chain
--config string config file (default is $HOME/.avalanche-cli/config.json)
--log-level string log level for the application (default "ERROR")
--skip-update-check skip check for new versions
```
## avalanche network
The network command suite provides a collection of tools for managing local Blockchain
deployments.
When you deploy a Blockchain locally, it runs on a local, multi-node Avalanche network. The
blockchain deploy command starts this network in the background. This command suite allows you
to shutdown, restart, and clear that network.
This network currently supports multiple, concurrently deployed Blockchains.
**Usage:**
```bash
avalanche network [subcommand] [flags]
```
**Subcommands:**
- [`clean`](#avalanche-network-clean): The network clean command shuts down your local, multi-node network. All deployed Subnets
shutdown and delete their state. You can restart the network by deploying a new Subnet
configuration.
- [`start`](#avalanche-network-start): The network start command starts a local, multi-node Avalanche network on your machine.
By default, the command loads the default snapshot. If you provide the --snapshot-name
flag, the network loads that snapshot instead. The command fails if the local network is
already running.
- [`status`](#avalanche-network-status): The network status command prints whether or not a local Avalanche
network is running and some basic stats about the network.
- [`stop`](#avalanche-network-stop): The network stop command shuts down your local, multi-node network.
All deployed Subnets shutdown gracefully and save their state. If you provide the
--snapshot-name flag, the network saves its state under this named snapshot. You can
reload this snapshot with network start --snapshot-name `snapshotName`. Otherwise, the
network saves to the default snapshot, overwriting any existing state. You can reload the
default snapshot with network start.
**Flags:**
```bash
-h, --help help for network
--config string config file (default is $HOME/.avalanche-cli/config.json)
--log-level string log level for the application (default "ERROR")
--skip-update-check skip check for new versions
```
### clean
The network clean command shuts down your local, multi-node network. All deployed Subnets
shutdown and delete their state. You can restart the network by deploying a new Subnet
configuration.
**Usage:**
```bash
avalanche network clean [subcommand] [flags]
```
**Flags:**
```bash
-h, --help help for clean
--config string config file (default is $HOME/.avalanche-cli/config.json)
--log-level string log level for the application (default "ERROR")
--skip-update-check skip check for new versions
```
### start
The network start command starts a local, multi-node Avalanche network on your machine.
By default, the command loads the default snapshot. If you provide the --snapshot-name
flag, the network loads that snapshot instead. The command fails if the local network is
already running.
**Usage:**
```bash
avalanche network start [subcommand] [flags]
```
**Flags:**
```bash
--avalanchego-path string use this avalanchego binary path
--avalanchego-version string use this version of avalanchego (ex: v1.17.12) (default "latest-prerelease")
-h, --help help for start
--num-nodes uint32 number of nodes to be created on local network (default 2)
--relayer-path string use this relayer binary path
--relayer-version string use this relayer version (default "latest-prerelease")
--snapshot-name string name of snapshot to use to start the network from (default "default")
--config string config file (default is $HOME/.avalanche-cli/config.json)
--log-level string log level for the application (default "ERROR")
--skip-update-check skip check for new versions
```
### status
The network status command prints whether or not a local Avalanche
network is running and some basic stats about the network.
**Usage:**
```bash
avalanche network status [subcommand] [flags]
```
**Flags:**
```bash
-h, --help help for status
--config string config file (default is $HOME/.avalanche-cli/config.json)
--log-level string log level for the application (default "ERROR")
--skip-update-check skip check for new versions
```
### stop
The network stop command shuts down your local, multi-node network.
All deployed Subnets shutdown gracefully and save their state. If you provide the
--snapshot-name flag, the network saves its state under this named snapshot. You can
reload this snapshot with network start --snapshot-name `snapshotName`. Otherwise, the
network saves to the default snapshot, overwriting any existing state. You can reload the
default snapshot with network start.
**Usage:**
```bash
avalanche network stop [subcommand] [flags]
```
**Flags:**
```bash
--dont-save do not save snapshot, just stop the network
-h, --help help for stop
--snapshot-name string name of snapshot to use to save network state into (default "default")
--config string config file (default is $HOME/.avalanche-cli/config.json)
--log-level string log level for the application (default "ERROR")
--skip-update-check skip check for new versions
```
## avalanche node
The node command suite provides a collection of tools for creating and maintaining
validators on Avalanche Network.
To get started, use the node create command wizard to walk through the
configuration to make your node a primary validator on Avalanche public network. You can use the
rest of the commands to maintain your node and make your node a Subnet Validator.
**Usage:**
```bash
avalanche node [subcommand] [flags]
```
**Subcommands:**
- [`addDashboard`](#avalanche-node-adddashboard): (ALPHA Warning) This command is currently in experimental mode.
The node addDashboard command adds custom dashboard to the Grafana monitoring dashboard for the
cluster.
- [`create`](#avalanche-node-create): (ALPHA Warning) This command is currently in experimental mode.
The node create command sets up a validator on a cloud server of your choice.
The validator will be validating the Avalanche Primary Network and Subnet
of your choice. By default, the command runs an interactive wizard. It
walks you through all the steps you need to set up a validator.
Once this command is completed, you will have to wait for the validator
to finish bootstrapping on the primary network before running further
commands on it, e.g. validating a Subnet. You can check the bootstrapping
status by running avalanche node status
The created node will be part of group of validators called `clusterName`
and users can call node commands with `clusterName` so that the command
will apply to all nodes in the cluster
- [`destroy`](#avalanche-node-destroy): (ALPHA Warning) This command is currently in experimental mode.
The node destroy command terminates all running nodes in cloud server and deletes all storage disks.
If there is a static IP address attached, it will be released.
- [`devnet`](#avalanche-node-devnet): (ALPHA Warning) This command is currently in experimental mode.
The node devnet command suite provides a collection of commands related to devnets.
You can check the updated status by calling avalanche node status `clusterName`
- [`export`](#avalanche-node-export): (ALPHA Warning) This command is currently in experimental mode.
The node export command exports cluster configuration and its nodes config to a text file.
If no file is specified, the configuration is printed to the stdout.
Use --include-secrets to include keys in the export. In this case please keep the file secure as it contains sensitive information.
Exported cluster configuration without secrets can be imported by another user using node import command.
- [`import`](#avalanche-node-import): (ALPHA Warning) This command is currently in experimental mode.
The node import command imports cluster configuration and its nodes configuration from a text file
created from the node export command.
Prior to calling this command, call node whitelist command to have your SSH public key and IP whitelisted by
the cluster owner. This will enable you to use avalanche-cli commands to manage the imported cluster.
Please note, that this imported cluster will be considered as EXTERNAL by avalanche-cli, so some commands
affecting cloud nodes like node create or node destroy will be not applicable to it.
- [`list`](#avalanche-node-list): (ALPHA Warning) This command is currently in experimental mode.
The node list command lists all clusters together with their nodes.
- [`loadtest`](#avalanche-node-loadtest): (ALPHA Warning) This command is currently in experimental mode.
The node loadtest command suite starts and stops a load test for an existing devnet cluster.
- [`local`](#avalanche-node-local): The node local command suite provides a collection of commands related to local nodes
- [`refresh-ips`](#avalanche-node-refresh-ips): (ALPHA Warning) This command is currently in experimental mode.
The node refresh-ips command obtains the current IP for all nodes with dynamic IPs in the cluster,
and updates the local node information used by CLI commands.
- [`resize`](#avalanche-node-resize): (ALPHA Warning) This command is currently in experimental mode.
The node resize command can change the amount of CPU, memory and disk space available for the cluster nodes.
- [`scp`](#avalanche-node-scp): (ALPHA Warning) This command is currently in experimental mode.
The node scp command securely copies files to and from nodes. Remote source or destionation can be specified using the following format:
[clusterName|nodeID|instanceID|IP]:/path/to/file. Regular expressions are supported for the source files like /tmp/*.txt.
File transfer to the nodes are parallelized. IF source or destination is cluster, the other should be a local file path.
If both destinations are remote, they must be nodes for the same cluster and not clusters themselves.
For example:
$ avalanche node scp [cluster1|node1]:/tmp/file.txt /tmp/file.txt
$ avalanche node scp /tmp/file.txt [cluster1|NodeID-XXXX]:/tmp/file.txt
$ avalanche node scp node1:/tmp/file.txt NodeID-XXXX:/tmp/file.txt
- [`ssh`](#avalanche-node-ssh): (ALPHA Warning) This command is currently in experimental mode.
The node ssh command execute a given command [cmd] using ssh on all nodes in the cluster if ClusterName is given.
If no command is given, just prints the ssh command to be used to connect to each node in the cluster.
For provided NodeID or InstanceID or IP, the command [cmd] will be executed on that node.
If no [cmd] is provided for the node, it will open ssh shell there.
- [`status`](#avalanche-node-status): (ALPHA Warning) This command is currently in experimental mode.
The node status command gets the bootstrap status of all nodes in a cluster with the Primary Network.
If no cluster is given, defaults to node list behaviour.
To get the bootstrap status of a node with a Blockchain, use --blockchain flag
- [`sync`](#avalanche-node-sync): (ALPHA Warning) This command is currently in experimental mode.
The node sync command enables all nodes in a cluster to be bootstrapped to a Blockchain.
You can check the blockchain bootstrap status by calling avalanche node status `clusterName` --blockchain `blockchainName`
- [`update`](#avalanche-node-update): (ALPHA Warning) This command is currently in experimental mode.
The node update command suite provides a collection of commands for nodes to update
their avalanchego or VM config.
You can check the status after update by calling avalanche node status
- [`upgrade`](#avalanche-node-upgrade): (ALPHA Warning) This command is currently in experimental mode.
The node update command suite provides a collection of commands for nodes to update
their avalanchego or VM version.
You can check the status after upgrade by calling avalanche node status
- [`validate`](#avalanche-node-validate): (ALPHA Warning) This command is currently in experimental mode.
The node validate command suite provides a collection of commands for nodes to join
the Primary Network and Subnets as validators.
If any of the commands is run before the nodes are bootstrapped on the Primary Network, the command
will fail. You can check the bootstrap status by calling avalanche node status `clusterName`
- [`whitelist`](#avalanche-node-whitelist): (ALPHA Warning) The whitelist command suite provides a collection of tools for granting access to the cluster.
Command adds IP if --ip params provided to cloud security access rules allowing it to access all nodes in the cluster via ssh or http.
It also command adds SSH public key to all nodes in the cluster if --ssh params is there.
If no params provided it detects current user IP automaticaly and whitelists it
**Flags:**
```bash
-h, --help help for node
--config string config file (default is $HOME/.avalanche-cli/config.json)
--log-level string log level for the application (default "ERROR")
--skip-update-check skip check for new versions
```
### addDashboard
(ALPHA Warning) This command is currently in experimental mode.
The node addDashboard command adds custom dashboard to the Grafana monitoring dashboard for the
cluster.
**Usage:**
```bash
avalanche node addDashboard [subcommand] [flags]
```
**Flags:**
```bash
--add-grafana-dashboard string path to additional grafana dashboard json file
-h, --help help for addDashboard
--subnet string subnet that the dasbhoard is intended for (if any)
--config string config file (default is $HOME/.avalanche-cli/config.json)
--log-level string log level for the application (default "ERROR")
--skip-update-check skip check for new versions
```
### create
(ALPHA Warning) This command is currently in experimental mode.
The node create command sets up a validator on a cloud server of your choice.
The validator will be validating the Avalanche Primary Network and Subnet
of your choice. By default, the command runs an interactive wizard. It
walks you through all the steps you need to set up a validator.
Once this command is completed, you will have to wait for the validator
to finish bootstrapping on the primary network before running further
commands on it, e.g. validating a Subnet. You can check the bootstrapping
status by running avalanche node status
The created node will be part of group of validators called `clusterName`
and users can call node commands with `clusterName` so that the command
will apply to all nodes in the cluster
**Usage:**
```bash
avalanche node create [subcommand] [flags]
```
**Flags:**
```bash
--add-grafana-dashboard string path to additional grafana dashboard json file
--alternative-key-pair-name string key pair name to use if default one generates conflicts
--authorize-access authorize CLI to create cloud resources
--auto-replace-keypair automatically replaces key pair to access node if previous key pair is not found
--avalanchego-version-from-subnet string install latest avalanchego version, that is compatible with the given subnet, on node/s
--aws create node/s in AWS cloud
--aws-profile string aws profile to use (default "default")
--aws-volume-iops int AWS iops (for gp3, io1, and io2 volume types only) (default 3000)
--aws-volume-size int AWS volume size in GB (default 1000)
--aws-volume-throughput int AWS throughput in MiB/s (for gp3 volume type only) (default 125)
--aws-volume-type string AWS volume type (default "gp3")
--bootstrap-ids stringArray nodeIDs of bootstrap nodes
--bootstrap-ips stringArray IP:port pairs of bootstrap nodes
--cluster string operate on the given cluster
--custom-avalanchego-version string install given avalanchego version on node/s
--devnet operate on a devnet network
--enable-monitoring set up Prometheus monitoring for created nodes. This option creates a separate monitoring cloud instance and incures additional cost
--endpoint string use the given endpoint for network operations
-f, --fuji testnet operate on fuji (alias to testnet
--gcp create node/s in GCP cloud
--gcp-credentials string use given GCP credentials
--gcp-project string use given GCP project
--genesis string path to genesis file
--grafana-pkg string use grafana pkg instead of apt repo(by default), for example https://dl.grafana.com/oss/release/grafana_10.4.1_amd64.deb
-h, --help help for create
--latest-avalanchego-pre-release-version install latest avalanchego pre-release version on node/s
--latest-avalanchego-version install latest avalanchego release version on node/s
-m, --mainnet operate on mainnet
--node-type string cloud instance type. Use 'default' to use recommended default instance type
--num-apis ints number of API nodes(nodes without stake) to create in the new Devnet
--num-validators ints number of nodes to create per region(s). Use comma to separate multiple numbers for each region in the same order as --region flag
--partial-sync primary network partial sync (default true)
--public-http-port allow public access to avalanchego HTTP port
--region strings create node(s) in given region(s). Use comma to separate multiple regions
--ssh-agent-identity string use given ssh identity(only for ssh agent). If not set, default will be used
-t, --testnet fuji operate on testnet (alias to fuji)
--upgrade string path to upgrade file
--use-ssh-agent use ssh agent(ex: Yubikey) for ssh auth
--use-static-ip attach static Public IP on cloud servers (default true)
--config string config file (default is $HOME/.avalanche-cli/config.json)
--log-level string log level for the application (default "ERROR")
--skip-update-check skip check for new versions
```
### destroy
(ALPHA Warning) This command is currently in experimental mode.
The node destroy command terminates all running nodes in cloud server and deletes all storage disks.
If there is a static IP address attached, it will be released.
**Usage:**
```bash
avalanche node destroy [subcommand] [flags]
```
**Flags:**
```bash
--all destroy all existing clusters created by Avalanche CLI
--authorize-access authorize CLI to release cloud resources
-y, --authorize-all authorize all CLI requests
--authorize-remove authorize CLI to remove all local files related to cloud nodes
--aws-profile string aws profile to use (default "default")
-h, --help help for destroy
--config string config file (default is $HOME/.avalanche-cli/config.json)
--log-level string log level for the application (default "ERROR")
--skip-update-check skip check for new versions
```
### devnet
(ALPHA Warning) This command is currently in experimental mode.
The node devnet command suite provides a collection of commands related to devnets.
You can check the updated status by calling avalanche node status `clusterName`
**Usage:**
```bash
avalanche node devnet [subcommand] [flags]
```
**Subcommands:**
- [`deploy`](#avalanche-node-devnet-deploy): (ALPHA Warning) This command is currently in experimental mode.
The node devnet deploy command deploys a subnet into a devnet cluster, creating subnet and blockchain txs for it.
It saves the deploy info both locally and remotely.
- [`wiz`](#avalanche-node-devnet-wiz): (ALPHA Warning) This command is currently in experimental mode.
The node wiz command creates a devnet and deploys, sync and validate a subnet into it. It creates the subnet if so needed.
**Flags:**
```bash
-h, --help help for devnet
--config string config file (default is $HOME/.avalanche-cli/config.json)
--log-level string log level for the application (default "ERROR")
--skip-update-check skip check for new versions
```
#### devnet deploy
(ALPHA Warning) This command is currently in experimental mode.
The node devnet deploy command deploys a subnet into a devnet cluster, creating subnet and blockchain txs for it.
It saves the deploy info both locally and remotely.
**Usage:**
```bash
avalanche node devnet deploy [subcommand] [flags]
```
**Flags:**
```bash
-h, --help help for deploy
--no-checks do not check for healthy status or rpc compatibility of nodes against subnet
--subnet-aliases strings additional subnet aliases to be used for RPC calls in addition to subnet blockchain name
--subnet-only only create a subnet
--config string config file (default is $HOME/.avalanche-cli/config.json)
--log-level string log level for the application (default "ERROR")
--skip-update-check skip check for new versions
```
#### devnet wiz
(ALPHA Warning) This command is currently in experimental mode.
The node wiz command creates a devnet and deploys, sync and validate a subnet into it. It creates the subnet if so needed.
**Usage:**
```bash
avalanche node devnet wiz [subcommand] [flags]
```
**Flags:**
```bash
--add-grafana-dashboard string path to additional grafana dashboard json file
--alternative-key-pair-name string key pair name to use if default one generates conflicts
--authorize-access authorize CLI to create cloud resources
--auto-replace-keypair automatically replaces key pair to access node if previous key pair is not found
--aws create node/s in AWS cloud
--aws-profile string aws profile to use (default "default")
--aws-volume-iops int AWS iops (for gp3, io1, and io2 volume types only) (default 3000)
--aws-volume-size int AWS volume size in GB (default 1000)
--aws-volume-throughput int AWS throughput in MiB/s (for gp3 volume type only) (default 125)
--aws-volume-type string AWS volume type (default "gp3")
--chain-config string path to the chain configuration for subnet
--custom-avalanchego-version string install given avalanchego version on node/s
--custom-subnet use a custom VM as the subnet virtual machine
--custom-vm-branch string custom vm branch or commit
--custom-vm-build-script string custom vm build-script
--custom-vm-repo-url string custom vm repository url
--default-validator-params use default weight/start/duration params for subnet validator
--deploy-icm-messenger deploy Interchain Messenger (default true)
--deploy-icm-registry deploy Interchain Registry (default true)
--deploy-teleporter-messenger deploy Interchain Messenger (default true)
--deploy-teleporter-registry deploy Interchain Registry (default true)
--enable-monitoring set up Prometheus monitoring for created nodes. Please note that this option creates a separate monitoring instance and incures additional cost
--evm-chain-id uint chain ID to use with Subnet-EVM
--evm-defaults use default production settings with Subnet-EVM
--evm-production-defaults use default production settings for your blockchain
--evm-subnet use Subnet-EVM as the subnet virtual machine
--evm-test-defaults use default test settings for your blockchain
--evm-token string token name to use with Subnet-EVM
--evm-version string version of Subnet-EVM to use
--force-subnet-create overwrite the existing subnet configuration if one exists
--gcp create node/s in GCP cloud
--gcp-credentials string use given GCP credentials
--gcp-project string use given GCP project
--grafana-pkg string use grafana pkg instead of apt repo(by default), for example https://dl.grafana.com/oss/release/grafana_10.4.1_amd64.deb
-h, --help help for wiz
--icm generate an icm-ready vm
--icm-messenger-contract-address-path string path to an icm messenger contract address file
--icm-messenger-deployer-address-path string path to an icm messenger deployer address file
--icm-messenger-deployer-tx-path string path to an icm messenger deployer tx file
--icm-registry-bytecode-path string path to an icm registry bytecode file
--icm-version string icm version to deploy (default "latest")
--latest-avalanchego-pre-release-version install latest avalanchego pre-release version on node/s
--latest-avalanchego-version install latest avalanchego release version on node/s
--latest-evm-version use latest Subnet-EVM released version
--latest-pre-released-evm-version use latest Subnet-EVM pre-released version
--node-config string path to avalanchego node configuration for subnet
--node-type string cloud instance type. Use 'default' to use recommended default instance type
--num-apis ints number of API nodes(nodes without stake) to create in the new Devnet
--num-validators ints number of nodes to create per region(s). Use comma to separate multiple numbers for each region in the same order as --region flag
--public-http-port allow public access to avalanchego HTTP port
--region strings create node/s in given region(s). Use comma to separate multiple regions
--relayer run AWM relayer when deploying the vm
--ssh-agent-identity string use given ssh identity(only for ssh agent). If not set, default will be used.
--subnet-aliases strings additional subnet aliases to be used for RPC calls in addition to subnet blockchain name
--subnet-config string path to the subnet configuration for subnet
--subnet-genesis string file path of the subnet genesis
--teleporter generate an icm-ready vm
--teleporter-messenger-contract-address-path string path to an icm messenger contract address file
--teleporter-messenger-deployer-address-path string path to an icm messenger deployer address file
--teleporter-messenger-deployer-tx-path string path to an icm messenger deployer tx file
--teleporter-registry-bytecode-path string path to an icm registry bytecode file
--teleporter-version string icm version to deploy (default "latest")
--use-ssh-agent use ssh agent for ssh
--use-static-ip attach static Public IP on cloud servers (default true)
--validators strings deploy subnet into given comma separated list of validators. defaults to all cluster nodes
--config string config file (default is $HOME/.avalanche-cli/config.json)
--log-level string log level for the application (default "ERROR")
--skip-update-check skip check for new versions
```
### export
(ALPHA Warning) This command is currently in experimental mode.
The node export command exports cluster configuration and its nodes config to a text file.
If no file is specified, the configuration is printed to the stdout.
Use --include-secrets to include keys in the export. In this case please keep the file secure as it contains sensitive information.
Exported cluster configuration without secrets can be imported by another user using node import command.
**Usage:**
```bash
avalanche node export [subcommand] [flags]
```
**Flags:**
```bash
--file string specify the file to export the cluster configuration to
--force overwrite the file if it exists
-h, --help help for export
--include-secrets include keys in the export
--config string config file (default is $HOME/.avalanche-cli/config.json)
--log-level string log level for the application (default "ERROR")
--skip-update-check skip check for new versions
```
### import
(ALPHA Warning) This command is currently in experimental mode.
The node import command imports cluster configuration and its nodes configuration from a text file
created from the node export command.
Prior to calling this command, call node whitelist command to have your SSH public key and IP whitelisted by
the cluster owner. This will enable you to use avalanche-cli commands to manage the imported cluster.
Please note, that this imported cluster will be considered as EXTERNAL by avalanche-cli, so some commands
affecting cloud nodes like node create or node destroy will be not applicable to it.
**Usage:**
```bash
avalanche node import [subcommand] [flags]
```
**Flags:**
```bash
--file string specify the file to export the cluster configuration to
-h, --help help for import
--config string config file (default is $HOME/.avalanche-cli/config.json)
--log-level string log level for the application (default "ERROR")
--skip-update-check skip check for new versions
```
### list
(ALPHA Warning) This command is currently in experimental mode.
The node list command lists all clusters together with their nodes.
**Usage:**
```bash
avalanche node list [subcommand] [flags]
```
**Flags:**
```bash
-h, --help help for list
--config string config file (default is $HOME/.avalanche-cli/config.json)
--log-level string log level for the application (default "ERROR")
--skip-update-check skip check for new versions
```
### loadtest
(ALPHA Warning) This command is currently in experimental mode.
The node loadtest command suite starts and stops a load test for an existing devnet cluster.
**Usage:**
```bash
avalanche node loadtest [subcommand] [flags]
```
**Subcommands:**
- [`start`](#avalanche-node-loadtest-start): (ALPHA Warning) This command is currently in experimental mode.
The node loadtest command starts load testing for an existing devnet cluster. If the cluster does
not have an existing load test host, the command creates a separate cloud server and builds the load
test binary based on the provided load test Git Repo URL and load test binary build command.
The command will then run the load test binary based on the provided load test run command.
- [`stop`](#avalanche-node-loadtest-stop): (ALPHA Warning) This command is currently in experimental mode.
The node loadtest stop command stops load testing for an existing devnet cluster and terminates the
separate cloud server created to host the load test.
**Flags:**
```bash
-h, --help help for loadtest
--config string config file (default is $HOME/.avalanche-cli/config.json)
--log-level string log level for the application (default "ERROR")
--skip-update-check skip check for new versions
```
#### loadtest start
(ALPHA Warning) This command is currently in experimental mode.
The node loadtest command starts load testing for an existing devnet cluster. If the cluster does
not have an existing load test host, the command creates a separate cloud server and builds the load
test binary based on the provided load test Git Repo URL and load test binary build command.
The command will then run the load test binary based on the provided load test run command.
**Usage:**
```bash
avalanche node loadtest start [subcommand] [flags]
```
**Flags:**
```bash
--authorize-access authorize CLI to create cloud resources
--aws create loadtest node in AWS cloud
--aws-profile string aws profile to use (default "default")
--gcp create loadtest in GCP cloud
-h, --help help for start
--load-test-branch string load test branch or commit
--load-test-build-cmd string command to build load test binary
--load-test-cmd string command to run load test
--load-test-repo string load test repo url to use
--node-type string cloud instance type for loadtest script
--region string create load test node in a given region
--ssh-agent-identity string use given ssh identity(only for ssh agent). If not set, default will be used
--use-ssh-agent use ssh agent(ex: Yubikey) for ssh auth
--config string config file (default is $HOME/.avalanche-cli/config.json)
--log-level string log level for the application (default "ERROR")
--skip-update-check skip check for new versions
```
#### loadtest stop
(ALPHA Warning) This command is currently in experimental mode.
The node loadtest stop command stops load testing for an existing devnet cluster and terminates the
separate cloud server created to host the load test.
**Usage:**
```bash
avalanche node loadtest stop [subcommand] [flags]
```
**Flags:**
```bash
-h, --help help for stop
--load-test strings stop specified load test node(s). Use comma to separate multiple load test instance names
--config string config file (default is $HOME/.avalanche-cli/config.json)
--log-level string log level for the application (default "ERROR")
--skip-update-check skip check for new versions
```
### local
The node local command suite provides a collection of commands related to local nodes
**Usage:**
```bash
avalanche node local [subcommand] [flags]
```
**Subcommands:**
- [`destroy`](#avalanche-node-local-destroy): Cleanup local node.
- [`start`](#avalanche-node-local-start): The node local start command creates Avalanche nodes on the local machine.
Once this command is completed, you will have to wait for the Avalanche node
to finish bootstrapping on the primary network before running further
commands on it, e.g. validating a Subnet.
You can check the bootstrapping status by running avalanche node status local.
- [`status`](#avalanche-node-local-status): Get status of local node.
- [`stop`](#avalanche-node-local-stop): Stop local node.
- [`track`](#avalanche-node-local-track): Track specified blockchain with local node
- [`validate`](#avalanche-node-local-validate): Use Avalanche Node set up on local machine to set up specified L1 by providing the
RPC URL of the L1.
This command can only be used to validate Proof of Stake L1.
**Flags:**
```bash
-h, --help help for local
--config string config file (default is $HOME/.avalanche-cli/config.json)
--log-level string log level for the application (default "ERROR")
--skip-update-check skip check for new versions
```
#### local destroy
Cleanup local node.
**Usage:**
```bash
avalanche node local destroy [subcommand] [flags]
```
**Flags:**
```bash
-h, --help help for destroy
--config string config file (default is $HOME/.avalanche-cli/config.json)
--log-level string log level for the application (default "ERROR")
--skip-update-check skip check for new versions
```
#### local start
The node local start command creates Avalanche nodes on the local machine.
Once this command is completed, you will have to wait for the Avalanche node
to finish bootstrapping on the primary network before running further
commands on it, e.g. validating a Subnet.
You can check the bootstrapping status by running avalanche node status local.
**Usage:**
```bash
avalanche node local start [subcommand] [flags]
```
**Flags:**
```bash
--avalanchego-path string use this avalanchego binary path
--bootstrap-id stringArray nodeIDs of bootstrap nodes
--bootstrap-ip stringArray IP:port pairs of bootstrap nodes
--cluster string operate on the given cluster
--custom-avalanchego-version string install given avalanchego version on node/s
--devnet operate on a devnet network
--endpoint string use the given endpoint for network operations
-f, --fuji testnet operate on fuji (alias to testnet
--genesis string path to genesis file
-h, --help help for start
--latest-avalanchego-pre-release-version install latest avalanchego pre-release version on node/s (default true)
--latest-avalanchego-version install latest avalanchego release version on node/s
-l, --local operate on a local network
-m, --mainnet operate on mainnet
--node-config string path to common avalanchego config settings for all nodes
--num-nodes uint32 number of Avalanche nodes to create on local machine (default 1)
--partial-sync primary network partial sync (default true)
--staking-cert-key-path string path to provided staking cert key for node
--staking-signer-key-path string path to provided staking signer key for node
--staking-tls-key-path string path to provided staking tls key for node
-t, --testnet fuji operate on testnet (alias to fuji)
--upgrade string path to upgrade file
--config string config file (default is $HOME/.avalanche-cli/config.json)
--log-level string log level for the application (default "ERROR")
--skip-update-check skip check for new versions
```
#### local status
Get status of local node.
**Usage:**
```bash
avalanche node local status [subcommand] [flags]
```
**Flags:**
```bash
--blockchain string specify the blockchain the node is syncing with
-h, --help help for status
--l1 string specify the blockchain the node is syncing with
--config string config file (default is $HOME/.avalanche-cli/config.json)
--log-level string log level for the application (default "ERROR")
--skip-update-check skip check for new versions
```
#### local stop
Stop local node.
**Usage:**
```bash
avalanche node local stop [subcommand] [flags]
```
**Flags:**
```bash
-h, --help help for stop
--config string config file (default is $HOME/.avalanche-cli/config.json)
--log-level string log level for the application (default "ERROR")
--skip-update-check skip check for new versions
```
#### local track
Track specified blockchain with local node
**Usage:**
```bash
avalanche node local track [subcommand] [flags]
```
**Flags:**
```bash
--avalanchego-path string use this avalanchego binary path
--custom-avalanchego-version string install given avalanchego version on node/s
-h, --help help for track
--latest-avalanchego-pre-release-version install latest avalanchego pre-release version on node/s (default true)
--latest-avalanchego-version install latest avalanchego release version on node/s
--config string config file (default is $HOME/.avalanche-cli/config.json)
--log-level string log level for the application (default "ERROR")
--skip-update-check skip check for new versions
```
#### local validate
Use Avalanche Node set up on local machine to set up specified L1 by providing the
RPC URL of the L1.
This command can only be used to validate Proof of Stake L1.
**Usage:**
```bash
avalanche node local validate [subcommand] [flags]
```
**Flags:**
```bash
--aggregator-log-level string log level to use with signature aggregator (default "Debug")
--aggregator-log-to-stdout use stdout for signature aggregator logs
--balance float amount of AVAX to increase validator's balance by
--blockchain string specify the blockchain the node is syncing with
--delegation-fee uint16 delegation fee (in bips) (default 100)
--disable-owner string P-Chain address that will able to disable the validator with a P-Chain transaction
-h, --help help for validate
--l1 string specify the blockchain the node is syncing with
--minimum-stake-duration uint minimum stake duration (in seconds) (default 100)
--remaining-balance-owner string P-Chain address that will receive any leftover AVAX from the validator when it is removed from Subnet
--rpc string connect to validator manager at the given rpc endpoint
--stake-amount uint amount of tokens to stake
--config string config file (default is $HOME/.avalanche-cli/config.json)
--log-level string log level for the application (default "ERROR")
--skip-update-check skip check for new versions
```
### refresh-ips
(ALPHA Warning) This command is currently in experimental mode.
The node refresh-ips command obtains the current IP for all nodes with dynamic IPs in the cluster,
and updates the local node information used by CLI commands.
**Usage:**
```bash
avalanche node refresh-ips [subcommand] [flags]
```
**Flags:**
```bash
--aws-profile string aws profile to use (default "default")
-h, --help help for refresh-ips
--config string config file (default is $HOME/.avalanche-cli/config.json)
--log-level string log level for the application (default "ERROR")
--skip-update-check skip check for new versions
```
### resize
(ALPHA Warning) This command is currently in experimental mode.
The node resize command can change the amount of CPU, memory and disk space available for the cluster nodes.
**Usage:**
```bash
avalanche node resize [subcommand] [flags]
```
**Flags:**
```bash
--aws-profile string aws profile to use (default "default")
--disk-size string Disk size to resize in Gb (e.g. 1000Gb)
-h, --help help for resize
--node-type string Node type to resize (e.g. t3.2xlarge)
--config string config file (default is $HOME/.avalanche-cli/config.json)
--log-level string log level for the application (default "ERROR")
--skip-update-check skip check for new versions
```
### scp
(ALPHA Warning) This command is currently in experimental mode.
The node scp command securely copies files to and from nodes. Remote source or destionation can be specified using the following format:
[clusterName|nodeID|instanceID|IP]:/path/to/file. Regular expressions are supported for the source files like /tmp/*.txt.
File transfer to the nodes are parallelized. IF source or destination is cluster, the other should be a local file path.
If both destinations are remote, they must be nodes for the same cluster and not clusters themselves.
For example:
$ avalanche node scp [cluster1|node1]:/tmp/file.txt /tmp/file.txt
$ avalanche node scp /tmp/file.txt [cluster1|NodeID-XXXX]:/tmp/file.txt
$ avalanche node scp node1:/tmp/file.txt NodeID-XXXX:/tmp/file.txt
**Usage:**
```bash
avalanche node scp [subcommand] [flags]
```
**Flags:**
```bash
--compress use compression for ssh
-h, --help help for scp
--recursive copy directories recursively
--with-loadtest include loadtest node for scp cluster operations
--with-monitor include monitoring node for scp cluster operations
--config string config file (default is $HOME/.avalanche-cli/config.json)
--log-level string log level for the application (default "ERROR")
--skip-update-check skip check for new versions
```
### ssh
(ALPHA Warning) This command is currently in experimental mode.
The node ssh command execute a given command [cmd] using ssh on all nodes in the cluster if ClusterName is given.
If no command is given, just prints the ssh command to be used to connect to each node in the cluster.
For provided NodeID or InstanceID or IP, the command [cmd] will be executed on that node.
If no [cmd] is provided for the node, it will open ssh shell there.
**Usage:**
```bash
avalanche node ssh [subcommand] [flags]
```
**Flags:**
```bash
-h, --help help for ssh
--parallel run ssh command on all nodes in parallel
--with-loadtest include loadtest node for ssh cluster operations
--with-monitor include monitoring node for ssh cluster operations
--config string config file (default is $HOME/.avalanche-cli/config.json)
--log-level string log level for the application (default "ERROR")
--skip-update-check skip check for new versions
```
### status
(ALPHA Warning) This command is currently in experimental mode.
The node status command gets the bootstrap status of all nodes in a cluster with the Primary Network.
If no cluster is given, defaults to node list behaviour.
To get the bootstrap status of a node with a Blockchain, use --blockchain flag
**Usage:**
```bash
avalanche node status [subcommand] [flags]
```
**Flags:**
```bash
--blockchain string specify the blockchain the node is syncing with
-h, --help help for status
--subnet string specify the blockchain the node is syncing with
--config string config file (default is $HOME/.avalanche-cli/config.json)
--log-level string log level for the application (default "ERROR")
--skip-update-check skip check for new versions
```
### sync
(ALPHA Warning) This command is currently in experimental mode.
The node sync command enables all nodes in a cluster to be bootstrapped to a Blockchain.
You can check the blockchain bootstrap status by calling avalanche node status `clusterName` --blockchain `blockchainName`
**Usage:**
```bash
avalanche node sync [subcommand] [flags]
```
**Flags:**
```bash
-h, --help help for sync
--no-checks do not check for bootstrapped/healthy status or rpc compatibility of nodes against subnet
--subnet-aliases strings subnet alias to be used for RPC calls. defaults to subnet blockchain ID
--validators strings sync subnet into given comma separated list of validators. defaults to all cluster nodes
--config string config file (default is $HOME/.avalanche-cli/config.json)
--log-level string log level for the application (default "ERROR")
--skip-update-check skip check for new versions
```
### update
(ALPHA Warning) This command is currently in experimental mode.
The node update command suite provides a collection of commands for nodes to update
their avalanchego or VM config.
You can check the status after update by calling avalanche node status
**Usage:**
```bash
avalanche node update [subcommand] [flags]
```
**Subcommands:**
- [`subnet`](#avalanche-node-update-subnet): (ALPHA Warning) This command is currently in experimental mode.
The node update subnet command updates all nodes in a cluster with latest Subnet configuration and VM for custom VM.
You can check the updated subnet bootstrap status by calling avalanche node status `clusterName` --subnet `subnetName`
**Flags:**
```bash
-h, --help help for update
--config string config file (default is $HOME/.avalanche-cli/config.json)
--log-level string log level for the application (default "ERROR")
--skip-update-check skip check for new versions
```
#### update subnet
(ALPHA Warning) This command is currently in experimental mode.
The node update subnet command updates all nodes in a cluster with latest Subnet configuration and VM for custom VM.
You can check the updated subnet bootstrap status by calling avalanche node status `clusterName` --subnet `subnetName`
**Usage:**
```bash
avalanche node update subnet [subcommand] [flags]
```
**Flags:**
```bash
-h, --help help for subnet
--config string config file (default is $HOME/.avalanche-cli/config.json)
--log-level string log level for the application (default "ERROR")
--skip-update-check skip check for new versions
```
### upgrade
(ALPHA Warning) This command is currently in experimental mode.
The node update command suite provides a collection of commands for nodes to update
their avalanchego or VM version.
You can check the status after upgrade by calling avalanche node status
**Usage:**
```bash
avalanche node upgrade [subcommand] [flags]
```
**Flags:**
```bash
-h, --help help for upgrade
--config string config file (default is $HOME/.avalanche-cli/config.json)
--log-level string log level for the application (default "ERROR")
--skip-update-check skip check for new versions
```
### validate
(ALPHA Warning) This command is currently in experimental mode.
The node validate command suite provides a collection of commands for nodes to join
the Primary Network and Subnets as validators.
If any of the commands is run before the nodes are bootstrapped on the Primary Network, the command
will fail. You can check the bootstrap status by calling avalanche node status `clusterName`
**Usage:**
```bash
avalanche node validate [subcommand] [flags]
```
**Subcommands:**
- [`primary`](#avalanche-node-validate-primary): (ALPHA Warning) This command is currently in experimental mode.
The node validate primary command enables all nodes in a cluster to be validators of Primary
Network.
- [`subnet`](#avalanche-node-validate-subnet): (ALPHA Warning) This command is currently in experimental mode.
The node validate subnet command enables all nodes in a cluster to be validators of a Subnet.
If the command is run before the nodes are Primary Network validators, the command will first
make the nodes Primary Network validators before making them Subnet validators.
If The command is run before the nodes are bootstrapped on the Primary Network, the command will fail.
You can check the bootstrap status by calling avalanche node status `clusterName`
If The command is run before the nodes are synced to the subnet, the command will fail.
You can check the subnet sync status by calling avalanche node status `clusterName` --subnet `subnetName`
**Flags:**
```bash
-h, --help help for validate
--config string config file (default is $HOME/.avalanche-cli/config.json)
--log-level string log level for the application (default "ERROR")
--skip-update-check skip check for new versions
```
#### validate primary
(ALPHA Warning) This command is currently in experimental mode.
The node validate primary command enables all nodes in a cluster to be validators of Primary
Network.
**Usage:**
```bash
avalanche node validate primary [subcommand] [flags]
```
**Flags:**
```bash
-e, --ewoq use ewoq key [fuji/devnet only]
-h, --help help for primary
-k, --key string select the key to use [fuji only]
-g, --ledger use ledger instead of key (always true on mainnet, defaults to false on fuji/devnet)
--ledger-addrs strings use the given ledger addresses
--stake-amount uint how many AVAX to stake in the validator
--staking-period duration how long validator validates for after start time
--start-time string UTC start time when this validator starts validating, in 'YYYY-MM-DD HH:MM:SS' format
--config string config file (default is $HOME/.avalanche-cli/config.json)
--log-level string log level for the application (default "ERROR")
--skip-update-check skip check for new versions
```
#### validate subnet
(ALPHA Warning) This command is currently in experimental mode.
The node validate subnet command enables all nodes in a cluster to be validators of a Subnet.
If the command is run before the nodes are Primary Network validators, the command will first
make the nodes Primary Network validators before making them Subnet validators.
If The command is run before the nodes are bootstrapped on the Primary Network, the command will fail.
You can check the bootstrap status by calling avalanche node status `clusterName`
If The command is run before the nodes are synced to the subnet, the command will fail.
You can check the subnet sync status by calling avalanche node status `clusterName` --subnet `subnetName`
**Usage:**
```bash
avalanche node validate subnet [subcommand] [flags]
```
**Flags:**
```bash
--default-validator-params use default weight/start/duration params for subnet validator
-e, --ewoq use ewoq key [fuji/devnet only]
-h, --help help for subnet
-k, --key string select the key to use [fuji/devnet only]
-g, --ledger use ledger instead of key (always true on mainnet, defaults to false on fuji/devnet)
--ledger-addrs strings use the given ledger addresses
--no-checks do not check for bootstrapped status or healthy status
--no-validation-checks do not check if subnet is already synced or validated (default true)
--stake-amount uint how many AVAX to stake in the validator
--staking-period duration how long validator validates for after start time
--start-time string UTC start time when this validator starts validating, in 'YYYY-MM-DD HH:MM:SS' format
--validators strings validate subnet for the given comma separated list of validators. defaults to all cluster nodes
--config string config file (default is $HOME/.avalanche-cli/config.json)
--log-level string log level for the application (default "ERROR")
--skip-update-check skip check for new versions
```
### whitelist
(ALPHA Warning) The whitelist command suite provides a collection of tools for granting access to the cluster.
Command adds IP if --ip params provided to cloud security access rules allowing it to access all nodes in the cluster via ssh or http.
It also command adds SSH public key to all nodes in the cluster if --ssh params is there.
If no params provided it detects current user IP automaticaly and whitelists it
**Usage:**
```bash
avalanche node whitelist [subcommand] [flags]
```
**Flags:**
```bash
-y, --current-ip whitelist current host ip
-h, --help help for whitelist
--ip string ip address to whitelist
--ssh string ssh public key to whitelist
--config string config file (default is $HOME/.avalanche-cli/config.json)
--log-level string log level for the application (default "ERROR")
--skip-update-check skip check for new versions
```
## avalanche primary
The primary command suite provides a collection of tools for interacting with the
Primary Network
**Usage:**
```bash
avalanche primary [subcommand] [flags]
```
**Subcommands:**
- [`addValidator`](#avalanche-primary-addvalidator): The primary addValidator command adds a node as a validator
in the Primary Network
- [`describe`](#avalanche-primary-describe): The subnet describe command prints details of the primary network configuration to the console.
**Flags:**
```bash
-h, --help help for primary
--config string config file (default is $HOME/.avalanche-cli/config.json)
--log-level string log level for the application (default "ERROR")
--skip-update-check skip check for new versions
```
### addValidator
The primary addValidator command adds a node as a validator
in the Primary Network
**Usage:**
```bash
avalanche primary addValidator [subcommand] [flags]
```
**Flags:**
```bash
--cluster string operate on the given cluster
--delegation-fee uint32 set the delegation fee (20 000 is equivalent to 2%)
--devnet operate on a devnet network
--endpoint string use the given endpoint for network operations
-f, --fuji testnet operate on fuji (alias to testnet
-h, --help help for addValidator
-k, --key string select the key to use [fuji only]
-g, --ledger use ledger instead of key (always true on mainnet, defaults to false on fuji)
--ledger-addrs strings use the given ledger addresses
-m, --mainnet operate on mainnet
--nodeID string set the NodeID of the validator to add
--proof-of-possession string set the BLS proof of possession of the validator to add
--public-key string set the BLS public key of the validator to add
--staking-period duration how long this validator will be staking
--start-time string UTC start time when this validator starts validating, in 'YYYY-MM-DD HH:MM:SS' format
-t, --testnet fuji operate on testnet (alias to fuji)
--weight uint set the staking weight of the validator to add
--config string config file (default is $HOME/.avalanche-cli/config.json)
--log-level string log level for the application (default "ERROR")
--skip-update-check skip check for new versions
```
### describe
The subnet describe command prints details of the primary network configuration to the console.
**Usage:**
```bash
avalanche primary describe [subcommand] [flags]
```
**Flags:**
```bash
--cluster string operate on the given cluster
-h, --help help for describe
-l, --local operate on a local network
--config string config file (default is $HOME/.avalanche-cli/config.json)
--log-level string log level for the application (default "ERROR")
--skip-update-check skip check for new versions
```
## avalanche transaction
The transaction command suite provides all of the utilities required to sign multisig transactions.
**Usage:**
```bash
avalanche transaction [subcommand] [flags]
```
**Subcommands:**
- [`commit`](#avalanche-transaction-commit): The transaction commit command commits a transaction by submitting it to the P-Chain.
- [`sign`](#avalanche-transaction-sign): The transaction sign command signs a multisig transaction.
**Flags:**
```bash
-h, --help help for transaction
--config string config file (default is $HOME/.avalanche-cli/config.json)
--log-level string log level for the application (default "ERROR")
--skip-update-check skip check for new versions
```
### commit
The transaction commit command commits a transaction by submitting it to the P-Chain.
**Usage:**
```bash
avalanche transaction commit [subcommand] [flags]
```
**Flags:**
```bash
-h, --help help for commit
--input-tx-filepath string Path to the transaction signed by all signatories
--config string config file (default is $HOME/.avalanche-cli/config.json)
--log-level string log level for the application (default "ERROR")
--skip-update-check skip check for new versions
```
### sign
The transaction sign command signs a multisig transaction.
**Usage:**
```bash
avalanche transaction sign [subcommand] [flags]
```
**Flags:**
```bash
-h, --help help for sign
--input-tx-filepath string Path to the transaction file for signing
-k, --key string select the key to use [fuji only]
-g, --ledger use ledger instead of key (always true on mainnet, defaults to false on fuji)
--ledger-addrs strings use the given ledger addresses
--config string config file (default is $HOME/.avalanche-cli/config.json)
--log-level string log level for the application (default "ERROR")
--skip-update-check skip check for new versions
```
## avalanche update
Check if an update is available, and prompt the user to install it
**Usage:**
```bash
avalanche update [subcommand] [flags]
```
**Flags:**
```bash
-c, --confirm Assume yes for installation
-h, --help help for update
-v, --version version for update
--config string config file (default is $HOME/.avalanche-cli/config.json)
--log-level string log level for the application (default "ERROR")
--skip-update-check skip check for new versions
```
## avalanche validator
The validator command suite provides a collection of tools for managing validator
balance on P-Chain.
Validator's balance is used to pay for continuous fee to the P-Chain. When this Balance reaches 0,
the validator will be considered inactive and will no longer participate in validating the L1
**Usage:**
```bash
avalanche validator [subcommand] [flags]
```
**Subcommands:**
- [`getBalance`](#avalanche-validator-getbalance): This command gets the remaining validator P-Chain balance that is available to pay
P-Chain continuous fee
- [`increaseBalance`](#avalanche-validator-increasebalance): This command increases the validator P-Chain balance
- [`list`](#avalanche-validator-list): This command gets a list of the validators of the L1
**Flags:**
```bash
-h, --help help for validator
--config string config file (default is $HOME/.avalanche-cli/config.json)
--log-level string log level for the application (default "ERROR")
--skip-update-check skip check for new versions
```
### getBalance
This command gets the remaining validator P-Chain balance that is available to pay
P-Chain continuous fee
**Usage:**
```bash
avalanche validator getBalance [subcommand] [flags]
```
**Flags:**
```bash
--cluster string operate on the given cluster
--devnet operate on a devnet network
--endpoint string use the given endpoint for network operations
-f, --fuji testnet operate on fuji (alias to testnet
-h, --help help for getBalance
--l1 string name of L1
-l, --local operate on a local network
-m, --mainnet operate on mainnet
--node-id string node ID of the validator
-t, --testnet fuji operate on testnet (alias to fuji)
--validation-id string validation ID of the validator
--config string config file (default is $HOME/.avalanche-cli/config.json)
--log-level string log level for the application (default "ERROR")
--skip-update-check skip check for new versions
```
### increaseBalance
This command increases the validator P-Chain balance
**Usage:**
```bash
avalanche validator increaseBalance [subcommand] [flags]
```
**Flags:**
```bash
--balance float amount of AVAX to increase validator's balance by
--cluster string operate on the given cluster
--devnet operate on a devnet network
--endpoint string use the given endpoint for network operations
-f, --fuji testnet operate on fuji (alias to testnet
-h, --help help for increaseBalance
-k, --key string select the key to use [fuji/devnet deploy only]
--l1 string name of L1 (to increase balance of bootstrap validators only)
-l, --local operate on a local network
-m, --mainnet operate on mainnet
--node-id string node ID of the validator
-t, --testnet fuji operate on testnet (alias to fuji)
--validation-id string validationIDStr of the validator
--config string config file (default is $HOME/.avalanche-cli/config.json)
--log-level string log level for the application (default "ERROR")
--skip-update-check skip check for new versions
```
### list
This command gets a list of the validators of the L1
**Usage:**
```bash
avalanche validator list [subcommand] [flags]
```
**Flags:**
```bash
--cluster string operate on the given cluster
--devnet operate on a devnet network
--endpoint string use the given endpoint for network operations
-f, --fuji testnet operate on fuji (alias to testnet
-h, --help help for list
-l, --local operate on a local network
-m, --mainnet operate on mainnet
-t, --testnet fuji operate on testnet (alias to fuji)
--config string config file (default is $HOME/.avalanche-cli/config.json)
--log-level string log level for the application (default "ERROR")
--skip-update-check skip check for new versions
```
# Create Avalanche L1 (/docs/tooling/avalanche-cli/create-avalanche-l1)
This tutorial walks you through the process of using Avalanche-CLI to create an Avalanche L1, deploy it to a local network, and connect to it with Core wallet.
The first step of learning Avalanche L1 development is learning to use [Avalanche-CLI](https://github.com/ava-labs/avalanche-cli).
Installation[](#installation "Direct link to heading")
-------------------------------------------------------
The fastest way to install the latest Avalanche-CLI binary is by running the install script:
```bash
curl -sSfL https://raw.githubusercontent.com/ava-labs/avalanche-cli/main/scripts/install.sh | sh -s
```
The binary installs inside the `~/bin` directory. If the directory doesn't exist, it will be created.
You can run all of the commands in this tutorial by calling `~/bin/avalanche`.
You can also add the command to your system path by running:
```bash
export PATH=~/bin:$PATH
```
To make this change permanent, add this line to your shell’s initialization file (e.g., `~/.bashrc` or `~/.zshrc`). For example:
```bash
echo 'export PATH=~/bin:$PATH' >> ~/.bashrc
source ~/.bashrc
```
Once you add it to your path, you should be able to call the program anywhere with just: `avalanche`
For more detailed installation instructions, see [Avalanche-CLI Installation](/docs/tooling/avalanche-cli).
Create Your Avalanche L1 Configuration[](#create-your-avalanche-l1-configuration "Direct link to heading")
-----------------------------------------------------------------------------------------------
This tutorial teaches you how to create an Ethereum Virtual Machine (EVM) based Avalanche L1. To do so, you use Subnet-EVM, Avalanche's L1 fork of the EVM. It supports airdrops, custom fee tokens, configurable gas parameters, and multiple stateful precompiles. To learn more, take a look at [Subnet-EVM](https://github.com/ava-labs/subnet-evm). The goal of your first command is to create a Subnet-EVM configuration.
The `avalanche-cli` command suite provides a collection of tools for developing and deploying Avalanche L1s.
The Creation Wizard walks you through the process of creating your Avalanche L1. To get started, first pick a name for your Avalanche L1. This tutorial uses `myblockchain`, but feel free to substitute that with any name you like. Once you've picked your name, run:
```bash
avalanche blockchain create myblockchain
```
The following sections walk through each question in the wizard.
### Choose Your VM
```bash
? Which Virtual Machine would you like to use?:
▸ Subnet-EVM
Custom VM
Explain the difference
```
Select `Subnet-EVM`.
### Choose Validator Manager
```text
? Which validator management type would you like to use in your blockchain?:
▸ Proof Of Authority
Proof Of Stake
Explain the difference
```
Select `Proof Of Authority`.
```text
? Which address do you want to enable as controller of ValidatorManager contract?:
▸ Get address from an existing stored key (created from avalanche key create or avalanche key import)
Custom
```
Select `Get address from an existing stored key`.
```text
? Which stored key should be used enable as controller of ValidatorManager contract?:
▸ ewoq
cli-awm-relayer
cli-teleporter-deployer
```
Select `ewoq`.
This key is used to manage (add/remove) the validator set.
Do not use EWOQ key in a testnet or production setup. The EWOQ private key is publicly exposed.
To learn more about different validator management types, see [PoA vs PoS](/docs/avalanche-l1s/validator-manager/contract).
### Choose Blockchain Configuration
```text
? Do you want to use default values for the Blockchain configuration?:
▸ I want to use defaults for a test environment
I want to use defaults for a production environment
I don't want to use default values
Explain the difference
```
Select `I want to use defaults for a test environment`.
This will automatically setup the configuration for a test environment, including an airdrop to the EWOQ key and Avalanche ICM.
### Enter Your Avalanche L1's ChainID
```text
✗ Chain ID:
```
Choose a positive integer for your EVM-style ChainID.
In production environments, this ChainID needs to be unique and not shared with any other chain. You can visit [chainlist](https://chainlist.org/) to verify that your selection is unique. Because this is a development Avalanche L1, feel free to pick any number. Stay away from well-known ChainIDs such as 1 (Ethereum) or 43114 (Avalanche C-Chain) as those may cause issues with other tools.
### Token Symbol
```text
✗ Token Symbol:
```
Enter a string to name your Avalanche L1's native token. The token symbol doesn't necessarily need to be unique. Example token symbols are AVAX, JOE, and BTC.
### Wrapping Up
If all worked successfully, the command prints:
```bash
✓ Successfully created blockchain configuration
```
To view the Genesis configuration, use the following command:
```bash
avalanche blockchain describe myblockchain --genesis
```
You've successfully created your first Avalanche L1 configuration. Now it's time to deploy it.
# Installation (/docs/tooling/avalanche-cli/get-avalanche-cli)
## Compatibility
Avalanche-CLI runs on Linux and Mac. Windows is currently not supported.
## Instructions
To download a binary for the latest release, run:
```bash
curl -sSfL https://raw.githubusercontent.com/ava-labs/avalanche-cli/main/scripts/install.sh | sh -s
```
The script installs the binary inside the `~/bin` directory. If the directory doesn't exist, it will be created.
## Adding Avalanche-CLI to Your PATH
To call the `avalanche` binary from anywhere, you'll need to add it to your system path. If you installed the binary into the default location, you can run the following snippet to add it to your path.
To add it to your path permanently, add an export command to your shell initialization script. If you run `bash`, use `.bashrc`. If you run `zsh`, use `.zshrc`.
For example:
```bash
export PATH=~/bin:$PATH >> .bashrc
```
## Checking Your Installation
You can test your installation by running `avalanche --version`. The tool should print the running version.
## Updating
To update your installation, you need to delete your current binary and download the latest version using the preceding steps.
## Building from Source
The source code is available in this [GitHub repository](https://github.com/ava-labs/avalanche-cli).
After you've cloned the repository, checkout the tag you'd like to run. You can compile the code by running `./scripts/build.sh` from the top level directory.
The build script names the binary `./bin/avalanche`.
# Avalanche-CLI Overview (Deprecated) (/docs/tooling/avalanche-cli)
> **Deprecated:** Avalanche-CLI is no longer actively maintained. For P-Chain operations (staking, transfers, subnets, L1 validators), use [Platform CLI](/docs/tooling/platform-cli) instead. For other functionality (ICM, node setup, L1 management), use the [Builder Console](/console).
The Avalanche-CLI is a command-line tool that streamlines the process of building, deploying, and managing Avalanche L1 blockchains (formerly known as Subnets).
## Key Features
- **Create & Deploy L1s**: Quickly create and deploy new Avalanche L1 blockchains to local, testnet, or mainnet environments
- **VM Management**: Deploy L1s with Subnet-EVM or custom Virtual Machines
- **Node Operations**: Run and manage validator nodes across different cloud providers
- **Cross-Chain Messaging**: Set up Teleporter for cross-chain communication
- **Transaction Management**: Handle native token transfers and P-Chain operations
## Getting Started
To get started with Avalanche-CLI:
1. [Install Avalanche-CLI](/docs/tooling/avalanche-cli/get-avalanche-cli) on your system
2. Review the [CLI Commands Reference](/docs/tooling/avalanche-cli/cli-commands) for available commands
3. Follow the guide to [Create an Avalanche L1](/docs/tooling/avalanche-cli/create-avalanche-l1)
## Quick Links
Get Avalanche-CLI installed on your system
Learn how to create your first Avalanche L1
Deploy L1s to various environments
Complete reference for all CLI commands
## Common Use Cases
### Local Development
Deploy and test your L1 locally before moving to testnet or mainnet.
### Production Deployment
Deploy L1s to Fuji testnet for testing, then to mainnet for production use.
### Validator Management
Add and remove validators, manage staking, and monitor node health.
### Cross-Chain Integration
Enable cross-chain messaging between your L1 and other chains using Teleporter.
## Support
- [GitHub Repository](https://github.com/ava-labs/avalanche-cli)
- [Discord Community](https://chat.avalabs.org/)
- [Documentation](https://docs.avax.network/)
# L1 Add-Ons (/docs/tooling/avalanche-deploy/add-ons)
After deploying your L1, you can add optional services to enhance the developer and operator experience. Each add-on is available for both deployment paths: **Ansible playbooks** (Docker Compose on VMs) and **Helm charts** (Kubernetes).
All add-on commands assume you have sourced your L1 environment: `source l1.env`
## eRPC Load Balancer
eRPC is deployed **automatically** during `make configure-l1`. It provides a single RPC endpoint that load balances across your archive and pruned RPC nodes with intelligent routing.
### Features
- **Intelligent routing** — `debug_*` and `trace_*` methods route to archive nodes only
- **Load balancing** across all RPC nodes
- **Automatic failover** with circuit breaker
- **Response caching**
- **Prometheus metrics**
### Endpoints
| Endpoint | URL |
|----------|-----|
| RPC | `http://:4000` |
| Health | `http://:4001/healthcheck` |
### Usage
Point your dApps and tools at the eRPC endpoint instead of individual nodes:
```bash
# Through eRPC (recommended)
curl -X POST http://:4000 \
-H "Content-Type: application/json" \
-d '{"jsonrpc":"2.0","method":"eth_blockNumber","params":[],"id":1}'
```
To skip eRPC during L1 configuration, add `SKIP_ERPC=true`:
```bash
make configure-l1 SUBNET_ID=$SUBNET_ID CHAIN_ID=$CHAIN_ID SKIP_ERPC=true
```
To redeploy eRPC standalone:
```bash
source l1.env
make erpc CHAIN_ID=$CHAIN_ID EVM_CHAIN_ID=99999
```
```bash
source l1.env
make k8s-erpc CHAIN_ID=$CHAIN_ID EVM_CHAIN_ID=99999
```
The Helm chart auto-discovers RPC upstreams from the `l1-rpc` service. Override with custom upstreams in `values.yaml`.
## Blockscout Block Explorer
Deploy a full-featured block explorer for your L1:
```bash
source l1.env
make deploy-blockscout CHAIN_ID=$CHAIN_ID EVM_CHAIN_ID=99999 CHAIN_NAME="My L1"
```
```bash
source l1.env
make k8s-blockscout CHAIN_ID=$CHAIN_ID EVM_CHAIN_ID=99999
# Access frontend
kubectl port-forward svc/blockscout-frontend 3000:3000
```
**Access**: `http://:4001`
Blockscout is deployed to the first archive RPC host (falls back to the first generic RPC host on GCP/Azure). It includes the backend indexer, frontend UI, stats service, and nginx reverse proxy.
Initial indexing can take hours for chains with significant history. Monitor progress with `docker logs -f blockscout-backend` on the RPC node.
## Faucet
Deploy a token faucet for developers to request test tokens:
```bash
source l1.env
make faucet CHAIN_ID=$CHAIN_ID EVM_CHAIN_ID=99999 FAUCET_KEY=0x...
```
```bash
source l1.env
make k8s-faucet CHAIN_ID=$CHAIN_ID EVM_CHAIN_ID=99999 FAUCET_KEY=0x...
```
**Access**: `http://:8010`
| Parameter | Description |
|-----------|-------------|
| `CHAIN_ID` | Blockchain ID from `l1.env` |
| `EVM_CHAIN_ID` | EVM chain ID from genesis |
| `FAUCET_KEY` | Hex private key of a funded wallet on your L1 |
The faucet wallet must be funded on your L1 chain. Use a dedicated wallet — not your deployer key.
## The Graph Node
Deploy The Graph for indexing blockchain data via GraphQL subgraphs:
```bash
source l1.env
make graph-node CHAIN_ID=$CHAIN_ID NETWORK_NAME=my-l1
```
```bash
source l1.env
make k8s-graph-node CHAIN_ID=$CHAIN_ID NETWORK_NAME=my-l1
# Access GraphQL
kubectl port-forward svc/graph-node 8000:8000
```
### Endpoints
| Endpoint | URL |
|----------|-----|
| GraphQL | `http://:8000/subgraphs/name/` |
| Admin | `http://:8020` |
| IPFS | `http://:5001` |
### Deploying a Subgraph
After The Graph Node is running, deploy a subgraph:
```bash
# 1. Initialize your subgraph project
graph init --product hosted-service my-subgraph
# 2. Update subgraph.yaml with your L1 network
# network: my-l1
# source.address: ""
# source.startBlock: 0
# 3. Generate types and build
graph codegen && graph build
# 4. Create and deploy
graph create --node http://:8020 my-subgraph
graph deploy --node http://:8020 \
--ipfs http://:5001 \
my-subgraph
```
## ICM Relayer (Cross-Chain Messaging)
Deploy the Interchain Messaging Relayer for cross-chain communication between your L1 and C-Chain:
```bash
source l1.env
make icm-relayer SUBNET_ID=$SUBNET_ID CHAIN_ID=$CHAIN_ID RELAYER_KEY=0x...
```
### Endpoints
| Endpoint | URL |
|----------|-----|
| API | `http://:8080` |
| Health | `http://:8080/health` |
| Metrics | `http://:9090/metrics` |
### How It Works
The ICM Relayer listens for Avalanche Warp Messages on source blockchains, aggregates BLS signatures from validators, and delivers cross-chain messages to destination blockchains. By default, it relays **bidirectionally** between your L1 and C-Chain.
### Configuration
| Parameter | Default | Description |
|-----------|---------|-------------|
| `SUBNET_ID` | (required) | Subnet ID from `l1.env` |
| `CHAIN_ID` | (required) | Blockchain ID from `l1.env` |
| `RELAYER_KEY` | (required) | Hex private key for relay transactions |
| `NETWORK` | fuji | Network name (`fuji` or `mainnet`) |
The relayer key wallet must be funded on **both** chains — AVAX on C-Chain for gas, and your L1's native token on the L1 chain. Use a dedicated relay wallet.
### Kubernetes Deployment
```bash
make k8s-icm-relayer SUBNET_ID=$SUBNET_ID CHAIN_ID=$CHAIN_ID RELAYER_KEY=0x...
```
## Safe Multisig
Deploy Gnosis Safe infrastructure for multisig governance of your L1:
```bash
make safe
```
This deploys the Safe UI, transaction service, client gateway, and nginx reverse proxy. It auto-detects chain configuration from `l1.env`.
```bash
source l1.env
make k8s-safe EVM_CHAIN_ID=99999 CHAIN_ID=$CHAIN_ID
```
Deploys Config Service (CFG), Transaction Service (TXS), Client Gateway (CGW), PostgreSQL (x2), Redis, and RabbitMQ. An init job handles DB migrations, contract registration, and Celery periodic task setup.
Safe UI requires a custom Docker image with `NEXT_PUBLIC_*` variables baked in at build time. Set `ui.image.repository` and `ui.image.tag` in your Helm values.
Safe requires the Singleton Factory (`0x914d7Fec6aaC8cd542e72Bca78B30650d45643d7`) in your genesis `alloc`. The default genesis template includes this.
For detailed Safe setup including contract deployment and chain registration, see the `SAFE.md` guide in the repository.
## Add-On Summary
| Add-On | Ansible Playbook | Helm Chart | Ports |
|--------|-----------------|------------|-------|
| eRPC | `l1/deploy-erpc.yml` | `helm/erpc` | 4000, 4001 |
| Blockscout | `l1/deploy-blockscout.yml` | `helm/blockscout` | 3000, 4000 |
| Faucet | `l1/deploy-faucet.yml` | `helm/faucet` | 8010 |
| The Graph | `l1/deploy-graph-node.yml` | `helm/graph-node` | 8000, 8020, 5001 |
| ICM Relayer | `l1/deploy-icm-relayer.yml` | `helm/icm-relayer` | 8080, 9090 |
| Safe | `l1/deploy-safe.yml` | `helm/safe` | 3000, 8000, 8888 |
| Monitoring | `shared/monitoring.yml` | `helm/monitoring` | 3000, 9090 |
| Staking Key Backup | `primary-network/backup-staking-keys.yml` | `helm/staking-key-backup` | — |
# Deploy an L1 on Kubernetes (/docs/tooling/avalanche-deploy/deploy-l1-kubernetes)
This guide covers deploying an Avalanche L1 on Kubernetes as an alternative to the Terraform + Ansible path. Use this when you already have a Kubernetes cluster or want local development with kind.
**Requirements**: `kubectl`, `helm` v3+, Docker (for kind). **Time to deploy**: ~15 minutes locally, ~30 minutes on a remote cluster (plus sync time).
## Prerequisites
- `kubectl` connected to your cluster
- `helm` v3+
- For local testing: `kind` and Docker
- For L1 creation: funded key in platform-cli keystore
## Helm Charts
| Chart | Path | Purpose |
|-------|------|---------|
| `avalanche-validator` | `helm/avalanche-validator` | L1 validator nodes |
| `avalanche-rpc` | `helm/avalanche-rpc` | L1 RPC nodes |
| `monitoring` | `helm/monitoring` | Prometheus + Grafana |
| `icm-relayer` | `helm/icm-relayer` | Cross-chain messaging |
| `erpc` | `helm/erpc` | RPC load balancer with caching and failover |
| `faucet` | `helm/faucet` | Token faucet for developers |
| `blockscout` | `helm/blockscout` | Block explorer |
| `graph-node` | `helm/graph-node` | The Graph Node for subgraph indexing |
| `safe` | `helm/safe` | Safe multisig infrastructure |
| `staking-key-backup` | `helm/staking-key-backup` | Automated staking key backup CronJob |
## Quick Start with Local Kind Cluster
### Create a Local Cluster
```bash
cd kubernetes
./scripts/create-kind-cluster.sh \
--name=avalanche-l1 \
--image=kindest/node:v1.34.0 \
--workers=1
```
The first run pulls the node image and can take several minutes. If your machine is resource-constrained, start with `--workers=1` and scale up later.
### Deploy L1 Validators and RPC
```bash
helm upgrade --install l1-validators ./helm/avalanche-validator \
-f ./helm/avalanche-validator/values-kind.yaml \
--set network=fuji
helm upgrade --install l1-rpc ./helm/avalanche-rpc \
-f ./helm/avalanche-rpc/values-kind.yaml \
--set network=fuji
```
### Wait for P-Chain Sync
```bash
./scripts/wait-for-sync.sh --release=l1-validators
```
### Create Your L1
```bash
# Import or create a deployer key
platform-cli keys import --name l1-deployer
platform-cli keys default --name l1-deployer
./scripts/create-l1.sh \
--release=l1-validators \
--network=fuji \
--chain-name=mychain \
--output=l1.env \
--key-name=l1-deployer
```
The script collects NodeIDs from validator pods and runs the same P-Chain transactions as the Terraform path: `CreateSubnetTx`, `CreateChainTx`, and `ConvertSubnetToL1Tx`.
### Configure Validators for Your L1
```bash
./scripts/configure-l1.sh --release=l1-validators --env=l1.env
```
### Verify Status
```bash
./scripts/status.sh --release=l1-validators
```
## Deploying on an Existing Cluster
Skip the kind cluster creation step and use the same Helm releases and scripts above. Ensure your cluster has sufficient resources for the validator and RPC pods.
## Accessing RPC
```bash
# L1 RPC service
kubectl port-forward svc/l1-rpc 9650:9650
# Then query
curl -X POST http://localhost:9650/ext/bc//rpc \
-H "Content-Type: application/json" \
-d '{"jsonrpc":"2.0","method":"eth_blockNumber","params":[],"id":1}'
```
## Add-Ons on Kubernetes
All add-on services are available as Helm charts. After your L1 is running:
### Monitoring
```bash
make k8s-monitoring
# Access Grafana
kubectl port-forward svc/monitoring-grafana 3000:3000
# http://localhost:3000 (admin/admin)
```
### eRPC Load Balancer
```bash
source l1.env
make k8s-erpc CHAIN_ID=$CHAIN_ID EVM_CHAIN_ID=99999
```
Auto-discovers RPC upstreams from the `l1-rpc` service. Provides caching, circuit breaking, hedged requests, and failover.
### Faucet
```bash
source l1.env
make k8s-faucet CHAIN_ID=$CHAIN_ID EVM_CHAIN_ID=99999 FAUCET_KEY=0x...
```
### Blockscout Block Explorer
```bash
source l1.env
make k8s-blockscout CHAIN_ID=$CHAIN_ID EVM_CHAIN_ID=99999
# Access frontend
kubectl port-forward svc/blockscout-frontend 3000:3000
```
Deploys the full Blockscout stack: backend indexer, frontend, PostgreSQL, Redis, and optional smart contract verifier.
### The Graph Node
```bash
source l1.env
make k8s-graph-node CHAIN_ID=$CHAIN_ID NETWORK_NAME=my-l1
# Access GraphQL
kubectl port-forward svc/graph-node 8000:8000
```
### ICM Relayer
```bash
source l1.env
make k8s-icm-relayer SUBNET_ID=$SUBNET_ID CHAIN_ID=$CHAIN_ID RELAYER_KEY=0x...
```
The relayer connects to the `l1-rpc` service by default. Override with `--set avalanchego.serviceName=`.
### Safe Multisig
```bash
make k8s-safe EVM_CHAIN_ID=99999 CHAIN_ID=$CHAIN_ID
```
Deploys Config Service, Transaction Service, Client Gateway, PostgreSQL (x2), Redis, and RabbitMQ. An init job handles DB migrations, contract registration, and indexer task setup.
Safe UI requires a custom Docker image with `NEXT_PUBLIC_*` variables baked in at build time. Set `ui.image.repository` and `ui.image.tag` in your Helm values to deploy a pre-built image.
## Operations on Kubernetes
### Health Checks
```bash
make k8s-health-checks # All nodes
make k8s-health-checks CHAIN_ID=$CHAIN_ID # Include L1 chain status
```
Checks pod status, `/ext/health`, P/X/C chain bootstrap, L1 sync, and node version consistency.
### Staking Key Backup
```bash
# Deploy a daily backup CronJob to S3
make k8s-backup-keys BACKUP_BUCKET=my-bucket BACKUP_PROVIDER=s3
```
Supports S3 and GCS. Use IRSA or Workload Identity for credential-free access on managed Kubernetes.
### L1 Reset
```bash
make k8s-reset-l1
```
Scales down pods, cleans chain data (preserves staking keys), removes L1 tracking config, and scales back up.
### ValidatorManager Initialization
```bash
make k8s-init-validator-manager \
SUBNET_ID=$SUBNET_ID CHAIN_ID=$CHAIN_ID \
CONVERSION_TX= PROXY_ADDRESS=0x... EVM_CHAIN_ID=99999
```
Port-forwards to an RPC pod and runs the Go initialization tool.
## Make Wrappers
From the repo root, you can also use `make` targets:
| Command | Description |
|---------|-------------|
| `make k8s-kind` | Create local kind cluster |
| `make k8s-l1-deploy` | Deploy L1 validators + RPC |
| `make k8s-l1-wait` | Wait for P-Chain sync |
| `make k8s-l1-create` | Create L1 chain |
| `make k8s-l1-configure` | Configure validators for L1 |
| `make k8s-l1-status` | Check L1 status |
| `make k8s-monitoring` | Deploy monitoring stack |
| `make k8s-icm-relayer` | Deploy ICM Relayer |
| `make k8s-erpc` | Deploy eRPC load balancer |
| `make k8s-faucet` | Deploy token faucet |
| `make k8s-blockscout` | Deploy Blockscout block explorer |
| `make k8s-graph-node` | Deploy The Graph Node |
| `make k8s-safe` | Deploy Safe multisig infrastructure |
| `make k8s-backup-keys` | Deploy staking key backup CronJob |
| `make k8s-health-checks` | Run comprehensive health checks |
| `make k8s-reset-l1` | Reset L1 for redeployment |
| `make k8s-init-validator-manager` | Initialize ValidatorManager contract |
| `make k8s-cleanup` | Remove releases and optional PVC/kind cleanup |
## Troubleshooting
### Pods Stuck in Pending
```bash
kubectl describe pod
```
If you see `Insufficient cpu` or `does not have a host assigned`, use the kind-specific value files:
```bash
helm upgrade --install l1-validators ./helm/avalanche-validator \
-f ./helm/avalanche-validator/values-kind.yaml --set network=fuji
```
### Node Not Syncing
```bash
kubectl logs -f
```
### Kind Fails with "No Such Container"
This usually means the Docker daemon API is unhealthy. Restart Docker Desktop and retry `./scripts/create-kind-cluster.sh`.
## Cleanup
```bash
cd kubernetes
./scripts/cleanup.sh
```
This removes Helm releases and optionally deletes PVCs and the kind cluster.
## Next Steps
- [Deploy with Terraform + Ansible instead](/docs/tooling/avalanche-deploy/deploy-l1) — Full-featured deployment with archive/pruned RPC split and staking key backup
- [Deploy add-ons](/docs/tooling/avalanche-deploy/add-ons) — Blockscout, faucet, The Graph, ICM Relayer
- [Operations guide](/docs/tooling/avalanche-deploy/operations) — Upgrades, monitoring, health checks
- [Troubleshooting](/docs/tooling/avalanche-deploy/troubleshooting) — Common issues and solutions
# Deploy an L1 with Terraform and Ansible (/docs/tooling/avalanche-deploy/deploy-l1)
This guide walks through deploying a complete Avalanche L1 blockchain on cloud VMs. By the end, you will have a running L1 with validators, archive and pruned RPC nodes, monitoring, and an eRPC load balancer.
**Supported clouds**: AWS (full feature set), GCP, Azure. **Time to deploy**: ~30 minutes (plus sync time). **Cost**: ~$651/month on AWS.
## Architecture
|P2P :9651| V1
PrimaryNetwork <-->|P2P :9651| V2
PrimaryNetwork <-->|P2P :9651| ArchiveRPC
PrimaryNetwork <-->|P2P :9651| PrunedRPC
Users -->|RPC| eRPC
eRPC -->|debug/trace| ArchiveRPC
eRPC -->|eth/net/web3| PrunedRPC
Users -->|Dashboard :3000| Grafana
V1 -.->|metrics| Prometheus
V2 -.->|metrics| Prometheus
ArchiveRPC -.->|metrics| Prometheus
PrunedRPC -.->|metrics| Prometheus
Prometheus -.-> Grafana
`} />
## Infrastructure Sizing (AWS)
| Component | Instance | Disk | Purpose |
|-----------|----------|------|---------|
| Validators (default: 3, production: 5) | c6a.xlarge | 500GB EBS gp3 | Block production, consensus |
| Archive RPC | c6a.xlarge | 1TB EBS gp3 | Full history, debug/trace APIs, block explorer |
| Pruned RPC | c6a.large | 500GB EBS gp3 | State-sync, transaction workloads |
| Monitoring | t3.small | 50GB EBS gp3 | Prometheus, Grafana, eRPC |
### RPC Node Types
| Type | APIs | Pruning | State-Sync | Use Case |
|------|------|---------|------------|----------|
| Archive | Full (incl. `debug_*`, `trace_*`) | Disabled | Disabled | Block explorer, debugging, historical queries |
| Pruned | Standard (`eth`, `net`, `web3`) | Enabled | Enabled | Transaction submission, latest state queries |
GCP and Azure use a single generic `rpc` pool instead of the archive/pruned split. The archive/pruned separation is AWS-only.
## Step-by-Step Deployment
### Configure Cloud Credentials and SSH
```bash
# AWS
export AWS_ACCESS_KEY_ID="your-access-key"
export AWS_SECRET_ACCESS_KEY="your-secret-key"
# Generate an SSH key for node access
ssh-keygen -t rsa -b 4096 -f ~/.ssh/avalanche-deploy -N ""
```
For GCP, authenticate with `gcloud auth application-default login`. For Azure, use `az login`.
### Configure Terraform Variables
```bash
cd terraform/l1/aws # or terraform/l1/gcp, terraform/l1/azure
cp terraform.tfvars.example terraform.tfvars
```
Edit `terraform.tfvars`:
```hcl
name_prefix = "my-l1"
environment = "fuji" # or "mainnet"
validator_count = 5
rpc_archive_count = 1
rpc_pruned_count = 1
ssh_public_key = "ssh-rsa AAAA..."
ssh_private_key_file = "~/.ssh/avalanche-deploy"
enable_staking_key_backup = true
```
### Provision Cloud Infrastructure
```bash
make infra # Runs terraform init && terraform apply
```
This creates all VMs, networking (VPC, subnets, security groups), and storage (S3 bucket for staking keys if enabled). Terraform auto-generates the Ansible inventory at `ansible/inventory/aws_hosts`.
### Deploy AvalancheGo
```bash
make deploy
make status # Wait for "P:OK" on all nodes
```
This runs playbook `l1/deploy-nodes.yml`, which:
- Installs AvalancheGo on all nodes
- Starts syncing with the Primary Network using `partial-sync-primary-network: true` (syncs only P-Chain headers — much faster than a full sync)
- Collects NodeIDs and saves them to `ansible/node_ids.txt`
- Backs up initial staking keys to S3 (if configured)
### Configure Your Genesis
Before creating the L1, prepare your genesis file at `configs/l1/genesis/genesis.json`.
Use the [Genesis Builder](https://build.avax.network/tools/l1-toolbox/create-chain) to generate this visually, or edit the included template.
Key settings:
- **`chainId`** — Unique EVM chain ID ([check availability](https://chainlist.org/))
- **`feeConfig`** — Gas limits and base fees
- **`warpConfig`** — Cross-chain messaging with `quorumNumerator: 67`
- **`alloc`** — Pre-funded addresses and pre-deployed contracts
### Create Your L1
```bash
# Import or create a deployer key
platform-cli keys import --name l1-deployer
platform-cli keys default --name l1-deployer
# Build and run the create-l1 tool
make create-l1
./tools/create-l1/create-l1 \
--network=fuji \
--key-name=l1-deployer \
--validators=$(cd terraform/l1/aws && terraform output -json validator_ips | jq -r 'join(",")') \
--chain-name=mychain \
--output=l1.env
```
The `create-l1` tool executes three P-Chain transactions:
1. **`CreateSubnetTx`** — Creates a new Subnet (returns `SUBNET_ID`)
2. **`CreateChainTx`** — Creates the EVM chain with your genesis (returns `CHAIN_ID`)
3. **`ConvertSubnetToL1Tx`** — Converts the Subnet to an L1, registering all validators with their BLS keys
The output `l1.env` file contains `SUBNET_ID`, `CHAIN_ID`, `CONVERSION_TX`, and `EVM_CHAIN_ID`.
Your deployer key must be funded on the P-Chain. On Fuji, get test AVAX from the [Builder Hub Faucet](https://build.avax.network/tools/faucet) and cross-chain transfer to P-Chain via Core Wallet.
### Configure Nodes for Your L1
```bash
source l1.env
make configure-l1 SUBNET_ID=$SUBNET_ID CHAIN_ID=$CHAIN_ID
make status
```
This runs playbook `l1/configure.yml`, which:
- Adds `track-subnets: ` to each node's config
- Copies the appropriate chain config (archive, pruned, or validator)
- Restarts AvalancheGo on all nodes
- Automatically deploys **eRPC** as a load balancer (auto-detects EVM chain ID from genesis)
Your L1 is now running. Access it at:
| Endpoint | URL | Notes |
|----------|-----|-------|
| eRPC (recommended) | `http://:4000` | Load balanced, cached, automatic failover |
| Direct Archive RPC | `http://:9650/ext/bc//rpc` | Full debug/trace APIs |
| Direct Pruned RPC | `http://:9650/ext/bc//rpc` | Standard APIs only |
| Grafana | `http://:3000` | Default credentials: admin/admin |
## Optional: Initialize ValidatorManager
If your genesis includes a pre-deployed ValidatorManager proxy contract, initialize it to enable on-chain validator management:
```bash
# Install Foundry (if not already installed)
curl -L https://foundry.paradigm.xyz | bash && foundryup
# Set ICM contracts path
export ICM_CONTRACTS_PATH=~/code/icm-contracts
# Initialize
source l1.env
make initialize-validator-manager \
SUBNET_ID=$SUBNET_ID \
CHAIN_ID=$CHAIN_ID \
CONVERSION_TX=$CONVERSION_TX \
PROXY_ADDRESS=0xfacade01... \
EVM_CHAIN_ID=$EVM_CHAIN_ID
```
## Cost Estimate (AWS us-east-1)
| Component | Count | Monthly Estimate |
|-----------|-------|-----------------|
| Validators (c6a.xlarge) | 5 | ~$450 |
| Archive RPC (c6a.xlarge) | 1 | ~$120 |
| Pruned RPC (c6a.large) | 1 | ~$65 |
| Monitoring (t3.small) | 1 | ~$15 |
| S3 + KMS | — | ~$1 |
| **Total** | | **~$651/mo** |
## Next Steps
- [Deploy on Kubernetes instead](/docs/tooling/avalanche-deploy/deploy-l1-kubernetes) — Container-native alternative using Helm charts
- [Deploy add-ons](/docs/tooling/avalanche-deploy/add-ons) — Blockscout, faucet, The Graph, ICM Relayer, Safe multisig
- [Operations guide](/docs/tooling/avalanche-deploy/operations) — Upgrades, monitoring, health checks, backups
- [Troubleshooting](/docs/tooling/avalanche-deploy/troubleshooting) — Common issues and solutions
# Deploy Primary Network on Kubernetes (/docs/tooling/avalanche-deploy/deploy-primary-network-kubernetes)
This guide covers deploying Primary Network validators and RPC nodes on Kubernetes. Use this when you already have a Kubernetes cluster and want a container-native deployment.
**Requirements**: `kubectl`, `helm` v3+, cluster with 500GB+ storage per validator. **Bootstrap time**: 2–4 hours via state-sync.
Advanced operational workflows (staking key backup to S3, database snapshots, zero-downtime validator migration) are only available in the [Terraform + Ansible path](/docs/tooling/avalanche-deploy/deploy-primary-network). The Kubernetes path covers deployment and sync monitoring.
## Prerequisites
- `kubectl` connected to your cluster
- `helm` v3+
- Sufficient cluster resources (Primary Network nodes require significant storage for full P/X/C chain data)
## Helm Charts
| Chart | Path | Purpose |
|-------|------|---------|
| `primary-network-validator` | `helm/primary-network-validator` | Primary Network validators |
| `primary-network-rpc` | `helm/primary-network-rpc` | Primary Network RPC nodes |
| `monitoring` | `helm/monitoring` | Prometheus + Grafana |
## Quick Start
### Deploy Primary Network Validators
```bash
cd kubernetes
helm install primary-validators ./helm/primary-network-validator \
--set primary_validator_replicas=2 \
--set network=fuji
```
### Deploy Primary Network RPC Nodes
```bash
helm install primary-rpc ./helm/primary-network-rpc \
--set primary_rpc_replicas=2 \
--set network=fuji
```
### Wait for Sync
```bash
./scripts/wait-for-sync.sh --release=primary-validators
```
All three chains (P, X, C) must complete bootstrapping. This typically takes 2-4 hours via state-sync.
### Verify Status
```bash
./scripts/status.sh --release=primary-validators
```
### Register Your Validator
After sync completes, register your validator on the P-Chain using [Core Wallet](https://core.app/) or the Avalanche CLI. You need the NodeID displayed by the status script.
Staking requirements:
- **Fuji testnet**: 1 AVAX minimum
- **Mainnet**: 2,000 AVAX minimum
## Accessing RPC
```bash
# Primary Network RPC
kubectl port-forward svc/primary-rpc 9650:9650
# Query C-Chain
curl -X POST http://localhost:9650/ext/bc/C/rpc \
-H "Content-Type: application/json" \
-d '{"jsonrpc":"2.0","method":"eth_blockNumber","params":[],"id":1}'
```
## Monitoring
```bash
helm install monitoring ./helm/monitoring
kubectl port-forward svc/monitoring-grafana 3000:3000
# http://localhost:3000 (admin/admin)
```
## Make Wrappers
From the repo root:
| Command | Description |
|---------|-------------|
| `make k8s-primary-deploy` | Deploy Primary Network validators + RPC |
| `make k8s-primary-wait` | Wait for chain sync |
| `make k8s-primary-status` | Check Primary Network status |
| `make k8s-monitoring` | Deploy monitoring stack |
| `make k8s-cleanup` | Remove releases and optional PVC cleanup |
## Troubleshooting
### Insufficient Storage
Primary Network nodes require significant disk space for full chain data. Ensure your PersistentVolumeClaims have adequate storage provisioned. For mainnet, plan for at least 500GB per validator.
### Pods Stuck in Pending
```bash
kubectl describe pod
```
Check for resource constraints (`Insufficient cpu`, `Insufficient memory`) and adjust replica counts or node pool sizes.
### Node Not Syncing
```bash
kubectl logs -f
```
Verify the pod can reach the Avalanche P2P network on port 9651. Check that your cluster's network policies and load balancer allow inbound/outbound traffic on this port.
## Cleanup
```bash
cd kubernetes
./scripts/cleanup.sh
```
## Next Steps
- [Deploy with Terraform + Ansible instead](/docs/tooling/avalanche-deploy/deploy-primary-network) — Full-featured deployment with staking key backup, snapshots, and zero-downtime migration
- [Operations guide](/docs/tooling/avalanche-deploy/operations) — Upgrades, monitoring, health checks
- [Troubleshooting](/docs/tooling/avalanche-deploy/troubleshooting) — Common issues and solutions
# Deploy Primary Network with Terraform and Ansible (/docs/tooling/avalanche-deploy/deploy-primary-network)
This guide covers deploying and operating Avalanche Primary Network validators — the nodes that validate the P-Chain, X-Chain, and C-Chain. These validators participate in Avalanche consensus and earn staking rewards.
**AWS only**. **Staking minimum**: 2,000 AVAX (mainnet), 1 AVAX (Fuji). **Bootstrap time**: 2–4 hours via state-sync. **Cost**: ~$292/month per validator.
Primary Network workflows are currently supported on **AWS only**. The instances require high-performance NVMe storage for the full chain database.
## Architecture
|P2P :9651| PV1
PrimaryNetwork <-->|P2P :9651| PV2
Operator -->|SSH / API| PV1
Operator -->|Dashboard :3000| Grafana
PV1 -.->|backup| S3
PV2 -.->|backup| S3
PV1 -.->|snapshot| Snapshots
PV1 -.->|metrics| Prometheus
PV2 -.->|metrics| Prometheus
Prometheus -.-> Grafana
`} />
## Key Differences from L1 Deployment
| Aspect | L1 Deployment | Primary Network |
|--------|---------------|-----------------|
| Chain sync | Partial P-Chain headers only | Full P/X/C chain data |
| Instance type | c6a.xlarge (general compute) | i7i.xlarge (NVMe-optimized) |
| Storage | EBS gp3 volumes | 937GB local NVMe |
| Bootstrap time | Minutes (partial sync) | 2–4 hours (state-sync) |
| Cloud support | AWS, GCP, Azure | AWS only |
| Staking key backup | Optional | Strongly recommended |
## Quick Start
### Provision Infrastructure
```bash
make primary-infra CLOUD=aws
```
This uses a **separate Terraform state** from the L1 deployment (`terraform/primary-network/aws/`), creating i7i.xlarge instances with 937GB NVMe drives.
Edit `terraform/primary-network/aws/terraform.tfvars` before running:
```hcl
primary_validator_count = 2
enable_staking_key_backup = true
ssh_public_key = "ssh-rsa AAAA..."
ssh_private_key_file = "~/.ssh/avalanche-deploy"
```
### Deploy Validators
```bash
make primary-deploy CLOUD=aws NETWORK=fuji # or mainnet
```
This runs playbook `primary-network/deploy.yml`, which:
1. Installs AvalancheGo with Primary Network configuration
2. Enables state-sync for fast initial bootstrap
3. Waits for P/X/C chain bootstrap to complete (polls for up to 90 minutes)
4. Backs up staking keys to S3 with KMS encryption
5. Creates an initial database snapshot and uploads it to S3
### Monitor Sync Progress
```bash
make primary-status CLOUD=aws
```
Bootstrap typically takes 2–4 hours via state-sync. All three chains (P, X, C) must report `isBootstrapped: true` before proceeding.
### Register Your Validator on the P-Chain
Validator registration requires staking AVAX on the P-Chain:
- **Fuji testnet**: 1 AVAX minimum
- **Mainnet**: 2,000 AVAX minimum
Register using [Core Wallet](https://core.app/) or the Avalanche CLI. You will need your validator's NodeID, which is displayed by `make primary-status`.
### Back Up Staking Keys
```bash
make backup-keys CLOUD=aws
```
Staking keys are uploaded to S3 with KMS encryption. The validator instances have an IAM role that grants access to the backup bucket — no manual credential configuration required.
## Staking Key Management
Staking keys are the cryptographic identity of your validator. Losing them means losing your NodeID and any associated staking position.
```bash
# Backup all validator keys to S3
make backup-keys CLOUD=aws
# Restore keys to a specific node
make restore-keys CLOUD=aws SOURCE=primary-validator-1 TARGET_IP=10.0.1.50
# List existing backups
aws s3 ls s3://$(terraform -chdir=terraform/primary-network/aws output -raw staking_keys_bucket)/
```
Always back up staking keys immediately after deployment and after any key rotation. Keys are encrypted with KMS — they cannot be read even if the S3 bucket is compromised without KMS access.
## Database Snapshots
Create lz4-compressed snapshots of synced nodes for faster bootstrapping of new nodes. A pruned mainnet snapshot is approximately 400GB and restores in minutes compared to hours for state-sync.
```bash
# Create a snapshot from a synced validator
make create-snapshot CLOUD=aws NODE=primary-validator-1
# Create with a custom name
make create-snapshot CLOUD=aws NODE=primary-validator-1 NAME=mainnet-2025-02
# List available snapshots
make list-snapshots CLOUD=aws
# Restore a snapshot to a node
make restore-snapshot CLOUD=aws TARGET=migration-target
make restore-snapshot CLOUD=aws TARGET=migration-target SNAPSHOT=mainnet-2025-02
```
Snapshots are stored in S3 with KMS encryption and SHA256 checksums for integrity verification.
## Validator Migration
Migrate a validator to a new instance with approximately 30 seconds of downtime. This is useful for hardware upgrades, instance type changes, or region moves.
>Network: Validating (active)
Note over New: Phase 1 Sync new node
New->>Network: State-sync or restore from snapshot
Note over Old,S3: Phase 2 Backup keys
Old->>S3: Upload staking keys KMS encrypted
Note over New,S3: Phase 3 Prepare migration
New->>S3: Download staking keys
New-->>New: Stop AvalancheGo
Note over Old,New: Phase 4 Execute about 30s downtime
Old-->>Old: Stop AvalancheGo
New-->>New: Start with staking keys
New->>Network: Validating same NodeID
`} />
### Migration Steps
```bash
# 1. Prepare the new node (choose one):
# Option A: From snapshot (faster — minutes)
make prepare-migration CLOUD=aws NODE=migration-target SNAPSHOT=true
# Option B: From state-sync (slower — hours)
make prepare-migration CLOUD=aws NODE=migration-target
# 2. Wait for the new node to fully sync
./scripts/primary-network/check-sync.sh
# 3. Execute migration (~30s downtime)
make migrate-validator CLOUD=aws SOURCE=primary-validator-1 TARGET=migration-target
```
## Cost Estimate (AWS us-east-1)
| Component | Instance | Storage | Monthly Estimate |
|-----------|----------|---------|-----------------|
| Primary Validator | i7i.xlarge | 937GB NVMe (included) | ~$276 |
| S3 + KMS (keys + snapshots) | — | ~1GB | ~$1 |
| Monitoring | t3.small | 50GB EBS | ~$15 |
| **Per validator total** | | | **~$292/mo** |
## Terraform Configuration Reference
Edit `terraform/primary-network/aws/terraform.tfvars`:
| Variable | Default | Description |
|----------|---------|-------------|
| `primary_validator_count` | 1 | Number of Primary Network validators |
| `enable_staking_key_backup` | true | Enable S3 backup with KMS encryption |
| `ssh_public_key` | — | SSH public key for node access |
| `ssh_private_key_file` | — | Path to SSH private key |
Node runtime configuration is at `configs/primary-network/node/primary-validator-node-config.json`, which includes `state-sync-enabled: true` and `state-sync-min-blocks: 100000` for faster initial bootstrap.
## Next Steps
- [Operations guide](/docs/tooling/avalanche-deploy/operations) — Rolling upgrades, monitoring, health checks
- [Troubleshooting](/docs/tooling/avalanche-deploy/troubleshooting) — Common issues and solutions
# Avalanche Deploy (/docs/tooling/avalanche-deploy)
[`avalanche-deploy`](https://github.com/ava-labs/avalanche-deploy) is an Infrastructure as Code toolkit that automates provisioning, deployment, and operations for Avalanche nodes. It supports both **L1 blockchains** and **Primary Network validators** across AWS, GCP, Azure, and Kubernetes.
## L1 Deployment
Launch your own EVM blockchain with validators, RPC nodes, monitoring, and optional add-ons.
## Primary Network Validators
Operate production validators for the P-Chain, X-Chain, and C-Chain. Earn staking rewards.
## Which Method Should I Use?
| | Terraform + Ansible | Kubernetes |
|---|---|---|
| **Best for** | Production with full ops tooling | Existing clusters or local dev |
| **Cloud support** | AWS, GCP, Azure | Any cluster |
| **Staking key backup** | S3 + KMS | Manual |
| **DB snapshots and migration** | Built-in | Manual |
| **Local development** | No | Yes (kind) |
| **Add-ons** (Blockscout, faucet, etc.) | Yes | Yes |
**Not sure?** Start with **Terraform + Ansible on AWS** for the most complete experience. Use **Kubernetes** if you already have a cluster or want to test locally with kind.
## Operations and Troubleshooting
# Operations and Maintenance (/docs/tooling/avalanche-deploy/operations)
This guide covers ongoing operations for infrastructure deployed with `avalanche-deploy`. Commands are available for both **Terraform + Ansible** and **Kubernetes** deployment paths.
## Health Checks
Run comprehensive health checks across all nodes:
```bash
# Basic health checks
make health-checks
# Include L1 chain status
make health-checks CHAIN_ID=$CHAIN_ID
```
```bash
# Basic health checks
make k8s-health-checks
# Include L1 chain status
make k8s-health-checks CHAIN_ID=$CHAIN_ID
```
Health checks verify:
- AvalancheGo service/pod status
- NodeID and version consistency
- P-Chain, X-Chain, and C-Chain bootstrap status
- L1 block number (if `CHAIN_ID` is provided)
## Monitoring
### Deploy Prometheus and Grafana
```bash
make monitoring
```
**Access Grafana**: `http://:3000` (default credentials: `admin`/`admin`)
### Pre-Built Dashboards
| Dashboard | Metrics |
|-----------|---------|
| Avalanche L1 | Block height, transaction throughput, validator status |
| L1 EVM | Gas usage, contract calls, pending transactions |
| P-Chain | Staking metrics, validator set changes |
| System Health | CPU, memory, disk, network for all nodes |
Prometheus is pre-configured to scrape both AvalancheGo metrics and node_exporter system metrics from all hosts.
## Viewing Logs
```bash
# View logs from all nodes
make logs
```
Or SSH directly to inspect a specific node:
```bash
ssh -i ~/.ssh/avalanche-deploy ubuntu@ \
"sudo journalctl -u avalanchego -f --no-pager -n 100"
```
## Rolling Restart
Restart all nodes one at a time with health checks between each restart. This ensures zero downtime:
```bash
make rolling-restart
```
The playbook:
1. Stops AvalancheGo on one node
2. Starts AvalancheGo
3. Waits for the node to report healthy
4. Moves to the next node
## Upgrading AvalancheGo
Perform a zero-downtime rolling upgrade to a new AvalancheGo version:
```bash
make upgrade VERSION=1.14.1
```
Subnet-EVM is bundled with AvalancheGo v1.12.0+ and updates automatically with each AvalancheGo upgrade. No separate plugin management is needed.
The upgrade playbook follows the same rolling pattern as restarts: one node at a time with health checks between each upgrade.
## Staking Key Backup and Restore
### Backup
```bash
# Backup all validator keys to S3 (KMS encrypted)
make backup-keys CLOUD=aws
```
Keys are encrypted with AWS KMS. Validator instances access the S3 bucket via IAM role — no credentials stored on disk.
```bash
# Deploy a daily backup CronJob
make k8s-backup-keys BACKUP_BUCKET=my-bucket BACKUP_PROVIDER=s3
```
Supports S3 and GCS. Use IRSA (AWS) or Workload Identity (GCP) for credential-free access on managed Kubernetes.
### Restore
```bash
# Restore keys from one node to another
make restore-keys CLOUD=aws SOURCE=primary-validator-1 TARGET_IP=10.0.1.50
```
### List Backups
```bash
aws s3 ls s3://$(terraform -chdir=terraform/primary-network/aws output -raw staking_keys_bucket)/
```
## Database Snapshots
Create lz4-compressed snapshots of node databases for fast bootstrapping:
```bash
# Create a snapshot
make create-snapshot CLOUD=aws NODE=primary-validator-1
# Create with custom name
make create-snapshot CLOUD=aws NODE=primary-validator-1 NAME=mainnet-2025-02
# List snapshots
make list-snapshots CLOUD=aws
# Restore a snapshot
make restore-snapshot CLOUD=aws TARGET=migration-target
```
Snapshots include SHA256 checksums for integrity verification. Enable integrity checking with:
```bash
cd ansible && ansible-playbook -i inventory/aws_hosts playbooks/primary-network/restore-snapshot.yml \
--limit migration-target \
-e verify_integrity=true
```
Verified restore mode requires approximately 3x the snapshot size in free disk space (download + extract + verify).
## Reset L1 Chain Data
Wipe L1 chain data on all nodes for redeployment. This preserves staking keys and Primary Network data:
```bash
make reset-l1
```
```bash
make k8s-reset-l1
```
Scales down pods, cleans chain data from PVCs (preserves staking keys), removes L1 tracking config, and scales back up.
## Tear Down Infrastructure
Permanently destroy all cloud resources:
```bash
# Destroy L1 infrastructure
make destroy
# Destroy Primary Network infrastructure
make primary-destroy CLOUD=aws
```
This permanently deletes all VMs, disks, and networking. Staking keys previously backed up to S3 are preserved, but node databases are permanently lost.
## Command Reference
### L1 Operations
| Command | Description |
|---------|-------------|
| `make status` | Check node sync status |
| `make health-checks` | Run comprehensive health checks |
| `make logs` | View node logs |
| `make rolling-restart` | Zero-downtime rolling restart |
| `make upgrade VERSION=x.y.z` | Rolling AvalancheGo upgrade |
| `make monitoring` | Deploy Prometheus + Grafana |
| `make reset-l1` | Wipe L1 chain data (keeps keys) |
| `make destroy` | Tear down all infrastructure |
### Primary Network Operations
| Command | Description |
|---------|-------------|
| `make primary-status CLOUD=aws` | Check Primary Network node status |
| `make backup-keys CLOUD=aws` | Backup staking keys to S3 |
| `make restore-keys CLOUD=aws SOURCE=... TARGET_IP=...` | Restore staking keys |
| `make create-snapshot CLOUD=aws NODE=...` | Create database snapshot |
| `make restore-snapshot CLOUD=aws TARGET=...` | Restore database snapshot |
| `make list-snapshots CLOUD=aws` | List available S3 snapshots |
| `make prepare-migration CLOUD=aws NODE=...` | Prepare node for migration |
| `make migrate-validator CLOUD=aws SOURCE=... TARGET=...` | Execute validator migration |
| `make primary-destroy CLOUD=aws` | Tear down Primary Network infra |
### Kubernetes Operations
| Command | Description |
|---------|-------------|
| `make k8s-health-checks` | Run comprehensive health checks |
| `make k8s-backup-keys BACKUP_BUCKET=...` | Deploy staking key backup CronJob |
| `make k8s-reset-l1` | Wipe L1 chain data (keeps keys) |
| `make k8s-init-validator-manager` | Initialize ValidatorManager contract |
| `make k8s-erpc` | Deploy eRPC load balancer |
| `make k8s-faucet` | Deploy token faucet |
| `make k8s-blockscout` | Deploy Blockscout block explorer |
| `make k8s-graph-node` | Deploy The Graph Node |
| `make k8s-safe` | Deploy Safe multisig infrastructure |
| `make k8s-monitoring` | Deploy Prometheus + Grafana |
| `make k8s-icm-relayer` | Deploy ICM Relayer |
| `make k8s-cleanup` | Remove all Helm releases |
# Troubleshooting (/docs/tooling/avalanche-deploy/troubleshooting)
## Connection Issues
### Ansible Cannot Connect to Nodes
**Symptom**: SSH connection timeouts or permission denied errors.
**Solutions**:
1. Verify the SSH key path in `ansible/inventory/_hosts` matches your key
2. Check that your security group allows SSH (port 22) from your current IP
3. Confirm the instance is running: `make status`
```bash
# Test SSH manually
ssh -i ~/.ssh/avalanche-deploy ubuntu@
```
Terraform auto-detects your operator IP for firewall rules. If your IP changes (VPN, new network), re-run `make infra` to update security groups.
### Nodes Not Syncing
**Symptom**: P-Chain stays at `NOT_BOOTSTRAPPED`.
**Solutions**:
1. Check node logs for errors: `make logs`
2. Verify the P2P port (9651) is open in your security group
3. Ensure nodes can reach Primary Network bootstrap nodes
```bash
# Check node health
ssh ubuntu@ "curl -s localhost:9650/ext/health"
```
## L1 Creation Issues
### "Insufficient Funds"
**Symptom**: The `create-l1` tool fails with an insufficient funds error.
**Solution**: Fund your P-Chain address:
1. Get test AVAX from the [Builder Hub Faucet](https://build.avax.network/tools/faucet)
2. Use Core Wallet to cross-chain transfer from C-Chain to P-Chain
### "Illegal Name Character"
**Symptom**: Chain creation fails with an illegal name character error.
**Solution**: Chain names must be alphanumeric only — no hyphens, underscores, or special characters:
```bash
# Incorrect
--chain-name=my-chain
# Correct
--chain-name=mychain
```
## RPC Access Issues
### Cannot Reach RPC Endpoint
**Symptom**: Connection refused when accessing RPC on port 9650.
**Explanation**: Validators do not expose port 9650 publicly for security. Only RPC nodes have this port open.
**Solutions**:
1. Use RPC node IPs (not validator IPs)
2. Use the eRPC load balancer at `http://:4000`
3. For development, use an SSH tunnel:
```bash
ssh -i ~/.ssh/avalanche-deploy -L 9650:localhost:9650 ubuntu@
```
## Genesis Configuration
### "Warp Cannot Be Activated Before Durango"
**Symptom**: Chain fails to start with a warp activation error.
**Solution**: Ensure your genesis file includes the Durango timestamp:
```json
{
"config": {
"durangoTimestamp": 0
}
}
```
## Snapshot Issues
### Checksum Verification Failed
**Symptom**: Snapshot restore fails checksum verification.
**Solutions**:
1. Re-download the snapshot (may have been corrupted in transit)
2. Try a different snapshot: `make list-snapshots CLOUD=aws`
3. Skip verification if needed (not recommended): remove `-e verify_integrity=true`
### Insufficient Disk Space
**Symptom**: Not enough space during snapshot creation or restore.
**Solutions**:
1. Use a larger instance type with more storage
2. Clean up temporary files: `sudo rm -rf /tmp/snapshot*`
3. For verified restore mode, ensure 3x the snapshot size is available (download + extract + verify)
## Migration Issues
### Target Node Not Fully Synced
**Symptom**: Migration fails with a sync check error.
**Solution**: Wait for all chains to complete syncing before migrating:
```bash
./scripts/primary-network/check-sync.sh
```
All chains (P, X, C) must report `SYNCED`.
### Both Validators Appear Active After Migration
**Symptom**: Both old and new validators show as active briefly after migration.
**Explanation**: This is expected. The old validator becomes inactive after missing its next validation slot. Verify the migration was successful:
```bash
curl -s http://:9650/ext/info -X POST \
-H "Content-Type: application/json" \
-d '{"jsonrpc":"2.0","id":1,"method":"info.getNodeID"}' | jq .result.nodeID
```
The NodeID should match the original validator.
## Add-On Issues
### Blockscout Not Indexing
**Symptom**: Block explorer shows no transactions.
**Solutions**:
1. Wait for initial indexing to complete (can take hours for large chains)
2. Check logs: `docker logs -f blockscout-backend` on the RPC node
3. Verify the RPC connection in the Blockscout configuration
### Faucet Not Dispensing
**Symptom**: Faucet returns an error or shows 0 balance.
**Solutions**:
1. Verify the faucet wallet is funded on your L1 chain
2. Check logs: `docker logs -f faucet`
3. Confirm the chain ID matches your L1's EVM chain ID
4. Access the faucet on port `8010` (not the default RPC port)
### eRPC Returning 502/503 Errors
**Symptom**: Load balancer returns 502 or 503 errors.
**Solutions**:
1. Verify upstream RPC nodes are healthy: `make health-checks`
2. Check eRPC configuration: `cat /etc/erpc/erpc.yaml` on the monitoring host
3. Check eRPC logs: `docker logs -f erpc`
## Getting Help
- Run health checks: `make health-checks`
- Check node logs: `make logs`
- Review the [Avalanche Discord](https://discord.gg/avalanche) for community support
- [Open an issue](https://github.com/ava-labs/avalanche-deploy/issues) on the repository
# Data Visualization (/docs/tooling/avalanche-postman/data-visualization)
Data visualization is available for a number of API calls whose responses are transformed and presented in tabular format for easy reference.
Please check out [Installing Postman Collection](/docs/tooling/avalanche-postman/index) and [Making API Calls](/docs/tooling/avalanche-postman/making-api-calls) beforehand, as this guide assumes that the user has already gone through these steps.
Data visualizations are available for following API calls:
### C-Chain[](#c-chain "Direct link to heading")
- [`eth_baseFee`](/docs/rpcs/c-chain#eth_basefee)
- [`eth_blockNumber`](https://www.quicknode.com/docs/ethereum/eth_blockNumber)
- [`eth_chainId`](https://www.quicknode.com/docs/ethereum/eth_chainId)
- [`eth_getBalance`](https://www.quicknode.com/docs/ethereum/eth_getBalance)
- [`eth_getBlockByHash`](https://www.quicknode.com/docs/ethereum/eth_getBlockByHash)
- [`eth_getBlockByNumber`](https://www.quicknode.com/docs/ethereum/eth_getBlockByNumber)
- [`eth_getTransactionByHash`](https://www.quicknode.com/docs/ethereum/eth_getTransactionByHash)
- [`eth_getTransactionReceipt`](https://www.quicknode.com/docs/ethereum/eth_getTransactionReceipt)
- [`avax.getAtomicTx`](/docs/rpcs/c-chain#avaxgetatomictx)
### P-Chain[](#p-chain "Direct link to heading")
- [`platform.getCurrentValidators`](/docs/rpcs/p-chain#platformgetcurrentvalidators)
### X-Chain[](#x-chain "Direct link to heading")
- [`avm.getAssetDescription`](/docs/rpcs/x-chain#avmgetassetdescription)
- [`avm.getBlock`](/docs/rpcs/x-chain#avmgetblock)
- [`avm.getBlockByHeight`](/docs/rpcs/x-chain#avmgetblockbyheight)
- [`avm.getTx`](/docs/rpcs/x-chain#avmgettx)
Data Visualization Features[](#data-visualization-features "Direct link to heading")
-------------------------------------------------------------------------------------
- The response output is displayed in tabular format, each data category having a different color.

- Unix timestamps are converted to date and time.

- Hexadecimal to decimal conversions.

- Native token amounts shown as AVAX and/or gwei and wei.

- The name of the transaction type added besides the transaction type ID.

- Percentages added for the amount of gas used. This percent represents what percentage of gas was used our of the `gasLimit`.

- Convert the output for atomic transactions from hexadecimal to user readable.
Please note that this only works for C-Chain Mainnet, not Fuji.

How to Visualize Responses[](#how-to-visualize-responses "Direct link to heading")
-----------------------------------------------------------------------------------
1. After [installing Postman](/docs/tooling/avalanche-postman#postman-installation) and importing the [Avalanche collection](/docs/tooling/avalanche-postman#collection-import), choose an API to make the call.
2. Make the call.
3. Click on the **Visualize** tab.
4. Now all data from the output is displayed in tabular format.
 
Examples[](#examples "Direct link to heading")
-----------------------------------------------
### `eth_getTransactionByHash`[](#eth_gettransactionbyhash "Direct link to heading")
### `avm.getBlock`[](#avmgetblock "Direct link to heading")
### `platform.getCurrentValidators`[](#platformgetcurrentvalidators "Direct link to heading")
### `avax.getAtomicTx`[](#avaxgetatomictx "Direct link to heading")
### `eth_getBalance`[](#eth_getbalance "Direct link to heading")
# Installing Postman Collection (/docs/tooling/avalanche-postman)
We have made a Postman collection for Avalanche, that includes all the public API calls that are available on an [AvalancheGo instance](https://github.com/ava-labs/avalanchego/releases/), including environment variables, allowing developers to quickly issue commands to a node and see the response, without having to copy and paste long and complicated `curl` commands.
[Link to GitHub](https://github.com/ava-labs/avalanche-postman-collection/)
What Is Postman?[](#what-is-postman "Direct link to heading")
--------------------------------------------------------------
Postman is a free tool used by developers to quickly and easily send REST, SOAP, and GraphQL requests and test APIs. It is available as both an online tool and an application for Linux, MacOS and Windows. Postman allows you to quickly issue API calls and see the responses in a nicely formatted, searchable form.
Along with the API collection, there is also the example Avalanche environment for Postman, that defines common variables such as IP address of the node, Avalanche addresses and similar common elements of the queries, so you don't have to enter them multiple times.
Combined, they will allow you to easily keep tabs on an Avalanche node, check on its state and do quick queries to find out details about its operation.
Setup[](#setup "Direct link to heading")
-----------------------------------------
### Postman Installation[](#postman-installation "Direct link to heading")
Postman can be installed locally or used as a web app. We recommend installing the application, as it simplifies operation. You can download Postman from its [website](https://www.postman.com/downloads/). It is recommended that you sign up using your email address as then your workspace can be easily backed up and shared between the web app and the app installed on your computer.

When you run Postman for the first time, it will prompt you to create an account or log in. Again, it is not necessary, but recommended.
### Collection Import[](#collection-import "Direct link to heading")
Select `Create workspace` from Workspaces tab and follow the prompts to create a new workspace. This will be where the rest of the work will be done.

We're ready to import the collection. On the top-left corner of the Workspaces tab select `Import` and switch to `Link` tab.

There, in the URL input field paste the link below to the collection:
```bash
https://raw.githubusercontent.com/ava-labs/avalanche-postman-collection/master/Avalanche.postman_collection.json
```
Postman will recognize the format of the file content and offer to import the file as a collection. Complete the import. Now you will have Avalanche collection in your Workspace.

### Environment Import[](#environment-import "Direct link to heading")
Next, we have to import the environment variables. Again, on the top-left corner of the Workspaces tab select `Import` and switch to `Link` tab. This time, paste the link below to the environment JSON:
```bash
https://raw.githubusercontent.com/ava-labs/avalanche-postman-collection/master/Example-Avalanche-Environment.postman_environment.json
```
Postman will recognize the format of the file:

Import it to your workspace. Now, we will need to edit that environment to suit the actual parameters of your particular installation. These are the parameters that differ from the defaults in the imported file.
Select the Environments tab, choose the Avalanche environment which was just added. You can directly edit any values here:

As a minimum, you will need to change the IP address of your node, which is the value of the `host` variable. Change it to the IP of your node (change both the `initial` and `current` values). Also, if your node is not running on the same machine where you installed Postman, make sure your node is accepting the connections on the API port from the outside by checking the appropriate [command line option](/docs/nodes/configure/configs-flags#http-server).
Now we sorted everything out, and we're ready to query the node.
Conclusion[](#conclusion "Direct link to heading")
---------------------------------------------------
If you have completed the tutorial, you are now able to quickly [issue API calls](/docs/tooling/avalanche-postman/making-api-calls) to your node without messing with the curl commands in the terminal. This allows you to quickly see the state of your node, track changes or double-check the health or liveness of your node.
Contributing[](#contributing "Direct link to heading")
-------------------------------------------------------
We're hoping to continuously keep this collection up-to-date with the [Avalanche APIs](/docs/rpcs/p-chain). If you're able to help improve the Avalanche Postman Collection in any way, first create a feature branch by branching off of `master`, next make the improvements on your feature branch and lastly create a [pull request](https://github.com/ava-labs/builders-hub/pulls) to merge your work back in to `master`.
If you have any other questions or suggestions, come [talk to us](https://chat.avalabs.org/).
# Making API Calls (/docs/tooling/avalanche-postman/making-api-calls)
After [installing Postman Collection](/docs/tooling/avalanche-postman/index) and importing the [Avalanche collection](/docs/tooling/avalanche-postman/index#collection-import), you can choose an API to make the call.
You should also make sure the URL is the correct one for the call. This URL consists of the base URL and the endpoint:
- The base URL is set by an environment variable called `baseURL`, and it is by default Avalanche's [public API](/docs/rpcs#mainnet-rpc---public-api-server). If you need to make a local API call, simply change the URL to localhost. This can be done by changing the value of the `baseURL` variable or changing the URL directly on the call tab. Check out the [RPC providers](/docs/rpcs) to see all public URLs.
- The API endpoint depends on which API is used. Please check out [our APIs](/docs/rpcs/c-chain) to find the proper endpoint.
The last step is to add the needed parameters for the call. For example, if a user wants to fetch data about a certain transaction, the transaction hash is needed. For fetching data about a block, depending on the call used, the block hash or number will be required.
After clicking the **Send** button, if the call is successfully, the output will be displayed in the **Body** tab.
Data visualization is available for a number of methods. Learn how to use it with the help of [this](/docs/tooling/avalanche-postman/data-visualization) guide.

Examples[](#examples "Direct link to heading")
-----------------------------------------------
### C-Chain Public API Call[](#c-chain-public-api-call "Direct link to heading")
Fetching data about a C-Chain transaction using `eth_getTransactionByHash`.
### X-Chain Public API Call[](#x-chain-public-api-call "Direct link to heading")
Fetching data about an X-Chain block using `avm.getBlock`.
### P-Chain Public API Call[](#p-chain-public-api-call "Direct link to heading")
Getting the current P-Chain height using `platform.getHeight`.
### API Call Using Variables[](#api-call-using-variables "Direct link to heading")
Let's say we want fetch data about this `0x20cb0c03dbbe39e934c7bb04979e3073cc2c93defa30feec41198fde8fabc9b8` C-Chain transaction using both:
- `eth_getTransactionReceipt`
- `eth_getTransactionByHash`
We can set up an environment variable with the transaction hash as value and use it on both calls.
Find out more about variables [here](/docs/tooling/avalanche-postman/variables).
# Variable Types (/docs/tooling/avalanche-postman/variables)
Variables at different scopes are supported by Postman, as it follows:
- **Global variables**: A global variable can be used with every collection. Basically, it allows user to access data between collections.
- **Collection variables**: They are available for a certain collection and are independent of an environment.
- **Environment variables**: An environment allows you to use a set of variables, which are called environment variables. Every collection can use an environment at a time, but the same environment can be used with multiple collections. This type of variables make the most sense to use with the Avalanche Postman collection, therefore an environment file with preset variables is provided
- **Data variables**: Provided by external CSV and JSON files.
- **Local variables**: Temporary variables that can be used in a script. For example, the returned block number from querying a transaction can be a local variable. It exists only for that request, and it will change when fetching data for another transaction hash.

There are two types of variables:
- **Default type**: Every variable is automatically assigned this type when created.
- **Secret type**: Masks variable's value. It is used to store sensitive data.
Only default variables are used in the Avalanche Environment file. To learn more about using the secret type of variables, please checkout the [Postman documentation](https://learning.postman.com/docs/sending-requests/variables/#variable-types).
The [environment variables](/docs/tooling/avalanche-postman/index#environment-import) can be used to ease the process of making an API call. A variable contains the preset value of an API parameter, therefore it can be used in multiple places without having to add the value manually.
How to Use Variables[](#how-to-use-variables "Direct link to heading")
-----------------------------------------------------------------------
Let's say we want to use both `eth_getTransactionByHash` and `eth_getTransctionReceipt` for a transaction with the following hash: `0x631dc45342a47d360915ea0d193fc317777f8061fe57b4a3e790e49d26960202`. We can set a variable which contains the transaction hash, and then use it on both API calls. Then, when wanting to fetch data about another transaction, the variable can be updated and the new transaction hash will be used again on both calls.
Below are examples on how to set the transaction hash as variable of each scope.
### Set a Global Variable[](#set-a-global-variable "Direct link to heading")
Go to Environments

Select Globals

Click on the Add a new variable area

Add the variable name and value. Make sure to use quotes.

Click Save

Now it can be used on any call from any collection
### Set a Collection Variable[](#set-a-collection-variable "Direct link to heading")
Click on the three dots next to the Avalanche collection and select Edit

Go to the Variables tab

Click on the Add a new variable area

Add the variable name and value. Make sure to use quotes.

Click Save

Now it can be used on any call from this collection
### Set an Environment Variable[](#set-an-environment-variable "Direct link to heading")
Go to Environments

Select an environment. In this case, it is Example-Avalanche-Environment.

Scroll down until you find the Add a new variable area and click on it.

Add the variable name and value. Make sure to use quotes.

Click Save.

The variable is available now for any call collection that uses this environment.
### Set a Data Variable[](#set-a-data-variable "Direct link to heading")
Please check out [this guide](https://www.softwaretestinghelp.com/postman-variables/#5_Data) and [this video](https://www.youtube.com/watch?v=9wl_UQtRLw4) on how to use data variables.
### Set a Local Variable[](#set-a-local-variable "Direct link to heading")
Please check out [this guide](https://www.softwaretestinghelp.com/postman-variables/#4_Local) and [this video](https://www.youtube.com/watch?v=gOF7Oc0sXmE) on how to use local variables.
# Overview (/docs/tooling/avalanche-sdk)
The **Avalanche SDK for TypeScript** is a modular suite of tools designed for building powerful applications on the Avalanche ecosystem. Whether you're building DeFi applications, NFT platforms, or cross-chain bridges, our SDKs provide everything you need.
### Core Capabilities
* **Direct Chain Access** - RPC calls, wallet integration, and transaction management.
* **Indexed Data & Metrics** - Access Glacier Data API & Metrics API with type safety.
* **Interchain Messaging** - Build cross-L1 applications with ICM/Teleporter.
**Developer Preview**: This suite of SDKs is currently in beta and is subject to change. Use in production at your own risk.
We'd love to hear about your experience! **Please share your feedback here.**
Check out the code, contribute, or report issues. The Avalanche SDK TypeScript is fully open source.
## Which SDK Should I Use?
Choose the right SDK based on your specific needs:
| SDK Package | Description |
| :--------------------------------------------------------------------------- | :--------------------------------------------------------------- |
| [`@avalanche-sdk/client`](/avalanche-sdk/client-sdk/getting-started) | Direct blockchain interaction - transactions, wallets, RPC calls |
| [`@avalanche-sdk/chainkit`](/avalanche-sdk/chainkit-sdk/getting-started) | Complete suite: Data, Metrics and Webhooks API |
| [`@avalanche-sdk/interchain`](/avalanche-sdk/interchain-sdk/getting-started) | Send messages between Avalanche L1s using ICM/Teleporter |
## Quick Start
```bash theme={null}
npm install @avalanche-sdk/client
```
```bash theme={null}
yarn add @avalanche-sdk/client
```
```bash theme={null}
pnpm add @avalanche-sdk/client
```
### Basic Example
```typescript theme={null}
import { createClient } from '@avalanche-sdk/client';
// Initialize the client
const client = createClient({
network: 'mainnet'
});
// Get balance
const balance = await client.getBalance({
address: '0x...',
chainId: 43114
});
console.log('Balance:', balance);
```
## Available SDKs
### Client SDK
The main Avalanche client SDK for interacting with Avalanche nodes and building blockchain applications.
**Key Features:**
* **Complete API coverage** for P-Chain, X-Chain, and C-Chain.
* **Full viem compatibility** - anything you can do with viem works here.
* **TypeScript-first design** with full type safety.
* **Smart contract interactions** with first-class APIs.
* **Wallet integration** and transaction management.
* **Cross-chain transfers** between X, P and C chains.
**Common Use Cases:**
* Retrieve balances and UTXOs for addresses
* Build, sign, and issue transactions to any chain
* Add validators and delegators
* Create subnets and blockchains.
* Convert subnets to L1s.
Learn how to integrate blockchain functionality into your application
### ChainKit SDK
Combined SDK with full typed coverage of Avalanche Data (Glacier) and Metrics APIs.
**Key Features:**
* **Full endpoint coverage** for Glacier Data API and Metrics API
* **Strongly-typed models** with automatic TypeScript inference
* **Built-in pagination** helpers and automatic retries/backoff
* **High-level helpers** for transactions, blocks, addresses, tokens, NFTs
* **Metrics insights** including network health, validator stats, throughput
* **Webhook support** with payload shapes and signature verification
**API Endpoints:**
* Glacier API: [https://glacier-api.avax.network/api](https://glacier-api.avax.network/api)
* Metrics API: [https://metrics.avax.network/api](https://metrics.avax.network/api)
Access comprehensive blockchain data and analytics
### Interchain SDK
SDK for building cross-L1 applications and bridges.
**Key Features:**
* **Type-safe ICM client** for sending cross-chain messages
* **Seamless wallet integration** with existing wallet clients
* **Built-in support** for Avalanche C-Chain and custom subnets
* **Message tracking** and delivery confirmation
* **Gas estimation** for cross-chain operations
**Use Cases:**
* Cross-chain token bridges
* Multi-L1 governance systems
* Interchain data oracles
* Cross-subnet liquidity pools
Build powerful cross-chain applications
## Support
### Community & Help
* Discord - Get real-time help in the #avalanche-sdk channel
* Telegram - Join discussions
* Twitter - Stay updated
### Feedback Sessions
* Book a Google Meet Feedback Session - Schedule a 1-on-1 session to share your feedback and suggestions
### Issue Tracking
* Report a Bug
* Request a Feature
* View All Issues
### Direct Support
* Technical Issues: GitHub Issues
* Security Issues: [security@avalabs.org](mailto:security@avalabs.org)
* General Inquiries: [data-platform@avalabs.org](mailto:data-platform@avalabs.org)
# Example Contracts (/docs/tooling/interchain-kit/example-contracts)
The example contracts live under `contracts/src/examples/` — a Foundry project with `icm-contracts` v1.0.9 pinned, compiled with Solidity 0.8.25. They're the building blocks the [harness tests](/docs/tooling/interchain-kit/foundry-harness) and the [demo scripts](/docs/tooling/interchain-kit/icm-messaging) use, and a good starting point for your own contracts.
## Layout
| Directory | Contracts |
|-----------|-----------|
| `icm-basics/` | `SimpleSender` + `SimpleReceiver` — minimal ICM send/receive |
| `ictt-erc20/` | ERC-20 round-trip + `DemoERC20` |
| `ictt-native/` | Native token home/remote bridge |
| `teleporter-patterns/` | `PingPong` + `CrossChainCounter` |
Each example has matching harness tests under `contracts/test/examples/`.
## Build Configuration
The Foundry config (`contracts/foundry.toml`) pins the toolchain so builds are reproducible:
| Setting | Value |
|---------|-------|
| `solc_version` | `0.8.25` |
| `evm_version` | `shanghai` |
| `optimizer_runs` | `200` |
| `libs` | `lib`, `../packages/harness` |
`contracts/lib/` is **not** committed to the repo and `pnpm install` does not populate it. Install the Foundry dependencies (`forge-std`, OpenZeppelin, `icm-contracts`) per [Installation](/docs/tooling/interchain-kit/installation) before building or testing.
## Building
```bash
forge build --root contracts
```
This writes artifacts to `contracts/out/.sol/.json`, which `loadArtifact()` reads at runtime.
## Next Steps
Test these contracts in milliseconds
The Teleporter contracts the examples build on
# Foundry Harness (/docs/tooling/interchain-kit/foundry-harness)
The Foundry harness runs the real Teleporter and ICTT contracts inside a single EVM using a mock Warp precompile — no network, no relayer. It boots in roughly 100 ms, which makes it ideal for test-driven development on your cross-chain Solidity.
## Prerequisites
- Foundry (`forge`) installed
- The **contract dependencies** installed into `contracts/lib/` — see [Installation](/docs/tooling/interchain-kit/installation). Without them, `forge` fails with `No such file or directory` for `contracts/lib/...`.
## Run the Harness
From the repo root:
```bash
pnpm test:harness # forge test --root contracts -vv
```
This compiles the contracts under `contracts/src/examples/` and runs the harness tests in `contracts/test/examples/`. A green run is **18 tests passing** across the `icm-basics`, `ictt-erc20`, and `ictt-native` suites plus the harness internals.
## Format Solidity
```bash
pnpm fmt # forge fmt --root contracts
```
## Why the Harness Matters
Contract addresses are consistent between the harness and the live network. A scenario you prove here behaves the same when you run it end-to-end on a [local network](/docs/tooling/interchain-kit/local-network) — so you can iterate in milliseconds, then validate against real consensus only when you're ready.
The harness pairs a `FoundryWarpHarness` with a `MockWarpPrecompile` (in `packages/harness/`) to simulate cross-chain message delivery within one EVM. The contracts themselves are the real, unmodified `icm-contracts` — only the Warp transport is mocked.
## Next Steps
Validate end-to-end against a real local Avalanche network
Send your first interchain message
# ICM Messaging (/docs/tooling/interchain-kit/icm-messaging)
`send-message.ts` is the smallest complete [Interchain Messaging (ICM)](/docs/cross-chain/icm-contracts/overview) example. It deploys `SimpleSender` on the C-Chain (pointed at the local `TeleporterMessenger`) and `SimpleReceiver` on the destination L1 (pointed at that chain's `TeleporterRegistry`), sends a string, and polls the receiver until the relayer delivers it.
## Prerequisites
Boot a [local network](/docs/tooling/interchain-kit/local-network) and build the contracts first:
```bash
pnpm run up # writes .interchain-kit/artifacts/network.json
forge build --root contracts # produces contracts/out/*.json
```
## Run It
Run **from the repo root** — `tmpnetjs` walks up from your current directory to find `.interchain-kit/` and `contracts/out/`:
```bash
pnpm --filter @interchain-kit/examples run send-message
```
Target a specific L1 with `--destination ` (or the `DESTINATION` env var); it defaults to the first L1 in `network.json`.
## What a Successful Run Looks Like
```text
Source: C-Chain (evmChainId=43112)
Destination: testlanche (evmChainId=999001)
Funded: 0x8db97C7cEcE249c2b98bDC0226Cc4C2A57BF52FC
Deploying SimpleSender on C-Chain...
-> 0x5FbDB231...
Deploying SimpleReceiver on testlanche...
-> 0xCf7Ed3AC...
Sending message: "Hello from C-Chain!"
tx: 0xabc...
Polling receiver.latestMessage on testlanche...
Receiver.latestMessage (after): "Hello from C-Chain!"
Done. ICM round-trip succeeded.
```
## Walkthrough
```typescript
import {
loadNetwork,
pickL1,
loadArtifact,
makeClients,
blockchainIdToBytes32,
pollUntil,
} from "tmpnetjs";
import type { Address } from "viem";
async function main() {
// Flag takes precedence over env var.
const destName = argAfter("--destination") ?? process.env.DESTINATION;
const network = loadNetwork();
const dest = pickL1(network, destName);
const src = makeClients(network.cChain, network.funded.privateKey);
const dst = makeClients(dest, network.funded.privateKey);
const sender = loadArtifact("SimpleSender");
const receiver = loadArtifact("SimpleReceiver");
// 1. Deploy SimpleSender on C-Chain (ctor: teleporterMessenger).
const senderTx = await src.walletClient.deployContract({
abi: sender.abi,
bytecode: sender.bytecode,
account: src.account,
chain: src.chain,
args: [network.cChain.teleporter],
});
const senderAddress = (await src.publicClient.waitForTransactionReceipt({ hash: senderTx }))
.contractAddress as Address;
// 2. Deploy SimpleReceiver on the L1 (ctor: registry, minVersion).
const receiverTx = await dst.walletClient.deployContract({
abi: receiver.abi,
bytecode: receiver.bytecode,
account: dst.account,
chain: dst.chain,
args: [dest.teleporterRegistry, 1n],
});
const receiverAddress = (await dst.publicClient.waitForTransactionReceipt({ hash: receiverTx }))
.contractAddress as Address;
// 3. Send the message. Teleporter addresses destinations by bytes32,
// not EVM chain ID.
const destBlockchainIdBytes32 = blockchainIdToBytes32(dest.blockchainId);
const message = "Hello from C-Chain!";
const sendTx = await src.walletClient.writeContract({
address: senderAddress,
abi: sender.abi,
functionName: "sendMessage",
args: [destBlockchainIdBytes32, receiverAddress, message],
account: src.account,
chain: src.chain,
});
await src.publicClient.waitForTransactionReceipt({ hash: sendTx });
// 4. Poll the destination. The relayer collects BLS sigs from the source's
// validators and delivers receiveCrossChainMessage. Local latency ~2-5s.
const after = await pollUntil(
async () =>
(await dst.publicClient.readContract({
address: receiverAddress,
abi: receiver.abi,
functionName: "latestMessage",
})) as string,
(v) => v === message,
{ timeoutMs: 60_000, label: "receiver.latestMessage to update" },
);
console.log(`Receiver.latestMessage (after): "${after}"`);
}
function argAfter(flag: string): string | undefined {
const i = process.argv.indexOf(flag);
return i >= 0 ? process.argv[i + 1] : undefined;
}
main().catch((err) => {
console.error("\nsend-message failed:", err.message ?? err);
process.exit(1);
});
```
Teleporter routes messages by a chain's 32-byte blockchain ID, not its EVM chain ID. `blockchainIdToBytes32()` converts the blockchain ID from `network.json` into the format `sendMessage` expects.
## Next Steps
Move an ERC-20 across chains
The helpers these scripts are built on
# Overview (/docs/tooling/interchain-kit)
**Interchain Kit** is a local development toolkit for building and testing [Interchain Messaging (ICM)](/docs/cross-chain/icm-contracts/overview) and [Interchain Token Transfer (ICTT)](/docs/cross-chain/interchain-token-transfer/overview). It gives you two ways to iterate on cross-chain Solidity: a fast Foundry harness for unit testing, and a one-command local Avalanche network — Primary Network, L1s, ICM relayer, and signature aggregator — for end-to-end validation before you touch Fuji.
It is the next-gen replacement for [`avalanche-starter-kit`](https://github.com/ava-labs/avalanche-starter-kit), built directly on the [Avalanche SDK](/docs/tooling/avalanche-sdk) (`@avalanche-sdk/client` and `@avalanche-sdk/interchain`) and the `subnet-evm` bundled with AvalancheGo. Every primitive is driven directly — `avalanche-cli` is intentionally not used — so you can see exactly what each step does.
Interchain Kit runs entirely on your machine and is not published to npm. You use it by cloning the repository and running it with `pnpm`. It is meant for development and testing, not as a dependency you install into a production app.
## Two Development Flows
Interchain Kit ships the same contracts in two environments. Iterate fast in the harness, then prove it end-to-end against a real local network.
| Flow | Boots in | What you get |
|------|----------|--------------|
| **Foundry harness** | ~100 ms | Real, unmodified `icm-contracts` (Teleporter + ICTT) running end-to-end inside a single EVM. Best for test-driven development on your Solidity. |
| **Local tmpnet + relayer** | ~3 min cold (snapshot after) | A real local Avalanche network (Primary Network + L1s) with `icm-relayer` and `signature-aggregator`. Best for end-to-end validation before Fuji. |
Contract addresses stay consistent across both modes, so a scenario you prove in the harness behaves the same on the live network.
## What You Get
| Capability | Description |
|------------|-------------|
| **One-command network** | `pnpm run up` boots the Primary Network, an L1, Teleporter, the ICM relayer, and the signature aggregator. |
| **Foundry harness** | `MockWarpPrecompile` + `FoundryWarpHarness` exercise real Teleporter/ICTT contracts inside `forge test`. |
| **Example contracts** | `SimpleSender`/`SimpleReceiver`, ERC-20 and native ICTT, and Teleporter patterns (PingPong, CrossChainCounter). |
| **TypeScript SDK** | `tmpnetjs` provides `loadNetwork`, `makeClients`, `pickL1`, and `pollUntil` so you can script scenarios with [viem](https://viem.sh). |
| **End-to-end demos** | Ready-to-run scripts for ICM messaging, ICTT transfers, and validator management. |
## Repository Layout
```text
contracts/ Foundry-first. icm-contracts v1.0.9 pinned.
src/examples/
icm-basics/ SimpleSender + SimpleReceiver
ictt-erc20/ ERC20 round-trip + DemoERC20
ictt-native/ Native token home/remote
teleporter-patterns/ PingPong + CrossChainCounter
test/examples/ Harness tests, all green
packages/
harness/ FoundryWarpHarness + MockWarpPrecompile
tmpnetjs/ JS analog of AvalancheGo's tmpnet. Producer
(boot network → L1 → ICM → validator set →
relayer + sigagg → artifacts) + consumer SDK
(loadNetwork, makeClients, …).
icm-services-installer/ Downloads icm-relayer + signature-aggregator
examples/ End-to-end demos against the live network
send-message.ts ICM hello-world
transfer-token.ts ICTT ERC20 transfer
validator-manager-setup.ts Deploy + upgrade + initialize ValidatorManager
add-validator.ts Register a new L1 validator
```
## Prerequisites
| Requirement | Notes |
|-------------|-------|
| **Node.js 20+** and **pnpm 9+** | The repo is a pnpm workspace (`packageManager: pnpm@9.12.0`). |
| **Foundry** (`forge`) | Used by the harness and contract builds. |
| **AvalancheGo** with the `subnet-evm` plugin | Built from source; required only for the live-network flow. |
| **`AVALANCHEGO_PATH`** | Environment variable pointing to the built `avalanchego` binary. |
See [Installation](/docs/tooling/interchain-kit/installation) for the full setup.
## Getting Started
Install the prerequisites and build AvalancheGo + the subnet-evm plugin
Iterate on cross-chain Solidity in ~100 ms
Boot a real local network with relayer + sigagg
Send your first interchain message
## Support & Resources
- [Interchain Kit on GitHub](https://github.com/ava-labs/interchain-kit)
- [ICM Contracts (Teleporter) documentation](/docs/cross-chain/icm-contracts/overview)
- [Interchain Token Transfer documentation](/docs/cross-chain/interchain-token-transfer/overview)
- [Running ICM contracts on a local network](/docs/cross-chain/icm-contracts/icm-contracts-on-local-network)
- [Avalanche Discord](https://chat.avalabs.org/)
# Installation (/docs/tooling/interchain-kit/installation)
This guide gets your machine ready for Interchain Kit's two flows: the Foundry harness and the live local network. The live network's AvalancheGo + `subnet-evm` binaries are **downloaded automatically** on your first `pnpm run up`, so there's no AvalancheGo build to do and no `AVALANCHEGO_PATH` to set.
## Prerequisites
| Requirement | Version | Used by |
|-------------|---------|---------|
| [Node.js](https://nodejs.org) | 20+ | Both flows |
| [pnpm](https://pnpm.io) | 9+ | Both flows |
| [Foundry](https://book.getfoundry.sh) (`forge`) | latest | Harness + contract builds |
The live-network flow auto-installs a pinned, checksum-verified AvalancheGo + `subnet-evm` release on first `pnpm run up` (cached under `.interchain-kit/bin/`). You only need an AvalancheGo build of your own if you want to override that — see the optional step at the end.
## Step 1: Install Node.js and pnpm
Interchain Kit is a pnpm workspace pinned to `pnpm@9.12.0`. Confirm Node 20+:
```bash
node --version # v20.x or later
```
If you don't already have pnpm 9+, enable it via [Corepack](https://nodejs.org/api/corepack.html) (ships with Node). On macOS where Node was installed in a root-owned location, `corepack enable` may need `sudo` or `--install-directory ` — or just install pnpm directly:
```bash
corepack enable
corepack prepare pnpm@9 --activate
pnpm --version # 9.x or later
```
## Step 2: Install Foundry
Foundry provides `forge`, used by the harness tests and contract builds:
```bash
curl -L https://foundry.paradigm.xyz | bash
foundryup
forge --version
```
## Step 3: Clone Interchain Kit and Install
```bash
git clone https://github.com/ava-labs/interchain-kit
cd interchain-kit
pnpm install
```
## Step 4: Install the Contract Dependencies
The Solidity contracts depend on `forge-std`, OpenZeppelin, and `icm-contracts`, which live under `contracts/lib/`. They are **not** included in the clone and `pnpm install` does not fetch them, so install them before running the harness or building contracts:
```bash
cd contracts
forge install foundry-rs/forge-std
forge install ava-labs/icm-contracts@v1.0.9
forge install OpenZeppelin/openzeppelin-contracts-upgradeable@v5.0.2
cd ..
```
`icm-contracts` v1.0.9 imports OpenZeppelin upgradeable as `@5.0.2`. Installing a newer major (e.g. the current `v5.x`) makes the harness fail to compile (`ReentrancyGuardUpgradeable.sol` not found). Keep the `@v5.0.2` pin above.
## Verify Your Setup
With Node, pnpm, Foundry, and the contract dependencies installed, run the Foundry harness — no AvalancheGo needed:
```bash
pnpm test:harness # forge test --root contracts -vv
```
A green run (**18 tests** across the example suites — `icm-basics`, `ictt-erc20`, `ictt-native`, and `teleporter-patterns`) means the contracts compile and the harness is wired up. To exercise the live network, continue to [Local Network](/docs/tooling/interchain-kit/local-network) and run `pnpm run up` — it downloads the pinned AvalancheGo on first use.
Hitting a setup error? See [Troubleshooting](/docs/tooling/interchain-kit/troubleshooting).
## Optional: Use Your Own AvalancheGo Build
By default `pnpm run up` installs and runs a pinned AvalancheGo release. To run your own build instead — for example to test a local AvalancheGo change — build it from source and point `AVALANCHEGO_PATH` at the **binary**:
```bash
git clone https://github.com/ava-labs/avalanchego
cd avalanchego
./scripts/build.sh # builds build/avalanchego
cd graft/subnet-evm && ./scripts/build.sh # builds the subnet-evm plugin
export AVALANCHEGO_PATH=$HOME/avalanchego/build/avalanchego
```
Point `AVALANCHEGO_PATH` at a build from a **tagged release**. A development branch (e.g. `helicon-devnet`) runs a C-Chain VM that won't produce blocks under tmpnet and silently stalls the boot. If `up` hangs after "deploying Teleporter," unset `AVALANCHEGO_PATH` to fall back to the pinned release.
## Next Steps
Run the contract tests in milliseconds
Boot a full local ICM/ICTT network
# Local Network (/docs/tooling/interchain-kit/local-network)
The local-network flow boots a complete stack with a single command and validates ICM/ICTT against real consensus and a real relayer: the Primary Network, an L1, Teleporter, the ICM relayer, and the signature aggregator.
## Prerequisites
- Completed [installation](/docs/tooling/interchain-kit/installation), including the contract dependencies.
That's all — `pnpm run up` auto-installs a pinned AvalancheGo + `subnet-evm` release on first run (cached under `.interchain-kit/bin/`) and rebuilds the workspace packages itself, so there's no `AVALANCHEGO_PATH` to set and no separate build step.
## Boot the Network
```bash
pnpm run up # boots Primary Network + L1 + ICM + relayer + sigagg
```
The first run is a cold boot (~3 minutes) because it downloads the ICM services, starts the network, creates an L1, sets up the validator set, and launches the relayer and signature aggregator. Subsequent runs reuse a snapshot and are much faster.
`pnpm run up` runs the `tmpnetjs` producer, which orchestrates the full sequence:
1. Spawns 5 primary-network nodes (AvalancheGo's preconfigured local stakers).
2. Creates a subnet on the P-Chain.
3. Issues a `CreateChainTx` for a `subnet-evm` L1 with the `ValidatorManager` proxy pre-allocated.
4. Spawns L1 validator + RPC nodes tracking the subnet.
5. Converts the subnet to an L1 (`ConvertSubnetToL1Tx`).
6. Initializes the validator set on the L1 via the signature aggregator + Warp.
7. Deploys `TeleporterMessenger` + `TeleporterRegistry` on every chain from a single-use deployer (so addresses match across chains — the relayer requires this).
8. Funds the relayer EOA on the C-Chain.
9. Starts `icm-relayer` (`:8080`) and `signature-aggregator` (`:8090`) with peer discovery.
10. Writes `network.json`, `addresses.ts`, and `.env` to `.interchain-kit/artifacts/`.
## Generated Artifacts
Once the network is up, Interchain Kit writes everything your scripts need to `.interchain-kit/artifacts/`:
| File | Contents |
|------|----------|
| `network.json` | Network topology — chains, blockchain IDs, Teleporter/registry addresses, funded key |
| `addresses.ts` | Deployed contract addresses, importable from TypeScript |
| `.env` | Environment variables for the running network |
Your TypeScript scripts load `network.json` through `loadNetwork()` (see [tmpnetjs SDK](/docs/tooling/interchain-kit/tmpnetjs-sdk)).
## Build the Contracts
Before running any example, compile the contracts so the scripts can load their ABIs and bytecode from `contracts/out/`:
```bash
forge build --root contracts
```
The demo scripts read compiled artifacts (e.g. `contracts/out/SimpleSender.sol/SimpleSender.json`). If you skip this, you'll see `Forge artifact not found: contracts/out/...`.
With the network running and the contracts built, you're ready to run the [examples](/docs/tooling/interchain-kit/icm-messaging).
## Stop and Clean Up
```bash
pnpm run down # stop processes (snapshot preserved for a fast next boot)
pnpm run clean # nuke data, snapshots, and logs in .interchain-kit/
```
Use `down` when you want to pause and resume quickly. Use `clean` when a run failed partway and subsequent runs are reusing stale data — clean, then `up` again.
## Lifecycle Commands
| Command | What it does |
|---------|--------------|
| `pnpm test:harness` | Run the Foundry harness tests (`forge test --root contracts -vv`) |
| `pnpm run build` | Build the workspace packages (required before the first `up`) |
| `pnpm run up` | Boot the full local network + ICM relayer + signature aggregator |
| `pnpm run down` | Stop the running processes; keep the snapshot |
| `pnpm run clean` | Remove all data, snapshots, and logs under `.interchain-kit/` |
| `pnpm fmt` | Format Solidity with `forge fmt` |
## Ports
The local network binds the following ports. If a boot fails with "address already in use," find and stop whatever is holding the port (for example `lsof -iTCP:8080 -sTCP:LISTEN`).
| Service | Port(s) |
|---------|---------|
| Primary Network nodes | `9650 + 100*i` (i.e. `9650`, `9750`, …) |
| `icm-relayer` | `8080` (API) + `9090` (metrics) |
| `signature-aggregator` | `8090` |
Hitting an error? See [Troubleshooting](/docs/tooling/interchain-kit/troubleshooting).
## Next Steps
Send an interchain message C-Chain → L1
Move an ERC-20 across chains
# tmpnetjs SDK (/docs/tooling/interchain-kit/tmpnetjs-sdk)
`tmpnetjs` is the JavaScript analog of AvalancheGo's `tmpnet`. The **producer** side boots the network (driven by `pnpm run up`); the **consumer** side is the SDK you import in your scripts. It reads the artifacts written to `.interchain-kit/` and hands you ready-to-use [viem](https://viem.sh) clients.
The demo scripts ([ICM Messaging](/docs/tooling/interchain-kit/icm-messaging), [Token Transfer](/docs/tooling/interchain-kit/token-transfer), [Validator Management](/docs/tooling/interchain-kit/validator-management)) are all thin consumers of this SDK.
## Consumer API
| Export | Purpose |
|--------|---------|
| `loadNetwork()` | Load the running network's topology from `network.json` (chains, blockchain IDs, Teleporter/registry addresses, funded key). Walks up from the current directory to find `.interchain-kit/artifacts/network.json`. |
| `pickL1(network, name?)` | Select an L1 from the network by name (defaults to the first L1). |
| `makeClients(chain, privateKey)` | Build a viem `publicClient` + `walletClient` (plus `account` and `chain`) for a given chain. |
| `loadArtifact(name)` | Load a compiled contract's `abi` and `bytecode` by name (e.g. `"SimpleSender"`) from `contracts/out/`. |
| `blockchainIdToBytes32(id)` | Convert a blockchain ID into the bytes32 form Teleporter uses to address destinations. |
| `pollUntil(fn, predicate, opts)` | Poll an async read until `predicate` is satisfied or `timeoutMs` elapses — used to wait for cross-chain delivery. |
`loadNetwork()` and `loadArtifact()` walk **up** the directory tree from `process.cwd()` to locate `.interchain-kit/` and `contracts/out/`. Running scripts from the repo root is the reliable choice; running from a directory outside the repo throws `network.json not found`.
## Use tmpnetjs in Your Own Script
Point a script at the running network in a few lines:
```typescript
import { loadNetwork, makeClients, pickL1, pollUntil } from "tmpnetjs";
const net = loadNetwork();
const dst = pickL1(net, "myl1");
const { publicClient, walletClient } = makeClients(net.cChain, net.funded.privateKey);
// … your ICM/ICTT/whatever scenario
```
## Producer API
The producer side — `up`, `down`, `Network.start`, `captureSnapshot`, and friends — is also exported for programmatic orchestration. Most workflows drive it through `pnpm run up` / `pnpm run down` instead; see [`packages/tmpnetjs/README.md`](https://github.com/ava-labs/interchain-kit/blob/main/packages/tmpnetjs/README.md) in the repo for the full surface.
## Next Steps
The Solidity building blocks the scripts deploy
Browse the full source
# Token Transfer (ICTT) (/docs/tooling/interchain-kit/token-transfer)
`transfer-token.ts` runs a complete [Interchain Token Transfer (ICTT)](/docs/cross-chain/interchain-token-transfer/overview) ERC-20 round-trip: it deploys a token and a home contract on the C-Chain, a remote contract on the destination L1, registers them, then moves wrapped tokens across.
## Prerequisites
Boot a [local network](/docs/tooling/interchain-kit/local-network) and build the contracts first:
```bash
pnpm run up # writes .interchain-kit/artifacts/network.json
forge build --root contracts # produces contracts/out/*.json
```
## Run It
Run **from the repo root**:
```bash
pnpm --filter @interchain-kit/examples run transfer-token
```
Override the amount and destination with flags or env vars (precedence: flag > env var > default):
```bash
pnpm --filter @interchain-kit/examples run transfer-token --amount 100 --destination myl1
# or
DESTINATION=myl1 AMOUNT=42 pnpm --filter @interchain-kit/examples run transfer-token
```
## What It Does
1. Deploy a `DemoERC20` token on the C-Chain.
2. Deploy `ERC20TokenHome` on the C-Chain to lock the token.
3. Deploy `ERC20TokenRemote` on the destination L1 to mint the wrapped representation.
4. The remote registers with the home over Teleporter.
5. Approve and send tokens from the home; poll the remote until the wrapped balance arrives.
The example uses 18 token decimals so the underlying and wrapped tokens scale 1:1 with no rescaling. On success you'll see the deployment lines plus a balance journey on the remote — for example `0 -> 100000000000000000000` (100 tokens at 18 decimals).
ICTT uses a **home** contract on the chain where the token originates (it locks/holds the underlying) and a **remote** contract on each destination chain (it mints/burns a wrapped representation). Registration is a Teleporter message from the remote back to the home, so the relayer must be running in both directions.
## Next Steps
Set up and grow an L1's validator set
The home/remote model in depth
# Troubleshooting (/docs/tooling/interchain-kit/troubleshooting)
Errors are grouped by the phase where they show up: setup, the local network, and the example scripts.
## Setup
| Symptom | Fix |
|---------|-----|
| `forge: command not found` | Install Foundry and ensure `~/.foundry/bin` is on your `PATH`. See [Installation step 2](/docs/tooling/interchain-kit/installation). |
| `pnpm: command not found` | Enable Corepack (`corepack enable`) or install pnpm 9+ directly. |
| `No such file or directory` for `contracts/lib/forge-std/...`, `contracts/lib/icm-contracts/...`, or `contracts/lib/openzeppelin-...` | The contract dependencies aren't installed. Run the `forge install` commands in [Installation](/docs/tooling/interchain-kit/installation). |
## Local Network
| Symptom | Fix |
|---------|-----|
| `ERR_MODULE_NOT_FOUND … packages/tmpnetjs/dist/cli.js` | `pnpm run up` rebuilds the packages first, so this only appears if you invoke the CLI directly — run `pnpm run build`, or just use `pnpm run up`. |
| `avalanchego binary not found` (lists tried paths) | Only happens with a bad `AVALANCHEGO_PATH` override. **Unset** `AVALANCHEGO_PATH` to use the auto-installed pinned release, or point it at a real `/build/avalanchego`. |
| `up` stalls after "deploying Teleporter" / C-Chain never produces a block | You set `AVALANCHEGO_PATH` to a **devnet** AvalancheGo (e.g. `helicon-devnet`), whose C-Chain won't produce blocks under tmpnet. Unset it to fall back to the pinned release. |
| Node never goes healthy / "plugin not found" / L1 won't bootstrap | Only relevant with your own `AVALANCHEGO_PATH` build — the `subnet-evm` plugin isn't beside the binary. Unset `AVALANCHEGO_PATH` to use the auto-installed release, or rebuild the plugin (`cd /graft/subnet-evm && ./scripts/build.sh`). |
| `Timed out after 60000ms waiting for /ext/info` | A node started then exited before going healthy. A common cause is **low disk** — AvalancheGo refuses to run below 3% free space. Free up disk (node databases are large) and retry. Check the node logs under `.interchain-kit/` for the underlying `FATAL` line. |
| `up` fails partway, then keeps failing on retry | Stale data in `.interchain-kit/` is being reused. Run `pnpm run clean`, then `pnpm run up`. |
| Port already in use (`:9650+`, `:8080`, `:8090`, `:9090`) | Kill the process holding the port (`lsof -iTCP: -sTCP:LISTEN`) or stop the conflicting service. |
## Examples
| Symptom | Likely cause | Fix |
|---------|--------------|-----|
| `network.json not found` | The network isn't running, or you're running from outside the repo tree. | `cd` to the repo root and run `pnpm run up`. |
| `Forge artifact not found: contracts/out/...` | You haven't compiled the contracts. | `forge build --root contracts` |
| `Timed out after 60000ms waiting for receiver.latestMessage to update` | The `icm-relayer` isn't running or hasn't picked up the message. | Check `.interchain-kit/logs/relayer.log`; if it's down, `pnpm run down && pnpm run up`. |
| `No L1 named "X" in network.json. Available: ...` | `--destination` doesn't match any L1 name. | Use one of the names listed in the error. |
## Still Stuck?
- Browse open issues or file a new one on [GitHub](https://github.com/ava-labs/interchain-kit/issues).
- Ask in the [Avalanche Discord](https://chat.avalabs.org/).
# Validator Management (/docs/tooling/interchain-kit/validator-management)
Two scripts exercise the L1's `ValidatorManager` contract — the on-chain component that tracks an L1's validator set. Run them **in order**: `add-validator.ts` assumes `validator-manager-setup.ts` has already initialized the manager.
## Prerequisites
Boot a [local network](/docs/tooling/interchain-kit/local-network) and build the contracts first:
```bash
pnpm run up # writes .interchain-kit/artifacts/network.json
forge build --root contracts # produces contracts/out/*.json
```
`add-validator.ts` also spawns a fresh AvalancheGo node, so it needs `AVALANCHEGO_PATH` set.
Run both scripts **from the repo root** — `tmpnetjs` walks up from your current directory to find `.interchain-kit/` and `contracts/out/`.
## 1. Set Up the Validator Manager
```bash
pnpm --filter @interchain-kit/examples run validator-manager-setup
```
This script:
- Deploys a real `ValidatorManager` implementation.
- Upgrades the genesis proxy (pre-allocated at `0xfacade…`) to point at it and runs `initialize(settings)`.
- Calls `initializeValidatorSet` so the bootstrap validator from `ConvertSubnetToL1Tx` is reflected on-chain.
- Prints `isValidatorSetInitialized`, the total weight, and the validator list.
## 2. Add a Validator
```bash
AVALANCHEGO_PATH=$HOME/avalanchego/build/avalanchego pnpm --filter @interchain-kit/examples run add-validator
```
This script:
- Spawns a fresh AvalancheGo node (on port `10750`) tracking the L1's subnet, then reads its NodeID + BLS proof of possession.
- Runs the SDK's `registerL1Validator` flow: EVM-initiate → signature aggregator → P-Chain `RegisterL1ValidatorTx` → signature aggregator ACK → EVM-complete.
- Verifies the new validator on both the L1's `ValidatorManager` and the P-Chain validator set.
`add-validator.ts` leaves the new validator node running so it can keep validating. Use `pnpm run down` (and `pnpm run clean`) to stop everything when you're done.
## Next Steps
Script your own validator and ICM scenarios
The on-chain contracts behind L1 validator management
# Chains (/docs/tooling/platform-cli/chains)
Deploy a new blockchain on an existing subnet using the `chain create` command.
## Create a Chain
```bash
platform-cli chain create \
--subnet-id 2QYfFcfZ9... \
--genesis genesis.json \
--name mychain \
--key-name mykey
```
## Flags
| Flag | Description | Default |
|------|-------------|---------|
| `--subnet-id` | Subnet to create chain on (required) | |
| `--genesis` | Path to genesis JSON file (required, max 1 MB) | |
| `--name` | Chain name | `mychain` |
| `--vm-id` | VM ID | Subnet-EVM |
## Genesis File
The genesis file must be valid JSON and under 1 MB. For Subnet-EVM chains, you can use the standard Subnet-EVM genesis format.
```json
{
"config": {
"chainId": 99999,
"feeConfig": {
"gasLimit": 8000000,
"targetBlockRate": 2,
"minBaseFee": 25000000000,
"targetGas": 15000000,
"baseFeeChangeDenominator": 36,
"minBlockGasCost": 0,
"maxBlockGasCost": 1000000,
"blockGasCostStep": 200000
}
},
"alloc": {
"0xYourAddress": {
"balance": "0x295BE96E64066972000000"
}
}
}
```
# Command Reference (/docs/tooling/platform-cli/command-reference)
## Global Flags
Available on all commands:
| Flag | Short | Description | Default |
|------|-------|-------------|---------|
| `--network` | `-n` | Network: `fuji` or `mainnet` | `fuji` |
| `--key-name` | | Load key from keystore by name | |
| `--ledger` | | Use Ledger hardware wallet | `false` |
| `--ledger-index` | | Ledger BIP44 address index | `0` |
| `--rpc-url` | | Custom RPC URL (overrides `--network`) | |
| `--network-id` | | Network ID for custom RPC | auto-detect |
| `--allow-insecure-http` | | Allow plain HTTP for non-local endpoints (unsafe) | `false` |
| `--private-key` | `-k` | Private key (deprecated, prefer `--key-name`) | |
## version
```bash
platform-cli version
```
Prints the CLI version.
## keys
Manage persistent keys stored in `~/.platform/keys/`.
### keys generate
```bash
platform-cli keys generate --name [--encrypt=false]
```
| Flag | Description | Default |
|------|-------------|---------|
| `--name` | Key name (required, 1-64 chars: `[a-zA-Z0-9._-]`, starts with alphanumeric) | |
| `--encrypt` | Encrypt with password (AES-256-GCM + Argon2id) | `true` |
### keys import
```bash
platform-cli keys import --name [--private-key ] [--encrypt=false]
```
| Flag | Description | Default |
|------|-------------|---------|
| `--name` | Key name (required) | |
| `--private-key` | Private key string (prompted if omitted) | |
| `--encrypt` | Encrypt with password | `true` |
### keys list
```bash
platform-cli keys list [--show-addresses]
```
| Flag | Description |
|------|-------------|
| `--show-addresses` | Show P-Chain and EVM addresses |
### keys export
```bash
platform-cli keys export --name --output-file
platform-cli keys export --name --unsafe-stdout
```
| Flag | Description | Default |
|------|-------------|---------|
| `--name` | Key name (required) | |
| `--format` | Output format: `cb58` or `hex` | `cb58` |
| `--output-file` | Write key to file (permissions forced to 0600) | |
| `--unsafe-stdout` | Print private key to stdout (unsafe, required if no `--output-file`) | `false` |
### keys delete
```bash
platform-cli keys delete --name [--force]
```
| Flag | Description |
|------|-------------|
| `--name` | Key name (required) |
| `--force` | Skip confirmation prompt |
### keys default
```bash
platform-cli keys default [--name ]
```
Shows current default if `--name` is omitted. Sets default if `--name` is provided.
## wallet
### wallet balance
```bash
platform-cli wallet balance
```
Displays P-Chain address and AVAX balance.
### wallet address
```bash
platform-cli wallet address
```
Displays P-Chain and EVM addresses derived from the key.
## transfer
### transfer send
```bash
platform-cli transfer send --to --amount
```
| Flag | Description |
|------|-------------|
| `--to` | Destination P-Chain address (required) |
| `--amount` | Amount in AVAX |
| `--amount-navax` | Amount in nAVAX (mutually exclusive with `--amount`) |
### transfer p-to-c
```bash
platform-cli transfer p-to-c --amount
```
One-step P-Chain to C-Chain transfer (export + import).
| Flag | Description |
|------|-------------|
| `--amount` | Amount in AVAX |
| `--amount-navax` | Amount in nAVAX |
### transfer c-to-p
```bash
platform-cli transfer c-to-p --amount
```
One-step C-Chain to P-Chain transfer (export + import).
### transfer export
```bash
platform-cli transfer export --from --to --amount
```
Manual export step for two-step transfers.
| Flag | Description |
|------|-------------|
| `--from` | Source chain: `p` or `c` (required) |
| `--to` | Destination chain: `p` or `c` (required) |
| `--amount` | Amount in AVAX |
| `--amount-navax` | Amount in nAVAX |
### transfer import
```bash
platform-cli transfer import --from --to
```
Manual import step for two-step transfers.
| Flag | Description |
|------|-------------|
| `--from` | Source chain: `p` or `c` (required) |
| `--to` | Destination chain: `p` or `c` (required) |
## validator
### validator add-permissionless
```bash
platform-cli validator add-permissionless --node-id --stake
```
| Flag | Description | Default |
|------|-------------|---------|
| `--node-id` | Node ID (required) | |
| `--stake` | Stake in AVAX (required) | |
| `--duration` | Validation duration | `336h` |
| `--start` | Start time (RFC3339 or `now`). Ignored post-Durango; validation starts at tx acceptance | `now` |
| `--delegation-fee` | Fee percentage (0.02 = 2%) | `0.02` |
| `--reward-address` | Reward address | own address |
| `--bls-public-key` | BLS public key hex (recommended) | |
| `--bls-pop` | BLS proof of possession hex (recommended) | |
| `--node-endpoint` | Node endpoint to auto-fetch BLS | |
### validator add-permissionless-delegator
```bash
platform-cli validator add-permissionless-delegator --node-id --stake
```
| Flag | Description | Default |
|------|-------------|---------|
| `--node-id` | Node ID to delegate to (required) | |
| `--stake` | Stake in AVAX (required) | |
| `--duration` | Delegation duration | `336h` |
| `--start` | Start time (RFC3339 or `now`). Ignored post-Durango; validation starts at tx acceptance | `now` |
| `--reward-address` | Reward address | own address |
### validator add-auto-renewed
```bash
platform-cli validator add-auto-renewed --node-id --stake
```
Adds an auto-renewed validator (`AddAutoRenewedValidatorTx`, ACP-236) that restakes each cycle.
| Flag | Description | Default |
|------|-------------|---------|
| `--node-id` | Node ID to validate (required) | |
| `--stake` | Stake in AVAX (network minimum applies) | |
| `--period` | Auto-renewal cycle duration | `336h` |
| `--auto-compound` | Fraction of rewards to auto-compound (0.3 = 30%, 1 = 100%) | `1` |
| `--delegation-fee` | Fee percentage (0.02 = 2%) | `0.02` |
| `--owner-address` | Address authorized to update the auto-renew config | own address |
| `--reward-address` | Reward address | own address |
| `--bls-public-key` | BLS public key hex (recommended) | |
| `--bls-pop` | BLS proof of possession hex (recommended) | |
| `--node-endpoint` | Node endpoint to auto-fetch BLS | |
### validator set-auto-renewed-config
```bash
platform-cli validator set-auto-renewed-config --tx-id --period --auto-compound
```
Updates the next-cycle config of an auto-renewed validator (`SetAutoRenewedValidatorConfigTx`). Must be signed by the owner address set at add time.
| Flag | Description |
|------|-------------|
| `--tx-id` | Original `AddAutoRenewedValidatorTx` ID (required) |
| `--period` | Next cycle duration, or `0` to exit after the current cycle (required) |
| `--auto-compound` | Fraction of rewards to auto-compound (required) |
| `--node-id` | Validator node ID to narrow the authority lookup (optional, recommended) |
## subnet
### subnet create
```bash
platform-cli subnet create
```
Creates a new subnet owned by the wallet address. No additional flags required.
### subnet transfer-ownership
```bash
platform-cli subnet transfer-ownership --subnet-id --new-owner
```
| Flag | Description |
|------|-------------|
| `--subnet-id` | Subnet ID (required) |
| `--new-owner` | New owner P-Chain address (required) |
### subnet convert-to-l1
```bash
platform-cli subnet convert-to-l1 --subnet-id --chain-id
```
| Flag | Description | Default |
|------|-------------|---------|
| `--subnet-id` | Subnet ID to convert (required) | |
| `--chain-id` | Chain ID for validator manager (required) | |
| `--manager` | Validator manager contract address (hex) | |
| `--contract-address` | Alias for `--manager` | |
| `--validators` | Comma-separated node addresses (auto-discovery mode) | |
| `--validator-node-ids` | Manual mode: comma-separated NodeIDs | |
| `--validator-bls-public-keys` | Manual mode: comma-separated BLS public keys | |
| `--validator-bls-pops` | Manual mode: comma-separated BLS PoPs | |
| `--validator-balance` | Balance per validator in AVAX | `1.0` |
| `--mock-validator` | Use mock validator for testing | `false` |
### subnet add-validator
```bash
platform-cli subnet add-validator --subnet-id --node-id --weight
```
Adds a validator to a permissioned subnet (`AddSubnetValidatorTx`). The node must already be a primary network validator.
| Flag | Description | Default |
|------|-------------|---------|
| `--subnet-id` | Subnet ID (required) | |
| `--node-id` | Validator node ID, must already validate the primary network (required) | |
| `--weight` | Validator sampling weight on the subnet (required, > 0) | |
| `--start` | Start time (RFC3339 or `now`). Ignored post-Durango; validation starts at tx acceptance | `now` |
| `--duration` | Validation duration (must fall within the node's primary network validation period) | `336h` |
## l1
### l1 register-validator
```bash
platform-cli l1 register-validator --balance --pop --message
```
| Flag | Description |
|------|-------------|
| `--balance` | Initial balance in AVAX (required) |
| `--pop` | BLS proof of possession hex (required) |
| `--message` | Warp message hex (required) |
### l1 set-validator-weight
```bash
platform-cli l1 set-validator-weight --message
```
| Flag | Description |
|------|-------------|
| `--message` | Warp message authorizing weight change (required) |
### l1 increase-validator-balance
```bash
platform-cli l1 increase-validator-balance --validation-id --balance
```
| Flag | Description |
|------|-------------|
| `--validation-id` | Validation ID (required) |
| `--balance` | AVAX to add (required) |
### l1 disable-validator
```bash
platform-cli l1 disable-validator --validation-id
```
| Flag | Description |
|------|-------------|
| `--validation-id` | Validation ID to disable (required) |
## chain
### chain create
```bash
platform-cli chain create --subnet-id --genesis
```
| Flag | Description | Default |
|------|-------------|---------|
| `--subnet-id` | Subnet ID (required) | |
| `--genesis` | Genesis JSON file path (required, max 1 MB) | |
| `--name` | Chain name | `mychain` |
| `--vm-id` | VM ID | Subnet-EVM |
## node
### node info
```bash
platform-cli node info --ip
```
| Flag | Description |
|------|-------------|
| `--ip` | Node IP address or hostname (required) |
Returns Node ID, BLS Public Key, and BLS Proof of Possession.
# Platform CLI Overview (/docs/tooling/platform-cli)
Platform CLI is a lightweight command-line tool for Avalanche P-Chain operations. It handles key management, AVAX transfers, cross-chain transfers, primary network staking, subnet creation, and L1 validator management.
## Key Features
| Feature | Description |
|---------|-------------|
| **Key Management** | Generate, import, export, and encrypt private keys with AES-256-GCM |
| **P-Chain Transfers** | Send AVAX on P-Chain and transfer between P-Chain and C-Chain |
| **Staking** | Add validators and delegators to the primary network |
| **Subnets** | Create subnets, transfer ownership, and convert to L1 blockchains |
| **L1 Validators** | Register, configure, and manage L1 blockchain validators |
| **Chain Creation** | Deploy new blockchains on existing subnets |
| **Ledger Support** | Optional hardware wallet integration for signing transactions |
## Supported Networks
| Network | Usage | Min Validator Stake | Min Delegator Stake |
|---------|-------|---------------------|---------------------|
| **Local** | `--rpc-url http://127.0.0.1:9650` | 1 AVAX | 1 AVAX |
| **Fuji** | `--network fuji` (default) | 1 AVAX | 1 AVAX |
| **Mainnet** | `--network mainnet` | 2,000 AVAX | 25 AVAX |
| **Custom** | `--rpc-url ` | Varies | Varies |
## Getting Started
1. [Install Platform CLI](/docs/tooling/platform-cli/installation) via the install script or build from source
2. [Create or import a key](/docs/tooling/platform-cli/key-management) to sign transactions
3. Follow the guides for your use case: transfers, staking, or subnet operations
## Quick Links
Build from source and configure global options
Generate, import, and encrypt private keys
Send AVAX and perform cross-chain transfers
Add validators and delegate to the primary network
Create subnets and manage L1 validators
Complete reference for all commands and flags
## Support
- [GitHub Repository](https://github.com/ava-labs/platform-cli)
- [Discord Community](https://chat.avalabs.org/)
# Installation (/docs/tooling/platform-cli/installation)
## Install Script (Recommended)
The install script downloads the latest release binary for your platform:
```bash
curl -sSfL https://build.avax.network/install/platform-cli | sh
```
Options:
```bash
# Install to a custom directory
curl -sSfL https://build.avax.network/install/platform-cli | sh -s -- -b ~/.local/bin
# Install a specific version
curl -sSfL https://build.avax.network/install/platform-cli | sh -s -- -v v2.0.1
```
The script auto-detects your OS (Linux/macOS) and architecture (amd64/arm64), downloads the release tarball, verifies checksums, and installs the `platform-cli` binary.
Verify the installation:
```bash
platform-cli --help
```
## Build from Source
Requires **Go 1.25+** ([install Go](https://go.dev/dl/)).
```bash
git clone https://github.com/ava-labs/platform-cli.git
cd platform-cli
go build -o platform-cli .
```
### Ledger Support
To build with Ledger hardware wallet support:
```bash
go build -tags ledger -o platform-cli .
```
## Global Flags
These flags are available on all commands:
| Flag | Short | Description | Default |
|------|-------|-------------|---------|
| `--network` | `-n` | Network: `fuji` or `mainnet` | `fuji` |
| `--key-name` | | Name of key to load from keystore | |
| `--ledger` | | Use Ledger hardware wallet | `false` |
| `--ledger-index` | | Ledger address index (BIP44 path) | `0` |
| `--rpc-url` | | Custom RPC URL (overrides `--network`) | |
| `--network-id` | | Network ID for custom RPC (auto-detected if not set) | |
| `--allow-insecure-http` | | Allow plain HTTP for non-local endpoints (unsafe) | `false` |
| `--private-key` | `-k` | Private key (deprecated, prefer `--key-name` or `--ledger`) | |
## Environment Variables
| Variable | Description |
|----------|-------------|
| `AVALANCHE_PRIVATE_KEY` | Private key (alternative to `--private-key` flag) |
| `PLATFORM_CLI_KEY_PASSWORD` | Password for encrypted keys (avoids interactive prompts) |
| `PLATFORM_CLI_TIMEOUT` | Operation timeout duration (e.g., `5m`, `30s`, default: `2m`) |
## Key Loading Priority
When a command needs a private key, Platform CLI checks these sources in order:
1. `--key-name` flag (loads from keystore)
2. `--private-key` flag (deprecated)
3. Default key in keystore (if set)
4. `AVALANCHE_PRIVATE_KEY` environment variable
## Network Configuration
### Standard Networks
```bash
# Fuji testnet (default)
platform-cli wallet balance --key-name mykey
# Mainnet
platform-cli wallet balance --key-name mykey --network mainnet
```
### Custom RPC
For local networks or custom endpoints:
```bash
# Local network
platform-cli wallet balance --key-name mykey --rpc-url http://127.0.0.1:9650
# Custom endpoint with explicit network ID
platform-cli wallet balance --key-name mykey --rpc-url https://my-node.example.com:9650 --network-id 5
```
When using `--rpc-url`, the network ID is auto-detected from the node unless `--network-id` is specified.
## Next Steps
Set up keys for signing transactions
Explore all available commands
# Key Management (/docs/tooling/platform-cli/key-management)
Platform CLI stores keys in `~/.platform/keys/` with AES-256-GCM encryption enabled by default. Keys are encrypted using Argon2id key derivation with a user-provided password.
## Generating Keys
Create a new random secp256k1 key:
```bash
# Generate an encrypted key (default, prompts for password)
platform-cli keys generate --name mykey
# Generate an unencrypted key (unsafe, not recommended)
platform-cli keys generate --name mykey --encrypt=false
```
Output:
```
Key generated successfully!
Name: mykey
P-Chain: P-fuji1abc123...
EVM: 0xdef456...
Encrypted: true
Default: yes
WARNING: Back up your key! Use 'platform-cli keys export' to view the private key.
```
## Importing Keys
Import an existing private key:
```bash
# Import and encrypt (default)
platform-cli keys import --name mykey --private-key "PrivateKey-..."
# Import with hidden input prompt (encrypted by default)
platform-cli keys import --name mykey
# Import without encryption (unsafe)
platform-cli keys import --name mykey --encrypt=false
```
Accepted key formats:
- **CB58**: `PrivateKey-ewoq...` (Avalanche standard)
- **Hex**: `0x56289e99...` (Ethereum-style)
## Listing Keys
```bash
# Basic listing
platform-cli keys list
# Include addresses
platform-cli keys list --show-addresses
```
Output:
```
NAME ENCRYPTED DEFAULT P-CHAIN EVM CREATED
mykey yes * P-fuji1abc123... 0xdef456... 2026-01-15
testkey no P-fuji1xyz789... 0xabc123... 2026-01-10
Total: 2 key(s)
```
## Exporting Keys
Export a private key to a file (recommended) or stdout:
```bash
# Export to file with secure permissions (0600)
platform-cli keys export --name mykey --output-file ./mykey.txt
# Export in hex format to file
platform-cli keys export --name mykey --format hex --output-file ./mykey.hex
# Export to stdout (requires explicit opt-in)
platform-cli keys export --name mykey --unsafe-stdout
```
If the key is encrypted, you'll be prompted for the password. Set `PLATFORM_CLI_KEY_PASSWORD` to skip the prompt in scripts.
## Deleting Keys
```bash
# Delete with confirmation prompt
platform-cli keys delete --name mykey
# Delete without confirmation
platform-cli keys delete --name mykey --force
```
Deletion is irreversible. Ensure you have a backup first.
## Default Key
Set a default key to avoid specifying `--key-name` on every command:
```bash
# Set default
platform-cli keys default --name mykey
# Show current default
platform-cli keys default
```
## Built-in Test Key: ewoq
Platform CLI includes the well-known `ewoq` test key for local development:
```bash
platform-cli wallet address --key-name ewoq
```
The ewoq key is pre-funded on local networks. Platform CLI blocks its use on mainnet for safety.
## Ledger Hardware Wallet
Build with Ledger support and use the `--ledger` flag:
```bash
go build -tags ledger -o platform-cli .
# Use Ledger for any command
platform-cli wallet address --ledger
platform-cli transfer send --to P-fuji1... --amount 10 --ledger
# Use a different address index
platform-cli wallet balance --ledger --ledger-index 1
```
## Security Best Practices
1. **Keys are encrypted by default** - only use `--encrypt=false` for throwaway test keys
2. **Use strong passwords** (minimum 8 characters required)
3. **Back up keys** immediately after generation
4. **Use environment variables** (`AVALANCHE_PRIVATE_KEY`, `PLATFORM_CLI_KEY_PASSWORD`) for CI/CD
5. **Consider Ledger** for high-value mainnet operations
## Next Steps
Send AVAX using your keys
Add validators and delegate stake
# L1 Validators (/docs/tooling/platform-cli/l1-validators)
Once a subnet is converted to an L1, manage its validators with the `l1` commands. These operations use hex-encoded Warp messages for authorization.
## Register Validator
```bash
platform-cli l1 register-validator \
--balance 1.0 \
--pop 0xabc123... \
--message 0xdef456... \
--key-name mykey
```
| Flag | Description |
|------|-------------|
| `--balance` | Initial balance in AVAX (required) |
| `--pop` | BLS proof of possession hex (required) |
| `--message` | Warp message hex (required) |
## Set Validator Weight
```bash
platform-cli l1 set-validator-weight \
--message 0xabc123... \
--key-name mykey
```
| Flag | Description |
|------|-------------|
| `--message` | Warp message authorizing weight change (required) |
## Increase Validator Balance
Top up a validator's balance for continuous fee payments:
```bash
platform-cli l1 increase-validator-balance \
--validation-id 2QYfFcfZ9... \
--balance 5.0 \
--key-name mykey
```
| Flag | Description |
|------|-------------|
| `--validation-id` | Validation ID (required) |
| `--balance` | AVAX to add (required) |
## Disable Validator
Disable a validator and return remaining funds:
```bash
platform-cli l1 disable-validator \
--validation-id 2QYfFcfZ9... \
--key-name mykey
```
| Flag | Description |
|------|-------------|
| `--validation-id` | Validation ID to disable (required) |
# Staking (/docs/tooling/platform-cli/staking)
Platform CLI provides commands to add validators and delegate stake on the Avalanche primary network.
## Requirements
| Network | Validator Min | Delegator Min | Min Duration |
|---------|---------------|---------------|--------------|
| **Local** | 1 AVAX | 1 AVAX | 24 hours |
| **Fuji** | 1 AVAX | 1 AVAX | 24 hours |
| **Mainnet** | 2,000 AVAX | 25 AVAX | 14 days |
## Adding a Validator
All validators require a BLS proof of possession. You can provide this manually (recommended) or auto-fetch from a node endpoint.
### Manual BLS Mode (Recommended)
```bash
platform-cli validator add-permissionless \
--node-id NodeID-BFa1paAAAA... \
--stake 2000 \
--duration 336h \
--delegation-fee 0.02 \
--bls-public-key 0x1234... \
--bls-pop 0x5678... \
--key-name mykey \
--network mainnet
```
### Auto-Fetch BLS from Node
```bash
platform-cli validator add-permissionless \
--node-id NodeID-BFa1paAAAA... \
--stake 2000 \
--duration 336h \
--delegation-fee 0.02 \
--node-endpoint http://validator.example.com:9650 \
--key-name mykey \
--network mainnet
```
### Get BLS Credentials
Use `node info` to retrieve BLS credentials from a running node:
```bash
platform-cli node info --ip validator.example.com:9650
```
```
Node ID: NodeID-BFa1paAAAA...
BLS Public Key: 0x1234567890abcdef...
BLS PoP: 0xfedcba0987654321...
```
## Delegating Stake
Delegate AVAX to an existing validator:
```bash
platform-cli validator add-permissionless-delegator \
--node-id NodeID-BFa1paAAAA... \
--stake 100 \
--duration 336h \
--key-name mykey \
--network mainnet
```
## Delegation Fees
Validators charge a fee as a percentage of delegator rewards:
| `--delegation-fee` value | Percentage | Meaning |
|--------------------------|------------|---------|
| `0.02` | 2% | Validator keeps 2% of delegation rewards |
| `0.05` | 5% | Validator keeps 5% of delegation rewards |
| `0.10` | 10% | Validator keeps 10% of delegation rewards |
## Timing
### Start Time
```bash
--start now # Default: 30 seconds from submission (5 minutes with --ledger)
--start 2026-02-01T00:00:00Z # RFC3339 format
```
Post-Durango, the P-Chain ignores the transaction start time — validation begins when the transaction is accepted. `--start` is retained for compatibility but has no on-chain effect on current networks.
### Duration
Duration uses Go format (hours):
| Value | Period |
|-------|--------|
| `336h` | 14 days (minimum on mainnet) |
| `720h` | 30 days |
| `2160h` | 90 days |
| `8760h` | 365 days |
## Reward Address
By default, rewards go to your P-Chain address. Specify a different address with:
```bash
--reward-address P-avax1xyz789...
```
## Auto-Renewed Staking (ACP-236)
An auto-renewed validator automatically restakes at the end of each cycle instead of expiring, optionally compounding its rewards. The configuration for the *next* cycle can be updated at any time by the owner address set when the validator was added.
### Add an Auto-Renewed Validator
```bash
platform-cli validator add-auto-renewed \
--node-id NodeID-BFa1paAAAA... \
--stake 2000 \
--period 336h \
--delegation-fee 0.02 \
--auto-compound 1 \
--bls-public-key 0x1234... \
--bls-pop 0x5678... \
--owner-address P-avax1xyz789... \
--key-name mykey \
--network mainnet
```
| Flag | Description | Default |
|------|-------------|---------|
| `--node-id` | Node ID to validate (required) | |
| `--stake` | Stake amount in AVAX (network minimum applies) | |
| `--period` | Auto-renewal cycle duration (e.g. `336h` for 14 days) | `336h` |
| `--auto-compound` | Fraction of rewards to auto-compound (`0.3` = 30%, `1` = 100%) | `1` |
| `--delegation-fee` | Delegation fee (`0.02` = 2%) | `0.02` |
| `--owner-address` | Address authorized to update the auto-renew config | own address |
| `--reward-address` | Reward address | own address |
| `--bls-public-key` / `--bls-pop` | BLS credentials (recommended/manual mode) | |
| `--node-endpoint` | Node endpoint to auto-fetch BLS (fallback mode) | |
### Update the Next-Cycle Config
Change the next cycle's period and auto-compound rate, or stop auto-renewal. Must be signed by the `--owner-address` set at add time, and references the original `add-auto-renewed` transaction ID.
```bash
platform-cli validator set-auto-renewed-config \
--tx-id 2QYfFcfZ9... \
--node-id NodeID-BFa1paAAAA... \
--period 720h \
--auto-compound 0.5 \
--key-name mykey
```
| Flag | Description |
|------|-------------|
| `--tx-id` | Original `AddAutoRenewedValidatorTx` ID (required) |
| `--period` | Next cycle duration, or `0` to exit after the current cycle (required) |
| `--auto-compound` | Fraction of rewards to auto-compound (required) |
| `--node-id` | Validator node ID to narrow the authority lookup (optional, recommended) |
## Next Steps
Create subnets and manage L1 validators
Complete staking command reference
# Subnets (/docs/tooling/platform-cli/subnets)
Platform CLI supports creating subnets, transferring ownership, and converting them to L1 blockchains.
## Create a Subnet
```bash
platform-cli subnet create --key-name mykey --network fuji
```
```
Creating new subnet...
Owner: P-fuji1abc123...
Submitting transaction...
Subnet created successfully!
Subnet ID: 2QYfFcfZ9...
```
The subnet owner is the wallet address used to create it. You need P-Chain AVAX balance to create subnets.
## Transfer Subnet Ownership
Transfer ownership to a new P-Chain address:
```bash
platform-cli subnet transfer-ownership \
--subnet-id 2QYfFcfZ9... \
--new-owner P-fuji1xyz789... \
--key-name mykey
```
## Add a Validator (Permissioned Subnet)
Add a validator to a permissioned subnet (`AddSubnetValidatorTx`). The node must **already be a primary network validator**, and the subnet owner key authorizes the transaction.
```bash
platform-cli subnet add-validator \
--subnet-id 2QYfFcfZ9... \
--node-id NodeID-BFa1paAAAA... \
--weight 100 \
--duration 336h \
--key-name mykey
```
The validation period must fall within the node's primary network validation window. `--weight` is the validator's sampling weight on the subnet (not a stake amount). To add validators to a subnet that has already been converted to an L1, use [`l1 register-validator`](/docs/tooling/platform-cli/l1-validators) instead.
## Convert Subnet to L1
Convert a permissioned subnet to an L1 blockchain. This operation is **irreversible**.
### Auto-Discovery Mode
Provide validator node addresses and let the CLI fetch NodeID and BLS credentials:
```bash
platform-cli subnet convert-to-l1 \
--subnet-id 2QYfFcfZ9... \
--chain-id 3RZgGdaH1... \
--manager 0x1234567890abcdef1234567890abcdef12345678 \
--validators 127.0.0.1:9650,127.0.0.1:9652 \
--validator-balance 1.0 \
--key-name mykey
```
### Manual Mode
Provide validator data explicitly (all lists must be comma-separated and aligned by index):
```bash
platform-cli subnet convert-to-l1 \
--subnet-id 2QYfFcfZ9... \
--chain-id 3RZgGdaH1... \
--manager 0x1234... \
--validator-node-ids NodeID-A...,NodeID-B... \
--validator-bls-public-keys 0xabc...,0xdef... \
--validator-bls-pops 0x111...,0x222... \
--validator-balance 1.0 \
--key-name mykey
```
### Mock Validator (Testing)
For local testing, generate a mock validator with random BLS credentials:
```bash
platform-cli subnet convert-to-l1 \
--subnet-id 2QYfFcfZ9... \
--chain-id 3RZgGdaH1... \
--mock-validator \
--key-name mykey \
--rpc-url http://127.0.0.1:9650
```
# Transfers (/docs/tooling/platform-cli/transfers)
Platform CLI supports P-Chain AVAX transfers and cross-chain transfers between P-Chain and C-Chain.
## Amount Formats
| Format | Description | Example |
|--------|-------------|---------|
| `--amount` | Human-readable AVAX | `--amount 10.5` |
| `--amount-navax` | Exact nAVAX (1 AVAX = 1,000,000,000 nAVAX) | `--amount-navax 10500000000` |
These flags are mutually exclusive. Use `--amount-navax` when exact precision matters for large transfers.
## P-Chain Send
Send AVAX to another P-Chain address:
```bash
platform-cli transfer send --to P-fuji1abc123... --amount 10 --key-name mykey
# With exact nAVAX amount
platform-cli transfer send --to P-fuji1abc123... --amount-navax 10000000000 --key-name mykey
# On mainnet
platform-cli transfer send --to P-avax1abc123... --amount 100 --network mainnet --key-name mykey
```
## Cross-Chain: P-Chain to C-Chain
Transfer AVAX from P-Chain to C-Chain in one step (handles export + import automatically):
```bash
platform-cli transfer p-to-c --amount 10 --key-name mykey
```
Output:
```
Transferring 10000000000 nAVAX (10.000000000 AVAX) from P-Chain to C-Chain...
P-Chain Address: P-fuji1abc123...
C-Chain Address: 0xdef456...
Step 1/2: Exporting from P-Chain...
Export TX ID: 2QYfFcfZ9...
Step 2/2: Importing to C-Chain...
Import TX ID: 3RZgGdaH1...
Transfer complete!
```
## Cross-Chain: C-Chain to P-Chain
```bash
platform-cli transfer c-to-p --amount 5 --key-name mykey
```
## Manual Two-Step Transfers
For advanced use cases, perform export and import separately:
```bash
# Step 1: Export
platform-cli transfer export --from p --to c --amount 10 --key-name mykey
# Step 2: Import (after network confirmation)
platform-cli transfer import --from p --to c --key-name mykey
```
The `--from` and `--to` flags accept `p` or `c`.
## Checking Balances
```bash
platform-cli wallet balance --key-name mykey --network fuji
```
```
P-Chain Address: P-fuji1abc123...
Balance: 100.000000000 AVAX
```
## Viewing Addresses
The same private key derives different addresses on each chain:
```bash
platform-cli wallet address --key-name mykey
```
```
P-Chain Address: P-fuji1abc123...
EVM Address: 0xdef456...
```
## Next Steps
Use P-Chain AVAX for staking
Create subnets with P-Chain AVAX
# Overview (/docs/tooling/tmpnet)
tmpnet creates temporary Avalanche networks on your local machine. You get a complete multi-node network with consensus, P2P communication, and pre-funded test keys—everything you need to test custom VMs, L1s, and applications before deploying to testnet or mainnet.
Networks run as native processes (no Docker needed). All configuration lives on disk at `~/.tmpnet/networks/`, making it easy to inspect state, share configs, or debug issues.
## What You Get
| Feature | Description |
|---------|-------------|
| **Multi-node networks** | Spin up 2-50 validator nodes in under a minute |
| **Pre-funded keys** | 50 keys with AVAX balances on P, X, and C-Chain |
| **Custom VMs** | Deploy and test your Virtual Machines |
| **Subnets** | Create subnets with specific validator sets |
| **Monitoring** | Prometheus metrics and Promtail logs out of the box |
| **CLI + Go API** | Use `tmpnetctl` commands or Go code |
## Use Cases
| Scenario | What You Can Test |
|----------|-------------------|
| **L1 Development** | Run your L1 with multiple validators locally before deploying to Fuji |
| **Custom VMs** | Test VM behavior with real consensus across multiple nodes |
| **Staking Operations** | Add validators, test delegation, verify rewards distribution |
| **Subnet Testing** | Create subnets, manage validators, test cross-subnet messaging |
| **Integration Tests** | Write automated Go tests that spin up networks on demand |
## Basic Workflow
```bash
# Start a 5-node network
tmpnetctl start-network --avalanchego-path=./bin/avalanchego
# Network is running at ~/.tmpnet/networks/latest
# Get node URIs
cat ~/.tmpnet/networks/latest/NodeID-*/process.json | jq -r '.uri'
# Get pre-funded keys
cat ~/.tmpnet/networks/latest/config.json | jq -r '.preFundedKeys[0]'
# Stop when done
tmpnetctl stop-network
```
## Network Directory Structure
Each network you create gets its own directory at `~/.tmpnet/networks/[timestamp]/`:
| Path | Contents |
|------|----------|
| `config.json` | Network settings, pre-funded keys |
| `genesis.json` | Genesis configuration |
| `NodeID-*/` | Per-node directories (logs, database, config) |
| `NodeID-*/process.json` | Running node info (PID, URI, ports) |
| `metrics.txt` | Grafana dashboard link |
The `latest` symlink always points to your most recent network.
Both `tmpnetctl` and your Go code can manage the same networks because everything is file-based. No daemon, no Docker, no magic.
## Getting Started
Build tmpnet and avalanchego
Create your first network
Deploy your VM to a local network
Test validator operations
## Support & Resources
- [GitHub Repository](https://github.com/ava-labs/avalanchego/tree/master/tests/fixture/tmpnet)
- [Full README](https://github.com/ava-labs/avalanchego/blob/master/tests/fixture/tmpnet/README.md)
- [Discord Community](https://chat.avalabs.org/)
- [Documentation](https://docs.avax.network/)
# Installation (/docs/tooling/tmpnet/installation)
This guide walks you through setting up tmpnet for testing your Avalanche applications and L1s.
## Prerequisites
### 1. Operating System
tmpnet runs on:
- **macOS** (Intel and Apple Silicon)
- **Linux**
Windows is not currently supported.
### 2. Go
tmpnet requires **Go 1.21 or later**. Check your version:
```bash
go version
```
If you need to install or update Go, visit [golang.org/dl](https://golang.org/dl/).
### 3. Git
Ensure you have Git installed:
```bash
git --version
```
## Installation
### Step 1: Clone AvalancheGo
tmpnet is part of the AvalancheGo repository:
```bash
# Clone the repository
git clone https://github.com/ava-labs/avalanchego.git
cd avalanchego
```
### Step 2: Build the Binaries
Build both AvalancheGo and tmpnetctl:
```bash
# Build AvalancheGo
./scripts/build.sh
# Build tmpnetctl
./scripts/build_tmpnetctl.sh
```
You now have:
- `build/avalanchego` and `build/tmpnetctl` - compiled binaries
- `bin/avalanchego` and `bin/tmpnetctl` - thin wrappers that rebuild if needed
### Step 3: Verify Installation
Test that the binaries work:
```bash
# Check AvalancheGo
./bin/avalanchego --version
# Check tmpnetctl
./bin/tmpnetctl --help
```
You should see version information and available commands.
## Understanding the Directory Structure
AvalancheGo has two directories for binaries:
### `build/` Directory (Actual Binaries)
Contains the compiled binaries:
- `build/avalanchego` - Main node binary
- `build/tmpnetctl` - Network management CLI
- `build/plugins/` - Custom VM plugins
### `bin/` Directory (Convenience Wrappers)
Symlinks that rebuild when needed, so they're safe defaults while iterating:
- `bin/avalanchego` → `scripts/run_avalanchego.sh`
- `bin/tmpnetctl` → `scripts/run_tmpnetctl.sh`
For most workflows (and in the upstream README), use the `bin/` wrappers or enable the repo's `.envrc` so `tmpnetctl` is on your `PATH`.
## Optional: Simplified Setup with direnv
[direnv](https://direnv.net/) automatically loads the repo's `.envrc` so tmpnet has the paths it needs.
### Install and Configure
**macOS:**
```bash
brew install direnv
echo 'eval "$(direnv hook zsh)"' >> ~/.zshrc
source ~/.zshrc
```
**Linux:**
```bash
# Ubuntu/Debian
sudo apt-get install direnv
# Add to shell
echo 'eval "$(direnv hook bash)"' >> ~/.bashrc
source ~/.bashrc
```
### Enable in AvalancheGo
```bash
cd /path/to/avalanchego
direnv allow
```
The repo's `.envrc` then:
- Adds `bin/` to `PATH` so you can run `tmpnetctl` directly
- Sets `AVALANCHEGO_PATH=$PWD/bin/avalanchego`
- Sets `AVAGO_PLUGIN_DIR=$PWD/build/plugins` (and creates the dir)
- Sets `TMPNET_NETWORK_DIR=~/.tmpnet/networks/latest`
Now you can run:
```bash
tmpnetctl start-network --node-count=3
```
## Optional: Monitoring Tools
To collect metrics and logs from your networks:
**Using Nix (Recommended):**
```bash
nix develop # Provides prometheus and promtail
```
**Manual Installation:**
- **Prometheus**: Download from [prometheus.io/download](https://prometheus.io/download/) or `brew install prometheus`
- **Promtail**: Download from [Grafana Loki releases](https://github.com/grafana/loki/releases)
See the [Monitoring guide](/docs/tooling/tmpnet/guides/monitoring) for setup details.
## Environment Variables
Key environment variables tmpnet uses:
| Variable | Purpose | Default |
|----------|---------|---------|
| `AVALANCHEGO_PATH` | Path to avalanchego binary (required unless passed as `--avalanchego-path`) | None |
| `AVAGO_PLUGIN_DIR` | Plugin directory for custom VMs | `~/.avalanchego/plugins` (or `$PWD/build/plugins` via `.envrc`) |
| `TMPNET_ROOT_NETWORK_DIR` | Where new networks are created | `~/.tmpnet/networks` |
| `TMPNET_NETWORK_DIR` | Existing network to target for stop/restart/check commands | Unset (set automatically by `network.env` or `.envrc`) |
### Recommended Shell Setup
If you aren't using direnv, add something like this to `~/.bashrc` or `~/.zshrc`:
```bash
export AVALANCHEGO_PATH=~/avalanchego/bin/avalanchego
export AVAGO_PLUGIN_DIR=~/.avalanchego/plugins
export TMPNET_NETWORK_DIR=~/.tmpnet/networks/latest # optional convenience
export PATH=$PATH:~/avalanchego/bin
```
## Plugin Directory Setup
If you're testing custom VMs, create the plugin directory:
```bash
mkdir -p ~/.avalanchego/plugins
```
Place your custom VM binaries in this directory. The plugin binary name should match your VM name.
## Troubleshooting
### Command not found: tmpnetctl
If you get "command not found":
**Option 1:** Use the full path
```bash
./bin/tmpnetctl --help
```
**Option 2:** Add to PATH
```bash
export PATH=$PATH:$(pwd)/bin
tmpnetctl --help
```
**Option 3:** Use direnv (recommended)
```bash
direnv allow
tmpnetctl --help
```
### Build Failures
If builds fail:
1. **Check Go version:**
```bash
go version # Must be 1.21 or later
```
2. **Check you're in the repository root:**
```bash
pwd # Should be /path/to/avalanchego
ls scripts/build.sh # Should exist
```
3. **Try cleaning and rebuilding:**
```bash
rm -rf build/
./scripts/build.sh
```
### Permission Denied
If you get permission errors:
```bash
chmod +x ./bin/tmpnetctl
chmod +x ./bin/avalanchego
```
### Binary Not Found Error
If tmpnetctl says avalanchego not found:
```bash
# Verify the binary exists
ls -lh ./bin/avalanchego
# Use absolute path when starting networks
tmpnetctl start-network --avalanchego-path="$(pwd)/bin/avalanchego"
```
## Next Steps
Now that tmpnet is installed, create your first network!
Start your first temporary network in minutes
Learn how to test your custom VM or L1
# Quick Start (/docs/tooling/tmpnet/quick-start)
This guide will help you create, interact with, and manage your first temporary network using tmpnet.
## Before You Start
Make sure you've completed the [installation](/docs/tooling/tmpnet/installation) and have:
- Built `avalanchego` and `tmpnetctl`
- A shell in the avalanchego repo root
- Either `direnv allow`'d the repo **or** can pass `--avalanchego-path`
## Start Your First Network
### Basic Start Command
Start a 2-node network (default is 5):
```bash
cd /path/to/avalanchego
# If you enabled direnv (.envrc sets paths)
tmpnetctl start-network --node-count=2
# Without direnv, pass the avalanchego path explicitly
./bin/tmpnetctl start-network \
--avalanchego-path="$(pwd)/bin/avalanchego" \
--node-count=2
```
**Expected Output:**
```
[12-05|15:23:26.831] INFO tmpnet/network.go:254 preparing configuration for new network
[12-05|15:23:26.839] INFO tmpnet/network.go:385 starting network {"networkDir": "/Users/you/.tmpnet/networks/20251205-152326.831812", "uuid": "0ef20abc-4d96-438f-943c-a4442254b9bb"}
[12-05|15:23:27.992] INFO tmpnet/process_runtime.go:148 started local node {"nodeID": "NodeID-Pw8tmrG..."}
[12-05|15:23:28.395] INFO tmpnet/process_runtime.go:148 started local node {"nodeID": "NodeID-KBxAJo5..."}
[12-05|15:23:28.396] INFO tmpnet/network.go:400 waiting for nodes to report healthy
[12-05|15:23:30.399] INFO tmpnet/network.go:976 node is healthy {"nodeID": "NodeID-KBxAJo5...", "uri": "http://127.0.0.1:56395"}
[12-05|15:23:33.999] INFO tmpnet/network.go:976 node is healthy {"nodeID": "NodeID-Pw8tmrG...", "uri": "http://127.0.0.1:56386"}
[12-05|15:23:33.999] INFO tmpnet/network.go:404 started network
Configure tmpnetctl to target this network by default with one of the following statements:
- source /Users/you/.tmpnet/networks/20251205-152326.831812/network.env
- export TMPNET_NETWORK_DIR=/Users/you/.tmpnet/networks/20251205-152326.831812
- export TMPNET_NETWORK_DIR=/Users/you/.tmpnet/networks/latest
```
The network is now running with 2 validator nodes!
### With direnv (Simpler)
If you've set up direnv:
```bash
cd /path/to/avalanchego
direnv allow
# Much simpler!
tmpnetctl start-network --node-count=2
```
## Configure Your Shell
To manage your network without specifying `--network-dir` every time, set `TMPNET_NETWORK_DIR`:
```bash
# Option 1: Use the 'latest' symlink (recommended)
export TMPNET_NETWORK_DIR=~/.tmpnet/networks/latest
```
The `latest` symlink always points to the most recently created network. Now you can run commands without flags:
```bash
tmpnetctl stop-network # Uses TMPNET_NETWORK_DIR
tmpnetctl restart-network
```
**Make it permanent** by adding to your shell config:
```bash
# For zsh (macOS)
echo 'export TMPNET_NETWORK_DIR=~/.tmpnet/networks/latest' >> ~/.zshrc
source ~/.zshrc
# For bash (Linux)
echo 'export TMPNET_NETWORK_DIR=~/.tmpnet/networks/latest' >> ~/.bashrc
source ~/.bashrc
```
**Alternative**: Source the network's env file directly:
```bash
source ~/.tmpnet/networks/latest/network.env
```
## Explore Your Network
### Network Directory Structure
```bash
ls ~/.tmpnet/networks/latest/
```
**Output:**
```
config.json # Network configuration
genesis.json # Genesis file
metrics.txt # Grafana dashboard link
network.env # Environment setup script
NodeID-74mGyq7dVVCeE4RUn4pufRMvYTFTEykcp/ # Node 1 directory
NodeID-BTtC98RhLA5mbctKczZQC2Rt6N9DziM4c/ # Node 2 directory
```
### Find Node API Endpoints
Each node exposes API endpoints on dynamically allocated ports. When tmpnet starts a node with `--http-port=0`, the OS assigns an available port. AvalancheGo then writes the actual allocated port to `process.json` via the `--process-context-file` flag.
The `process.json` file is created by **avalanchego itself**, not by tmpnetctl. When tmpnet starts a node, it passes:
- `--http-port=0` and `--staking-port=0` for dynamic port allocation
- `--process-context-file=[node-dir]/process.json` to specify where avalanchego should write runtime info
AvalancheGo then writes its PID, URI (with the actual allocated port), and staking address to this file once it starts.
```bash
# View all node URIs
cat ~/.tmpnet/networks/latest/NodeID-*/process.json | jq -r '.uri'
```
**Example output:**
```
http://127.0.0.1:56395
http://127.0.0.1:56386
```
### Get a Single Node URI
```bash
# Store first node URI in a variable
NODE_URI=$(cat ~/.tmpnet/networks/latest/NodeID-*/process.json | jq -r '.uri' | head -1)
echo $NODE_URI
```
### Call Node RPCs
Use the URI to call standard Avalanche APIs over HTTP:
```bash
# Health
curl -s "$NODE_URI/ext/health" | jq '.healthy'
# Node ID
curl -s -X POST --data '{
"jsonrpc": "2.0",
"id": 1,
"method": "info.getNodeID"
}' -H 'content-type:application/json;' "$NODE_URI/ext/info" | jq
# C-Chain RPC (replace with your chain ID if different)
CHAIN_ID=C
curl -s -X POST --data '{
"jsonrpc":"2.0",
"id":1,
"method":"eth_blockNumber",
"params":[]
}' -H 'content-type:application/json;' "$NODE_URI/ext/bc/$CHAIN_ID/rpc" | jq
```
## Interact with Your Network
### Check Node Health
```bash
curl -s http://127.0.0.1:56395/ext/health | jq '.healthy'
```
**Response:**
```json
true
```
### Get Node Information
```bash
curl -s -X POST --data '{
"jsonrpc": "2.0",
"id": 1,
"method": "info.getNodeID"
}' -H 'content-type:application/json;' http://127.0.0.1:56395/ext/info | jq
```
**Response:**
```json
{
"jsonrpc": "2.0",
"result": {
"nodeID": "NodeID-74mGyq7dVVCeE4RUn4pufRMvYTFTEykcp",
"nodePOP": {
"publicKey": "...",
"proofOfPossession": "..."
}
},
"id": 1
}
```
### Check Network Info
```bash
curl -s -X POST --data '{
"jsonrpc": "2.0",
"id": 1,
"method": "info.getNetworkID"
}' -H 'content-type:application/json;' http://127.0.0.1:56395/ext/info | jq
```
## Use Pre-funded Keys
Every tmpnet network comes with **50 pre-funded test keys** ready for immediate use. These keys have large balances on all chains (X-Chain, P-Chain, and C-Chain).
### View Pre-funded Keys
```bash
cat ~/.tmpnet/networks/latest/config.json | jq '.preFundedKeys'
```
**Example output:**
```json
[
"PrivateKey-ewoqjP7PxY4yr3iLTpLisriqt94hdyDFNgchSxGGztUrTXtNN",
"PrivateKey-2VbLJLjPJn4XA8UqQ4BjmF5LmkZj4EZ2dXLKmKPmXTbKHvvQh6",
"PrivateKey-R6e8f5QSa89DjpvL9asNdhdJ4u8VqzMJStPV8VVdDmLgPd8x4",
...
]
```
### Get a Single Key for Testing
```bash
# Store the first pre-funded key
TEST_KEY=$(cat ~/.tmpnet/networks/latest/config.json | jq -r '.preFundedKeys[0]')
echo $TEST_KEY
# Output: PrivateKey-ewoqjP7PxY4yr3iLTpLisriqt94hdyDFNgchSxGGztUrTXtNN
```
### What Are These Keys Funded With?
Each key has balances on:
- **P-Chain** - For staking and subnet operations
- **X-Chain** - For asset transfers
- **C-Chain** - For EVM transactions (contract deployments, etc.)
You can use these keys immediately for transactions, contract deployments, staking operations, and validator management.
## Use with Foundry/Cast
tmpnet networks work with standard EVM tools like Foundry. Here's how to connect.
### Set Up Environment Variables
```bash
# Get the first node's URI and construct the C-Chain RPC URL
NODE_URI=$(cat ~/.tmpnet/networks/latest/NodeID-*/process.json | jq -r '.uri' | head -1)
export RPC_URL="${NODE_URI}/ext/bc/C/rpc"
echo $RPC_URL
# Example: http://127.0.0.1:56395/ext/bc/C/rpc
```
### The EWOQ Test Key
Every tmpnet network includes the well-known EWOQ test key, pre-funded with AVAX:
| Property | Value |
|----------|-------|
| Private Key (hex) | `56289e99c94b6912bfc12adc093c9b51124f0dc54ac7a766b2bc5ccf558d8027` |
| Address | `0x8db97C7cEcE249c2b98bDC0226Cc4C2A57BF52FC` |
| C-Chain Balance | 50,000,000 AVAX |
```bash
export PRIVATE_KEY="56289e99c94b6912bfc12adc093c9b51124f0dc54ac7a766b2bc5ccf558d8027"
```
The EWOQ key is publicly known. Never use it on Fuji or Mainnet—only for local development.
### Common Cast Commands
```bash
# Check balance
cast balance 0x8db97C7cEcE249c2b98bDC0226Cc4C2A57BF52FC --rpc-url $RPC_URL
# Get chain ID
cast chain-id --rpc-url $RPC_URL
# Get latest block
cast block-number --rpc-url $RPC_URL
# Send AVAX to another address
cast send 0xYourAddress --value 1ether \
--rpc-url $RPC_URL \
--private-key $PRIVATE_KEY
```
### Deploy Contracts with Forge
```bash
# Deploy a contract
forge create src/MyContract.sol:MyContract \
--rpc-url $RPC_URL \
--private-key $PRIVATE_KEY
# Run a deployment script
forge script script/Deploy.s.sol \
--rpc-url $RPC_URL \
--private-key $PRIVATE_KEY \
--broadcast
```
### Chain Configuration
For `foundry.toml`:
```toml
[rpc_endpoints]
local = "http://127.0.0.1:56395/ext/bc/C/rpc"
[etherscan]
# No explorer for local networks
```
Remember that tmpnet uses dynamic ports. If you restart your network, the port may change. Always re-export `RPC_URL` after restarting.
## View Network Configuration
### Network Configuration
```bash
cat ~/.tmpnet/networks/latest/config.json | jq '{
uuid,
owner,
preFundedKeyCount: (.preFundedKeys | length)
}'
```
### Genesis Configuration
```bash
cat ~/.tmpnet/networks/latest/genesis.json | jq '.networkID'
```
### Node Configuration
```bash
# View node flags
cat ~/.tmpnet/networks/latest/NodeID-*/flags.json | head -1 | jq
# View node runtime config
cat ~/.tmpnet/networks/latest/NodeID-*/config.json | head -1 | jq
```
## Manage Your Network
### Stop the Network
```bash
tmpnetctl stop-network
```
**Output:**
```
Stopped network configured at: /Users/you/.tmpnet/networks/latest
```
### Restart the Network
```bash
tmpnetctl restart-network
```
This preserves all network data and configuration, restarting with the same genesis and keys.
### Start a New Network
```bash
# This creates a completely new network with new keys
tmpnetctl start-network \
--avalanchego-path="$(pwd)/bin/avalanchego" \
--node-count=3
```
## View Node Logs
### Watch Logs in Real-time
```bash
# Watch all node logs
tail -f ~/.tmpnet/networks/latest/NodeID-*/logs/main.log
# Watch a specific node
tail -f ~/.tmpnet/networks/latest/NodeID-74mGyq7dVVCeE4RUn4pufRMvYTFTEykcp/logs/main.log
```
### Search Logs for Errors
```bash
grep -i "error" ~/.tmpnet/networks/latest/NodeID-*/logs/main.log
```
### View Recent Log Lines
```bash
tail -50 ~/.tmpnet/networks/latest/NodeID-*/logs/main.log
```
## Common Operations
### Check Running Processes
```bash
# View all node processes
ps aux | grep avalanchego
# Count running nodes
ps aux | grep avalanchego | grep -v grep | wc -l
```
### Get All Node URIs at Once
```bash
# Create a simple script
for process_file in ~/.tmpnet/networks/latest/NodeID-*/process.json; do
jq -r '.uri' "$process_file"
done
```
### Check Node Process Details
```bash
# View process information for all nodes
cat ~/.tmpnet/networks/latest/NodeID-*/process.json | jq '{
pid,
uri,
stakingAddress
}'
```
## Directory Structure Reference
```
~/.tmpnet/networks/latest/
├── config.json # Network configuration (owner, UUID, keys)
├── genesis.json # Genesis file with allocations
├── metrics.txt # Grafana dashboard link
├── network.env # Shell environment variables
└── NodeID-/ # Per-node directory
├── config.json # Node runtime configuration
├── flags.json # Node flags
├── process.json # Process info (PID, URIs, ports)
├── logs/
│ └── main.log # Node logs
├── db/ # Node database
└── chainData/ # Chain data
```
## Troubleshooting
### Network Won't Start
**Error: `avalanchego binary not found`**
Solution:
```bash
# Verify binary exists
ls -lh ./bin/avalanchego
# Use absolute path
tmpnetctl start-network \
--avalanchego-path="$(pwd)/bin/avalanchego"
```
**Error: `address already in use`**
Solution:
```bash
# Check for running nodes
ps aux | grep avalanchego
# Stop existing network
export TMPNET_NETWORK_DIR=~/.tmpnet/networks/latest
tmpnetctl stop-network
```
### Can't Connect to Nodes
**Issue:** Curl commands fail
Solution:
```bash
# 1. Verify nodes are running
ps aux | grep avalanchego
# 2. Check actual URIs
cat ~/.tmpnet/networks/latest/NodeID-*/process.json | jq -r '.uri'
# 3. Test health endpoint with correct URI
curl http://127.0.0.1:/ext/health
```
### Missing process.json Files
**Issue:** `process.json` files don't exist in node directories, or ports in `flags.json` are all `0`
This happens when running avalanchego manually without the `--process-context-file` flag.
**Understanding the issue:**
- `flags.json` showing `"http-port": "0"` is correct - this tells the OS to allocate a dynamic port
- `process.json` is created by **avalanchego itself** when started with the `--process-context-file` flag
- tmpnetctl automatically passes this flag, but manual setups need to include it
**Solution for manual avalanchego setups:**
```bash
# When starting avalanchego manually with dynamic ports, include:
avalanchego \
--http-port=0 \
--staking-port=0 \
--process-context-file=/path/to/node/process.json \
# ... other flags
# AvalancheGo will write the actual allocated ports to process.json
```
**If using tmpnetctl:** The `process.json` files should be created automatically. If they're missing, ensure:
1. The network started successfully (check for "started network" in output)
2. Nodes are still running (`ps aux | grep avalanchego`)
3. You're looking in the correct network directory
### Command Not Found
**Error: `tmpnetctl: command not found`**
Solution:
```bash
# Use full path
./bin/tmpnetctl --help
# Or add to PATH
export PATH=$PATH:$(pwd)/bin
tmpnetctl --help
# Or use direnv
direnv allow
tmpnetctl --help
```
### Clean Up Everything
To remove all networks and start fresh:
```bash
# Stop any running networks
export TMPNET_NETWORK_DIR=~/.tmpnet/networks/latest
tmpnetctl stop-network
# Remove all tmpnet data (optional)
rm -rf ~/.tmpnet/networks
```
## Next Steps
Now that you have a running network, learn how to:
Deploy and test your custom Virtual Machine
Create and test custom subnets
Choose between local and Kubernetes runtimes
Set up metrics and log collection
# Troubleshooting Runtime Issues (/docs/tooling/tmpnet/troubleshooting-runtime)
This guide helps you diagnose and resolve common issues with tmpnet's different runtime environments. Issues are organized by runtime type for quick reference.
## Local Process Runtime Issues
### Port Conflicts
**Symptom:** Error messages like "address already in use" or "bind: address already in use" when starting a network.
**Cause:** A previous network is still running, or another application is using the ports.
**Solution:**
```bash
# Check for orphaned avalanchego processes
ps aux | grep avalanchego
# Kill any orphaned processes
pkill -f avalanchego
# Verify ports are free
lsof -i :9650-9660
```
**Prevention:** Always use dynamic port allocation by setting ports to "0":
```go
network.DefaultFlags = tmpnet.FlagsMap{
"http-port": "0", // Let OS assign available port
"staking-port": "0", // Let OS assign available port
}
```
Avoid hardcoding port numbers unless you have a specific reason. Dynamic ports prevent conflicts when running multiple networks or tests concurrently.
### Process Not Stopping
**Symptom:** After calling `network.Stop()`, avalanchego processes remain running in the background.
**Cause:** Process termination may fail silently, or cleanup may not complete properly.
**Solution:**
```bash
# Find all avalanchego processes
ps aux | grep avalanchego
# Try graceful termination first
pkill -TERM -f avalanchego
sleep 5
# If processes still running, force kill as last resort
pkill -9 -f avalanchego
# Clean up temporary directories if needed
# First verify which network you want to delete
ls -lt ~/.tmpnet/networks/
# Then delete the specific network directory
rm -rf ~/.tmpnet/networks/20250312-143052.123456
```
Use `pkill -9` (SIGKILL) only as a last resort after graceful termination fails. SIGKILL doesn't allow cleanup and can leave the database in an inconsistent state.
**Prevention:** Always use context with timeout for Stop operations:
```go
ctx, cancel := context.WithTimeout(context.Background(), 30*time.Second)
defer cancel()
if err := network.Stop(ctx); err != nil {
// Log error but continue cleanup
log.Printf("Failed to stop network cleanly: %v", err)
}
```
### Binary Not Found
**Symptom:** Error "avalanchego not found" or "executable file not found in $PATH" when starting nodes.
**Cause:** The avalanchego binary path is incorrect or not specified.
**Solution:**
```bash
# Verify the binary exists
ls -lh /path/to/avalanchego
# Use absolute path when configuring
export AVALANCHEGO_PATH="$(pwd)/bin/avalanchego"
# Or specify in code
runtimeCfg := &tmpnet.ProcessRuntimeConfig{
AvalancheGoPath: "/absolute/path/to/avalanchego",
}
```
**Verification:**
```bash
# Test the binary works
/path/to/avalanchego --version
# Should output version information
```
When using relative paths, ensure they resolve correctly from your test working directory. Absolute paths are more reliable for test automation.
### Logs Location
**Where to find logs:** Node logs are stored in the network directory under each node's subdirectory.
```bash
# Find the latest network
ls -lt ~/.tmpnet/networks/
# Use the 'latest' symlink
tail -f ~/.tmpnet/networks/latest/NodeID-*/logs/main.log
# Or specify the timestamp directory
tail -f ~/.tmpnet/networks/20250312-143052.123456/NodeID-7Xhw2mX5xVHr1ANraYiTgjuB8Jqdbj8/logs/main.log
```
**Useful log commands:**
```bash
# View all node logs simultaneously
tail -f ~/.tmpnet/networks/latest/NodeID-*/logs/main.log
# Search for errors across all nodes
grep -r "ERROR" ~/.tmpnet/networks/latest/*/logs/
# Monitor a specific node
export NODE_ID="NodeID-7Xhw2mX5xVHr1ANraYiTgjuB8Jqdbj8"
tail -f ~/.tmpnet/networks/latest/$NODE_ID/logs/main.log
```
## Kubernetes Runtime Issues
### Pod Stuck in Pending
**Symptom:** Node pods remain in "Pending" state and never start.
**Common causes:**
- Insufficient cluster resources (CPU/memory)
- Node selector constraints not met
- Storage class unavailable
- Image pull errors (see below)
**Diagnosis:**
```bash
# Check pod status details
kubectl describe pod avalanchego-node-0 -n tmpnet
# Look for events section
kubectl get events -n tmpnet --sort-by='.lastTimestamp'
# Check node resources
kubectl top nodes
```
**Solutions:**
```bash
# If resource limits are too high, adjust them
kubectl edit statefulset avalanchego -n tmpnet
# Verify your cluster has available nodes
kubectl get nodes
# Check for node taints
kubectl describe nodes | grep -i taint
```
### Image Pull Errors
**Symptom:** Pod status shows "ImagePullBackOff" or "ErrImagePull".
**Cause:** Cannot pull the Docker image from the registry.
**Diagnosis:**
```bash
# Check image pull status
kubectl describe pod avalanchego-node-0 -n tmpnet | grep -A 5 "Events:"
# Verify image name
kubectl get pod avalanchego-node-0 -n tmpnet -o jsonpath='{.spec.containers[0].image}'
```
**Solutions:**
```bash
# Verify image exists in registry
docker pull avaplatform/avalanchego:latest
# If using private registry, check image pull secrets
kubectl get secrets -n tmpnet
# Create image pull secret if needed
kubectl create secret docker-registry regcred \
--docker-server= \
--docker-username= \
--docker-password= \
-n tmpnet
```
**Alternative:** Use a local image with kind:
```bash
# Load image into kind cluster
kind load docker-image avaplatform/avalanchego:latest --name tmpnet-cluster
```
### Ingress Not Working
**Symptom:** Cannot reach node APIs through ingress endpoints, connection refused or timeouts.
**Cause:** Ingress controller not installed, misconfigured, or ingress rules not applied.
**Diagnosis:**
```bash
# Check if ingress controller is running
kubectl get pods -n ingress-nginx
# Verify ingress resource exists
kubectl get ingress -n tmpnet
# Check ingress details
kubectl describe ingress avalanchego-ingress -n tmpnet
# Test service directly (bypassing ingress)
kubectl port-forward svc/avalanchego-node-0 9650:9650 -n tmpnet
curl http://localhost:9650/ext/health
```
**Solutions:**
```bash
# Install ingress controller if missing
kubectl apply -f https://raw.githubusercontent.com/kubernetes/ingress-nginx/main/deploy/static/provider/kind/deploy.yaml
# Verify ingress host configuration
kubectl get ingress -n tmpnet -o yaml | grep host:
# Check service endpoints
kubectl get endpoints -n tmpnet
```
For kind clusters, ensure you created the cluster with `extraPortMappings` to expose ports 80/443. See the [kind ingress documentation](https://kind.sigs.k8s.io/docs/user/ingress/).
### StatefulSet Not Updating
**Symptom:** After updating the StatefulSet (e.g., changing image version), pods still run the old image.
**Cause:** StatefulSet update strategy is set to `OnDelete` by default, requiring manual pod deletion.
**Solution:**
```bash
# Check update strategy
kubectl get statefulset avalanchego -n tmpnet -o jsonpath='{.spec.updateStrategy}'
# Manually delete pods to trigger update
kubectl delete pod avalanchego-node-0 -n tmpnet
# StatefulSet will recreate with new image
# Or delete all pods
kubectl delete pods -l app=avalanchego -n tmpnet
```
**Change to rolling updates:**
```bash
kubectl patch statefulset avalanchego -n tmpnet -p '{"spec":{"updateStrategy":{"type":"RollingUpdate"}}}'
```
### Persistent Volume Issues
**Symptom:** Pod cannot start with error "FailedMount" or "PVC not bound".
**Cause:** Persistent Volume Claims (PVCs) cannot be provisioned or bound.
**Diagnosis:**
```bash
# Check PVC status
kubectl get pvc -n tmpnet
# Should show "Bound" status
# If "Pending", check details
kubectl describe pvc data-avalanchego-node-0 -n tmpnet
# Verify storage class exists
kubectl get storageclass
```
**Solutions:**
```bash
# If using kind or minikube, ensure default storage class exists
kubectl get storageclass
# For kind, standard storage class should be available by default
# For custom clusters, install a storage provisioner
# Delete stuck PVCs if needed (will delete data!)
kubectl delete pvc data-avalanchego-node-0 -n tmpnet
```
## General Runtime Issues
### Health Check Failures
**Symptom:** Node reports as unhealthy or `IsHealthy()` returns false in tests.
**Cause:** Node may still be bootstrapping, or there's a configuration issue.
**Health check endpoint:** `GET /ext/health/liveness` on the HTTP port.
**Diagnosis:**
```bash
# Check health endpoint directly
curl http://localhost:9650/ext/health/liveness
# Expected healthy response:
# {"checks":{"network":{"message":{"..."},"timestamp":"...","duration":123,"contiguousFailures":0,"timeOfFirstFailure":null}},"healthy":true}
# Check if node is still bootstrapping
curl http://localhost:9650/ext/info | jq '.result.isBootstrapped'
```
**Solutions:**
Wait longer - bootstrapping can take time:
```go
// Use generous timeout for health checks
ctx, cancel := context.WithTimeout(context.Background(), 5*time.Minute)
defer cancel()
err := node.WaitForHealthy(ctx)
if err != nil {
return fmt.Errorf("node failed to become healthy: %w", err)
}
```
Check logs for errors:
```bash
# Look for bootstrap progress
tail -f ~/.tmpnet/networks/latest/NodeID-*/logs/main.log | grep -i "bootstrap"
# Check for errors
tail -f ~/.tmpnet/networks/latest/NodeID-*/logs/main.log | grep -i "error"
```
The first node in a network typically takes longer to start because it must wait for staking to be enabled. Subsequent nodes bootstrap from the first node.
### Monitoring Not Working
**Symptom:** No metrics or logs appear in Prometheus/Grafana/Loki dashboards.
**Diagnosis:**
```bash
# Check if collectors are running
ps aux | grep prometheus
ps aux | grep promtail
# Verify environment variables
echo $PROMETHEUS_URL
echo $LOKI_URL
# Check service discovery configs exist
ls -la ~/.tmpnet/prometheus/file_sd_configs/
ls -la ~/.tmpnet/promtail/file_sd_configs/
```
**Solutions:**
```bash
# Start collectors if not running
tmpnetctl start-metrics-collector
tmpnetctl start-logs-collector
# Verify binaries are in PATH
which prometheus
which promtail
# If using nix, ensure development shell is active
nix develop
# Check collector logs
tail -f ~/.tmpnet/prometheus/*.log
tail -f ~/.tmpnet/promtail/*.log
```
**Verify metrics are being collected:**
```bash
# Query Prometheus directly
curl -s "${PROMETHEUS_URL}/api/v1/query?query=up" \
-u "${PROMETHEUS_USERNAME}:${PROMETHEUS_PASSWORD}" \
| jq
```
## Performance Troubleshooting
### Slow Network Bootstrap
**Symptom:** Network takes longer than 5 minutes to bootstrap.
**Common causes:**
- Network too large (many nodes/subnets)
- Insufficient system resources
- Debug logging enabled
**Solutions:**
Reduce network size for testing:
```go
// Use fewer nodes for faster tests
network.Nodes = tmpnet.NewNodesOrPanic(3) // Instead of 5+
```
Reduce logging verbosity:
```go
network.DefaultFlags = tmpnet.FlagsMap{
"log-level": "info", // Instead of "debug" or "trace"
}
```
Increase system resources:
```bash
# Check current resource usage
top
df -h ~/.tmpnet/
# Clean up old networks
rm -rf ~/.tmpnet/networks/202*
```
### High Memory Usage
**Symptom:** avalanchego processes consume excessive memory, system becomes slow.
**Diagnosis:**
```bash
# Check memory usage per process
ps aux | grep avalanchego | awk '{print $2, $4, $11}'
# Monitor over time
watch -n 5 'ps aux | grep avalanchego'
```
**Solutions:**
Limit database size:
```go
network.DefaultFlags = tmpnet.FlagsMap{
"db-type": "memdb", // Use in-memory DB for tests
"pruning-enabled": "true",
"state-sync-enabled": "false", // Disable if not needed
}
```
Stop old networks:
```bash
# Stop all running networks
for dir in ~/.tmpnet/networks/*/; do
export TMPNET_NETWORK_DIR="$dir"
tmpnetctl stop-network
done
```
## Debugging Techniques
### Enable Verbose Logging
Increase log verbosity to diagnose issues:
```go
node.Flags = tmpnet.FlagsMap{
"log-level": "trace", // Most verbose
"log-display-level": "trace",
}
```
### Capture Process Output
Redirect process output to see initialization errors:
```bash
# Run avalanchego manually with same config
/path/to/avalanchego \
--config-file=~/.tmpnet/networks/latest/NodeID-*/flags.json \
2>&1 | tee avalanchego-debug.log
```
### Network State Inspection
Inspect the network state directory:
```bash
# View network configuration
cat ~/.tmpnet/networks/latest/config.json | jq
# View node flags
cat ~/.tmpnet/networks/latest/NodeID-*/flags.json | jq
# Check process status
cat ~/.tmpnet/networks/latest/NodeID-*/process.json | jq
```
### Test Individual Components
Test components in isolation:
```go
// Test just node health
func TestNodeHealth(t *testing.T) {
node := network.Nodes[0]
ctx, cancel := context.WithTimeout(context.Background(), 30*time.Second)
defer cancel()
err := node.WaitForHealthy(ctx)
require.NoError(t, err)
}
```
## Getting Help
If you're still experiencing issues:
1. **Check logs** - Always check node logs first for error messages
2. **Search GitHub issues** - Check [avalanchego issues](https://github.com/ava-labs/avalanchego/issues) for similar problems
3. **Ask the community** - Post in [Avalanche Discord](https://chat.avax.network) #developers channel
4. **Include details** - Share error messages, logs, and your configuration
**Information to include when asking for help:**
- tmpnet version: `go list -m github.com/ava-labs/avalanchego`
- Runtime type: Local process or Kubernetes
- Operating system and version
- Error messages and relevant log excerpts
- Network configuration (redact sensitive data)
- Steps to reproduce the issue
## Next Steps
Complete configuration options
Set up metrics and logging
Start with the basics
# What is ICM? (/docs/cross-chain/avalanche-warp-messaging/overview)
Avalanche Interchain Messaging (ICM) enables native cross-Avalanche L1 communication and allows [Virtual Machine (VM)](/docs/primary-network/virtual-machines) developers to implement arbitrary communication protocols between any two Avalanche L1s.
## Use Cases
Use cases for ICM may include but is not limited to:
- Oracle Networks: Connecting an Avalanche L1 to an oracle network is a costly process. ICM makes it easy for oracle networks to broadcast their data from their origin chain to other Avalanche L1s.
- Token transfers between Avalanche L1s
- State Sharding between multiple Avalanche L1s
Elements of Cross-Avalanche L1 Communication[](#elements-of-cross-avalanche-l1-communication "Direct link to heading")
-----------------------------------------------------------------------------------------------------------
The communication consists of the following four steps:

### Signing Messages on the Origin Avalanche L1[](#signing-messages-on-the-origin-avalanche-l1 "Direct link to heading")
ICM is a low-level messaging protocol. Any type of data encoded in an array of bytes can be included in the message sent to another Avalanche L1. ICM uses the [BLS signature scheme](https://crypto.stanford.edu/~dabo/pubs/papers/BLSmultisig.html), which allows message recipients to verify the authenticity of these messages. Therefore, every validator on the Avalanche network holds a BLS key pair, consisting of a private key for signing messages and a public key that others can use to verify the signature.
### Signature Aggregation on the Origin Avalanche L1[](#signature-aggregation-on-the-origin-avalanche-l1 "Direct link to heading")
If the validator set of an Avalanche L1 is very large, this would result in the Avalanche L1's validators sending many signatures between them. One of the powerful features of BLS is the ability to aggregate many signatures of different signers in a single multi-signature. Therefore, validators of one Avalanche L1 can now individually sign a message and these signatures are then aggregated into a short multi-signature that can be quickly verified.
### Delivery of Messages to the Destination Avalanche L1[](#delivery-of-messages-to-the-destination-avalanche-l1 "Direct link to heading")
The messages do not pass through a central protocol or trusted entity, and there is no record of messages sent between Avalanche L1s on the primary network. This avoids a bottleneck in Avalanche L1-to-Avalanche L1 communication, and non-public Avalanche L1s can communicate privately.
It is up to the Avalanche L1s and their users to determine how they want to transport data from the validators of the origin Avalanche L1 to the validators of the destination Avalanche L1 and what guarantees they want to provide for the transport.
### Verification of Messages in the Destination Avalanche L1[](#verification-of-messages-in-the-destination-avalanche-l1 "Direct link to heading")
When an Avalanche L1 wants to process another Avalanche L1's message, it will look up both BLS Public Keys and stake of the origin Avalanche L1. The authenticity of the message can be verified using these public keys and the signature.
The combined weight of the validators that must be part of the BLS multi-signature to be considered valid can be set according to the individual requirements of each Avalanche L1-to-Avalanche L1 communication. Avalanche L1 A may accept messages from Avalanche L1 B that are signed by at least 70% of stake. Messages from Avalanche L1 C are only accepted if they have been signed by validators that account for 90% of the stake.
Since both the public keys and stake weights of all validators are recorded on the primary network's P-chain, they are readily accessible to any virtual machine run by the validators. Therefore, the Avalanche L1s do not need to communicate with each other about changes in their respective sets of validators, but can simply rely on the latest information on the P-Chain. Therefore, ICM introduces no additional trust assumption other than that the validators of the origin Avalanche L1 are participating honestly.
Reference Implementation[](#reference-implementation "Direct link to heading")
-------------------------------------------------------------------------------
A Proof-of-Concept VM called [XSVM](https://github.com/ava-labs/xsvm) was created to demonstrate the power of ICM. XSVM enables simple ICM transfers between any two Avalanche L1s if run out-of-the-box.
# ICM Contract Addresses (/docs/cross-chain/icm-contracts/addresses)
## Deployed Addresses
| Contract | Address | Chain |
| --------------------- | ---------------------------------------------- | ------------------------ |
| `TeleporterMessenger` | **0x253b2784c75e510dD0fF1da844684a1aC0aa5fcf** | All chains, all networks |
| `TeleporterRegistry` | **0x7C43605E14F391720e1b37E49C78C4b03A488d98** | Mainnet C-Chain |
| `TeleporterRegistry` | **0xF86Cb19Ad8405AEFa7d09C778215D2Cb6eBfB228** | Fuji C-Chain |
1. Using [Nick's method](https://yamenmerhi.medium.com/nicks-method-ethereum-keyless-execution-168a6659479c#), `TeleporterMessenger` deploys at a universal address across all chains, varying with each ICM contracts Major release. **Compatibility exists only between same versions of `TeleporterMessenger` instances.** See [ICM Contract Deployment](https://github.com/ava-labs/icm-services/blob/main/utils/contract-deployment/README.md) and [Deploy ICM Contracts to a Subnet](https://github.com/ava-labs/icm-services/tree/main?tab=readme-ov-file#deploy-teleporter-to-a-subnet) for more details.
2. `TeleporterRegistry` can be deployed to any address. See [Deploy TeleporterRegistry to a Subnet](https://github.com/ava-labs/icm-services/blob/main/README.md#deploy-teleporter-to-a-subnet) for details. The table above enumerates the canonical registry addresses on the Mainnet and Fuji C-Chains.
## A Note on Versioning
Release versions follow the [semver](https://semver.org/) convention of incompatible Major releases. A new Major version is released whenever the `TeleporterMessenger` bytecode is changed, and a new version of `TeleporterMessenger` is meant to be deployed.
Due to the use of Nick's method to deploy the contract to the same address on all chains (see [ICM Contract Deployment](https://github.com/ava-labs/icm-services/blob/main/utils/contract-deployment/README.md) for details), this also means that new release versions would result in different ICM contract addresses. Minor and Patch versions may pertain to contract changes that do not change the `TeleporterMessenger` bytecode, or to changes in the test frameworks, and will only be included in tags.
# Teleporter CLI (/docs/cross-chain/icm-contracts/cli)
# ICM Contracts CLI
This directory contains the source code for the ICM Contracts CLI. The CLI is a command line interface for interacting with the ICM contracts. It is written with [cobra](https://github.com/spf13/cobra) commands as a Go application.
## Build
To build the CLI, run `go build` from this directory. This will create a binary called `teleporter-cli` in the current directory.
## Usage
The CLI has a number of subcommands. To see the list of subcommands, run `./teleporter-cli help`. To see the help for a specific subcommand, run `./teleporter-cli help `.
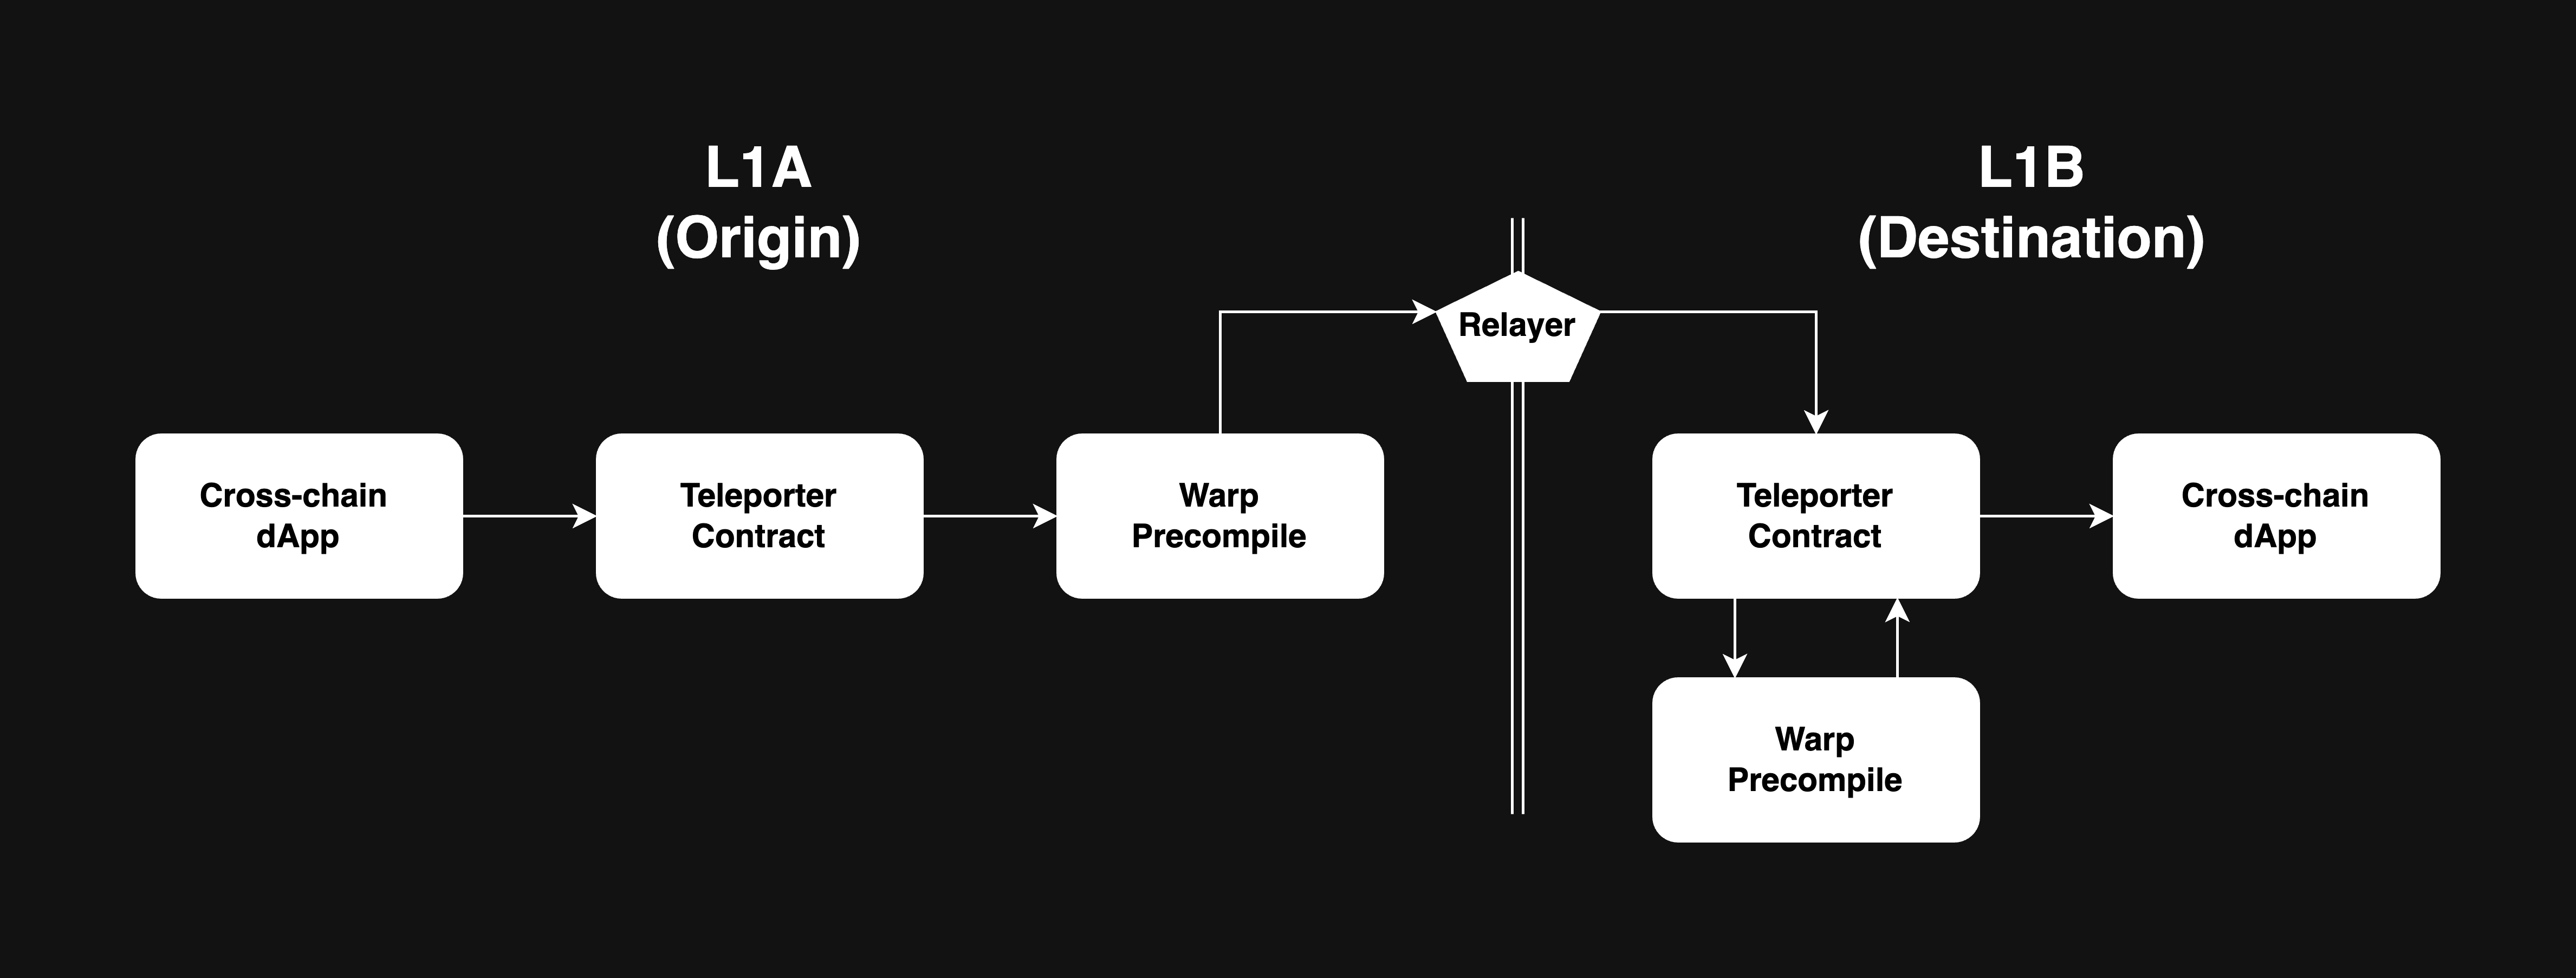
The supported subcommands include:
- `event`: given a log event's topics and data, attempts to decode into an ICM event in a more readable format.
- `message`: given an ICM message encoded as a hex string, attempts to decode into an ICM message in a more readable format.
- `transaction`: given a transaction hash, attempts to decode all relevant TeleporterMessenger and ICM log events in a more readable format.
# Getting Started (/docs/cross-chain/icm-contracts/getting-started)
Dive deeper into ICM contracts and kickstart your journey in building cross-chain dApps by enrolling in our [ICM contracts course](/academy/interchain-messaging).
Note: All example applications in the [examples](https://github.com/ava-labs/icm-services/tree/example-sequential-message-app/contracts/sequential-delivery-example) directory are meant for education purposes only and are not audited. The example contracts are not intended for use in production environments.
This section walks through how to build an example cross-chain application on top of ICM contracts, recreating the `ExampleCrossChainMessenger` [contract](https://github.com/ava-labs/icm-services/tree/example-sequential-message-app/contracts/sequential-delivery-example) that sends arbitrary string data from one chain to another. Note that this tutorial is meant for education purposes only. The resulting code is not intended for use in production environments.
Step 1: Create Initial Contract[](#step-1-create-initial-contract "Direct link to heading")
--------------------------------------------------------------------------------------------
Create a new file called `MyExampleCrossChainMessenger.sol` in a new directory:
```
mkdir teleporter/contracts/src/CrossChainApplications/MyExampleCrossChainMessenger/
touch teleporter/contracts/src/CrossChainApplications/MyExampleCrossChainMessenger/MyExampleCrossChainMessenger.sol
```
At the top of the file define the Solidity version to work with, and import the necessary types and interfaces.
```
pragma solidity 0.8.18;
import {ITeleporterMessenger, TeleporterMessageInput, TeleporterFeeInfo} from "@teleporter/ITeleporterMessenger.sol";
import {ReentrancyGuard} from "@openzeppelin/[email protected]/security/ReentrancyGuard.sol";
```
Next, define the initial empty contract. The contract inherits from `ReentrancyGuard` to prevent reentrancy attacks.
```
contract MyExampleCrossChainMessenger is
ReentrancyGuard
{
}
```
Finally, add the following struct and event declarations into the body of the contract, which will be integrated in later:
```
/**
* @dev Messages sent to this contract.
*/
struct Message {
address sender;
string message;
}
/**
* @dev Emitted when a message is submited to be sent.
*/
event SendMessage(
bytes32 indexed destinationBlockchainID,
address indexed destinationAddress,
address feeTokenAddress,
uint256 feeAmount,
uint256 requiredGasLimit,
string message
);
/**
* @dev Emitted when a new message is received from a given chain ID.
*/
event ReceiveMessage(
bytes32 indexed sourceBlockchainID,
address indexed originSenderAddress,
string message
);
```
Step 2: Integrating ICM Contracts[](#step-2-integrating-teleporter-messenger "Direct link to heading")
--------------------------------------------------------------------------------------------------------------
Now that the initial empty `MyExampleCrossChainMessenger` is defined, it's time to integrate with `ITeleporterMessenger`, which will provide the functionality to deliver cross chain messages.
Create a state variable of `ITeleporterMessenger` type called `teleporterMessenger`. Then create a constructor that takes in an address where the ICM Messenger contract would be deployed on this chain, and set the corresponding state variable.
```
ITeleporterMessenger public immutable teleporterMessenger;
constructor(address teleporterMessengerAddress) {
teleporterMessenger = ITeleporterMessenger(teleporterMessengerAddress);
}
```
Step 3: Send and Receive[](#step-3-send-and-receive "Direct link to heading")
------------------------------------------------------------------------------
Now that `MyExampleCrossChainMessenger` has an instantiation of `ITeleporterMessenger`, the next step is to add in the functionality of sending and receiving arbitrary string data between chains.
To start, create the function declaration for `sendMessage`, which will send string data cross-chain to the specified destination address' receiver. This function allows callers to specify the destination chain ID, destination address to send to, relayer fees, required gas limit for message execution at the destination address.
```
/**
* @dev Send a new message to another chain.
*/
function sendMessage(
bytes32 destinationBlockchainID,
address destinationAddress,
address feeTokenAddress,
uint256 feeAmount,
uint256 requiredGasLimit,
string calldata message
) external returns (bytes32 messageID) {
}
```
`MyExampleCrossChainMessenger` also needs to implement `ITeleporterReceiver`. First, add the import of this interface:
```
import {ITeleporterReceiver} from "@teleporter/ITeleporterReceiver.sol";
```
Then declare that the contract will implement it:
```
contract MyExampleCrossChainMessenger is
- ReentrancyGuard
+ ReentrancyGuard,
+ ITeleporterReceiver
{
```
And then finally add the method `receiveTeleporterMessage` that receives the cross-chain messages from ICM.
```
/**
* @dev Receive a new message from another chain.
*/
function receiveTeleporterMessage(
bytes32 sourceBlockchainID,
address originSenderAddress,
bytes calldata message
) external {
}
```
Now it's time to implement the methods, starting with `sendMessage`. First, add the necessary imports.
```
import {SafeERC20TransferFrom, SafeERC20} from "@teleporter/SafeERC20TransferFrom.sol";
import {IERC20} from "@openzeppelin/[email protected]/token/ERC20/IERC20.sol";
```
Next, add a `using` directive to the top of the contract body specifying `SafeERC20` as the `IERC20` implementation to use:
```
using SafeERC20 for IERC20;
```
Then add a check to the `sendMessage` function for whether `feeAmount` is greater than zero. If it is, transfer and approve the amount of IERC20 asset at `feeTokenAddress` to the Teleporter Messenger saved as a state variable.
```
// For non-zero fee amounts, first transfer the fee to this contract, and then
// allow the Teleporter contract to spend it.
uint256 adjustedFeeAmount;
if (feeAmount > 0) {
adjustedFeeAmount = SafeERC20TransferFrom.safeTransferFrom(
IERC20(feeTokenAddress),
feeAmount
);
IERC20(feeTokenAddress).safeIncreaseAllowance(
address(teleporterMessenger),
adjustedFeeAmount
);
}
```
> Note: Relayer fees are an optional way to incentivize relayers to deliver an ICM message to its destination. They are not strictly necessary, and may be omitted if a relayer is willing to relay messages with no fee, such as with a self-hosted relayer.
Next, to the end of the `sendMessage` function, add the event to emit, as well as the call to the `TeleporterMessenger` contract with the message data to be executed when delivered to the destination address. Form a `TeleporterMessageInput` and call `sendCrossChainMessage` on the `TeleporterMessenger` instance to start the cross chain messaging process. The `message` must be ABI encoded so that it can be properly decoded on the receiving end.
> Note: `allowedRelayerAddresses` is empty in this example, meaning any relayer can try to deliver this cross chain message. Specific relayer addresses can be specified to ensure only those relayers can deliver the message.
```
emit SendMessage({
destinationBlockchainID: destinationBlockchainID,
destinationAddress: destinationAddress,
feeTokenAddress: feeTokenAddress,
feeAmount: adjustedFeeAmount,
requiredGasLimit: requiredGasLimit,
message: message
});
return
teleporterMessenger.sendCrossChainMessage(
TeleporterMessageInput({
destinationBlockchainID: destinationBlockchainID,
destinationAddress: destinationAddress,
feeInfo: TeleporterFeeInfo({
feeTokenAddress: feeTokenAddress,
amount: adjustedFeeAmount
}),
requiredGasLimit: requiredGasLimit,
allowedRelayerAddresses: new address[](0),
message: abi.encode(message)
})
);
```
With the sending side complete, the next step is to implement `ITeleporterReceiver.receiveTeleporterMessage`. The receiver in this example will just receive the arbitrary string data, and check that the message is sent through ICM. To the `receiveTeleporterMessage` function, add:
```
// Only the Teleporter receiver can deliver a message.
require(msg.sender == address(teleporterMessenger), "Unauthorized.");
// do something with message.
```
The base of sending and receiving messages cross chain is complete. `MyExampleCrossChainMessenger` can now be expanded with functionality that saves the received messages, and allows users to query for the latest message received from a specified chain.
Step 4: Storing the Message[](#step-4-storing-the-message "Direct link to heading")
------------------------------------------------------------------------------------
Start by adding a map to the body of the contract, in which the key is the `sourceBlockchainID` and the value is the latest `message` sent from that chain. The `message` is of type `Message`, which is already declared in the contract.
```
mapping(bytes32 sourceBlockchainID => Message message) private _messages;
```
Next, update `receiveTeleporterMessage` to save the message into the mapping after it is received and verified that it's sent from Teleporter. At the end of that function, ABI decode the `message` bytes into a string, and emit the `ReceiveMessage` event.
```
// Store the message.
string memory messageString = abi.decode(message, (string));
_messages[sourceBlockchainID] = Message(
originSenderAddress,
messageString
);
emit ReceiveMessage(
sourceBlockchainID,
originSenderAddress,
messageString
);
```
Next, add a function to the contract called `getCurrentMessage` that allows users or contracts to easily query the contract for the latest message sent by a specified chain.
```
/**
* @dev Check the current message from another chain.
*/
function getCurrentMessage(
bytes32 sourceBlockchainID
) external view returns (address, string memory) {
Message memory messageInfo = _messages[sourceBlockchainID];
return (messageInfo.sender, messageInfo.message);
}
```
Step 5: Upgrade Support[](#step-5-upgrade-support "Direct link to heading")
----------------------------------------------------------------------------
At this point, the contract is now fully usable, and can be used to send arbitrary string data between chains. However, there are a few more modifications that need to be made to support upgrades to ICM contracts. For a more in-depth explanation of how to support upgrades, see the Upgrades README [here](https://github.com/ava-labs/icm-services/blob/main/icm-contracts/avalanche/teleporter/registry/UPGRADING.md).
The first change to make is to inherit from `TeleporterOwnerUpgradeable` instead of `ITeleporterReceiver`. `TeleporterOwnerUpgradeable` integrates with the `TeleporterRegistry` via `TeleporterUpgradeable` to easily utilize the latest `TeleporterMessenger` implementation. `TeleporterOwnerUpgradeable` also ensures that only an admin address for managing Teleporter versions, specified by the constructor argument `teleporterManager`, is able to upgrade the `TeleporterMessenger` implementation used by the contract.
To start, replace the import for `ITeleporterReceiver` with `TeleporterOwnerUpgradeable`:
```
- import {ITeleporterReceiver} from "@teleporter/ITeleporterReceiver.sol";
+ import {TeleporterOwnerUpgradeable} from "@teleporter/upgrades/TeleporterOwnerUpgradeable.sol";
```
Also, replace the contract declaration to inherit from `TeleporterOwnerUpgradeable` instead of `ITeleporterReceiver`:
```
contract MyExampleCrossChainMessenger is
ReentrancyGuard,
- ITeleporterReceiver
+ TeleporterOwnerUpgradeable
{
```
Next, update the constructor to invoke the `TeleporterOwnerUpgradeable` constructor.
```
- constructor(address teleporterMessengerAddress) {
- teleporterMessenger = ITeleporterMessenger(teleporterMessengerAddress);
- }
+ constructor(
+ address teleporterRegistryAddress,
+ address teleporterManager
+ ) TeleporterOwnerUpgradeable(teleporterRegistryAddress, teleporterManager) {}
```
Then, remove the `teleporterMessenger` state variable:
```
- ITeleporterMessenger public immutable teleporterMessenger;
```
And at the beginning of `sendMessage()` add a call to get the latest `ITeleporterMessenger` implementation from `TeleporterRegistry`:
```
ITeleporterMessenger teleporterMessenger = teleporterRegistry.getLatestTeleporter();
```
And finally, change `receiveTeleporterMessage` to `_receiveTeleporterMessage`, mark it as `internal override`, and change the data location of its `message` parameter to `memory`. It's also safe to remove the check against `teleporterMessenger` in `_receiveTeleporterMessage`, since that same check is handled in `TeleporterOwnerUpgradeable`'s `receiveTeleporterMessage` function.
```
- function receiveTeleporterMessage(
+ function _receiveTeleporterMessage(
bytes32 sourceBlockchainID,
address originSenderAddress,
- bytes calldata message
+ bytes memory message
- ) external {
+ ) internal override {
- // Only the Teleporter receiver can deliver a message.
- require(msg.sender == address(teleporterMessenger), "Unauthorized.");
```
`MyExampleCrossChainMessenger` is now a working cross-chain dApp built on top of ICM contracts! Full example [here](https://github.com/ava-labs/icm-services/tree/example-sequential-message-app/contracts/sequential-delivery-example).
Step 6: Testing[](#step-6-testing "Direct link to heading")
------------------------------------------------------------
For testing, `scripts/local/e2e_test.sh` sets up a local test environment consisting of three avalanche-l1s deployed with ICM contracts, and a lightweight inline relayer implementation to facilitate cross chain message delivery. An end-to-end test for `ExampleCrossChainMessenger` is included in `tests/flows/example_messenger.go`, which performs the following:
1. Deploys the [ExampleERC20](https://github.com/ava-labs/icm-services/blob/main/icm-contracts/avalanche/mocks/ExampleERC20.sol) token to avalanche-l1 A.
2. Deploys `ExampleCrossChainMessenger` to both avalanche-l1s A and B.
3. Approves the cross-chain messenger on avalanche-l1 A to spend ERC20 tokens from the default address.
4. Sends `"Hello, world!"` from avalanche-l1 A to avalanche-l1 B's cross-chain messenger to receive.
5. Calls `getCurrentMessage` on avalanche-l1 B to make sure the right message and sender are received.
To run this test against the newly created `MyExampleCrossChainMessenger`, first generate the ABI Go bindings by running `./scripts/abi_bindings.sh --contract MyExampleCrossChainMessenger` from the root of this repository. Then, add to the generated Go package the `SendMessageRequiredGas` constant, which is required by the tests, in a new file `abi-bindings/go/CrossChainApplications/MyExampleCrossChainMessenger/MyExampleCrossChainMessenger/constants.go`:
```js
package myexamplecrosschainmessenger
import "math/big"
var SendMessageRequiredGas = big.NewInt(300000)
```
Next, modify `tests/utils/utils.go`, which is used by `tests/flows/example_messenger.go`, to use the ABI bindings for `MyExampleCrossChainMessenger` instead of `ExampleCrossChainMessenger`. First replace the import:
```
- examplecrosschainmessenger "github.com/ava-labs/teleporter/abi-bindings/go/CrossChainApplications/examples/ExampleMessenger/ExampleCrossChainMessenger"
+ myexamplecrosschainmessenger "github.com/ava-labs/teleporter/abi-bindings/go/CrossChainApplications/MyExampleCrossChainMessenger/MyExampleCrossChainMessenger"
```
Then, in that same `utils.go`, replace all instances of to `examplecrosschainmessenger` with `myexamplecrosschainmessenger` and all instances of `ExampleCrossChainMessenger` with `MyExampleCrossChainMessenger`.
Finally, from the root of the repository, invoke the tests with an extra bit of configuration that tells the Ginkgo test framework to focus only on the tests of this example contract (excluding all of the broader tests of Teleporter):
```
GINKGO_FOCUS="Example cross chain messenger" scripts/local/e2e_test.sh
```
# ICM Contracts Avalanche L1s on Devnet (/docs/cross-chain/icm-contracts/icm-contracts-on-devnet)
After this tutorial, you would have created a Devnet and deployed two Avalanche L1s in it, and have enabled them to cross-communicate with each other and with the C-Chain through ICM contracts and the underlying Warp technology.
For more information on cross chain messaging through ICM contracts and Warp, check:
- [Cross Chain References](/docs/cross-chain)
Note that currently only [Subnet-EVM](https://github.com/ava-labs/subnet-evm) and [Subnet-EVM-Based](/docs/avalanche-l1s/evm-configuration/evm-l1-customization) virtual machines support ICM contracts.
## Prerequisites
Before we begin, you will need to have:
- Created an AWS account and have an updated AWS `credentials` file in home directory with \[default\] profile
Note: the tutorial uses AWS hosts, but Devnets can also be created and operated in other supported cloud providers, such as GCP.
Create Avalanche L1s Configurations[](#create-avalanche-l1s-configurations "Direct link to heading")
-----------------------------------------------------------------------------------------
For this section we will follow this [steps](/docs/tooling/avalanche-cli/cross-chain/teleporter-local-network#create-avalanche-l1s-configurations), to create two ICM contract-enabled Avalanche L1s, `` and ``.
Create a Devnet and Deploy an Avalanche L1 in It[](#create-a-devnet-and-deploy-a-avalanche-l1-in-it "Direct link to heading")
-----------------------------------------------------------------------------------------------------------------
Let's use the `devnet wiz` command to create a devnet `` and deploy `` in it.
The devnet will be created in the `us-east-1` region of AWS, and will consist of 5 validators only.
```
avalanche node devnet wiz --aws --node-type default --region us-east-1 --num-validators 5 --num-apis 0 --enable-monitoring=false --default-validator-params
Creating the devnet...
Creating new EC2 instance(s) on AWS...
...
Deploying [Avalanche L1] to Cluster
...
configuring AWM RElayer on host i-0f1815c016b555fcc
Setting the nodes as Avalanche L1 trackers
...
Setting up ICM contracts on Avalanche L1
Teleporter Messenger successfully deployed to Avalanche L1 (0x253b2784c75e510dD0fF1da844684a1aC0aa5fcf)
Teleporter Registry successfully deployed to Avalanche L1 (0xb623C4495220C603D0A939D32478F55891a61750)
Teleporter Messenger successfully deployed to c-chain (0x253b2784c75e510dD0fF1da844684a1aC0aa5fcf)
Teleporter Registry successfully deployed to c-chain (0x5DB9A7629912EBF95876228C24A848de0bfB43A9)
Starting AWM Relayer Service
setting AWM Relayer on host i-0f1815c016b555fcc to relay L1 chain1
updating configuration file ~/.avalanche-cli/nodes/i-0f1815c016b555fcc/services/awm-relayer/awm-relayer-config.json
Devnet is successfully created and is now validating blockchain chain1!
Avalanche L1 RPC URL: http://67.202.23.231:9650/ext/bc/fqcM24LNb3kTV7KD1mAvUJXYy5XunwP8mrE44YuNwPjgZHY6p/rpc
✓ Cluster information YAML file can be found at ~/.avalanche-cli/nodes/inventories//clusterInfo.yaml at local host
```
Notice some details here:
- Two smart contracts are deployed to the Avalanche L1: Teleporter Messenger and Teleporter Registry
- Both ICM smart contracts are also deployed to `C-Chain`
- [AWM ICM Relayer](https://github.com/ava-labs/icm-services/tree/main/relayer is installed and configured as a service into one of the nodes (A Relayer [listens](/docs/cross-chain/teleporter/overview#data-flow) for new messages being generated on a source Avalanche L1 and sends them to the destination Avalanche L1.)
CLI configures the Relayer to enable every Avalanche L1 to send messages to all other Avalanche L1s. If you add more Avalanche L1s to the Devnet, the Relayer will be automatically reconfigured.
Checking Devnet Configuration and Relayer Logs[](#checking-devnet-configuration-and-relayer-logs "Direct link to heading")
---------------------------------------------------------------------------------------------------------------------------
Execute `node list` command to get a list of the devnet nodes:
```
avalanche node list
Cluster "" (Devnet)
Node i-0f1815c016b555fcc (NodeID-91PGQ7keavfSV1XVFva2WsQXWLWZqqqKe) 67.202.23.231 [Validator,Relayer]
Node i-026392a651571232c (NodeID-AkPyyTs9e9nPGShdSoxdvWYZ6X2zYoyrK) 52.203.183.68 [Validator]
Node i-0d1b98d5d941d6002 (NodeID-ByEe7kuwtrPStmdMgY1JiD39pBAuFY2mS) 50.16.235.194 [Validator]
Node i-0c291f54bb38c2984 (NodeID-8SE2CdZJExwcS14PYEqr3VkxFyfDHKxKq) 52.45.0.56 [Validator]
Node i-049916e2f35231c29 (NodeID-PjQY7xhCGaB8rYbkXYddrr1mesYi29oFo) 3.214.163.110 [Validator]
```
Notice that, in this case, `i-0f1815c016b555fcc` was set as Relayer. This host contains a `systemd` service called `awm-relayer` that can be used to check the Relayer logs, and set the execution status.
To view the Relayer logs, the following command can be used:
```
avalanche node ssh i-0f1815c016b555fcc "journalctl -u awm-relayer --no-pager"
[Node i-0f1815c016b555fcc (NodeID-91PGQ7keavfSV1XVFva2WsQXWLWZqqqKe) 67.202.23.231 [Validator,Relayer]]
Warning: Permanently added '67.202.23.231' (ED25519) to the list of known hosts.
-- Logs begin at Fri 2024-04-05 14:11:43 UTC, end at Fri 2024-04-05 14:30:24 UTC. --
Apr 05 14:15:06 ip-172-31-47-187 systemd[1]: Started AWM Relayer systemd service.
Apr 05 14:15:07 ip-172-31-47-187 awm-relayer[6886]: {"level":"info","timestamp":"2024-04-05T14:15:07.018Z","logger":"awm-relayer","caller":"main/main.go:66","msg":"Initializing awm-relayer"}
Apr 05 14:15:07 ip-172-31-47-187 awm-relayer[6886]: {"level":"info","timestamp":"2024-04-05T14:15:07.018Z","logger":"awm-relayer","caller":"main/main.go:71","msg":"Set config options."}
Apr 05 14:15:07 ip-172-31-47-187 awm-relayer[6886]: {"level":"info","timestamp":"2024-04-05T14:15:07.018Z","logger":"awm-relayer","caller":"main/main.go:78","msg":"Initializing destination clients"}
Apr 05 14:15:07 ip-172-31-47-187 awm-relayer[6886]: {"level":"info","timestamp":"2024-04-05T14:15:07.021Z","logger":"awm-relayer","caller":"main/main.go:97","msg":"Initializing app request network"}
Apr 05 14:15:08 ip-172-31-47-187 awm-relayer[6886]: {"level":"info","timestamp":"2024-04-05T14:15:08.159Z","logger":"awm-relayer","caller":"main/main.go:309","msg":"starting metrics server...","port":9090}
Apr 05 14:15:08 ip-172-31-47-187 awm-relayer[6886]: {"level":"info","timestamp":"2024-04-05T14:15:08.160Z","logger":"awm-relayer","caller":"main/main.go:251","msg":"Creating relayer","originBlockchainID":"fqcM24LNb3kTV7KD1mAvUJXYy5XunwP8mrE44YuNwPjgZHY6p"}
Apr 05 14:15:08 ip-172-31-47-187 awm-relayer[6886]: {"level":"info","timestamp":"2024-04-05T14:15:08.160Z","logger":"awm-relayer","caller":"main/main.go:251","msg":"Creating relayer","originBlockchainID":"2EfJg86if9Ka5Ag73JRfoqWz4EGuFwtemaNf4XiBBpUW4YngS6"}
Apr 05 14:15:08 ip-172-31-47-187 awm-relayer[6886]: {"level":"info","timestamp":"2024-04-05T14:15:08.160Z","logger":"awm-relayer","caller":"relayer/relayer.go:114","msg":"Creating relayer","subnetID":"11111111111111111111111111111111LpoYY","subnetIDHex":"0000000000000000000000000000000000000000000000000000000000000000","blockchainID":"2EfJg86if9Ka5Ag73JRfoqWz4EGuFwtemaNf4XiBBpUW4YngS6","blockchainIDHex":"a2b6b947cf2b9bf6df03c8caab08e38ab951d8b120b9c37265d9be01d86bb170"}
Apr 05 14:15:08 ip-172-31-47-187 awm-relayer[6886]: {"level":"info","timestamp":"2024-04-05T14:15:08.160Z","logger":"awm-relayer","caller":"relayer/relayer.go:114","msg":"Creating relayer","subnetID":"giY8tswWgZmcAWzPkoNrmjjrykited7GJ9799SsFzTiq5a1ML","subnetIDHex":"5a2e2d87d74b4ec62fdd6626e7d36a44716484dfcc721aa4f2168e8a61af63af","blockchainID":"fqcM24LNb3kTV7KD1mAvUJXYy5XunwP8mrE44YuNwPjgZHY6p","blockchainIDHex":"582fc7bd55472606c260668213bf1b6d291df776c9edf7e042980a84cce7418a"}
Apr 05 14:15:08 ip-172-31-47-187 awm-relayer[6886]: {"level":"info","timestamp":"2024-04-05T14:15:08.171Z","logger":"awm-relayer","caller":"evm/subscriber.go:247","msg":"Successfully subscribed","blockchainID":"2EfJg86if9Ka5Ag73JRfoqWz4EGuFwtemaNf4XiBBpUW4YngS6"}
Apr 05 14:15:08 ip-172-31-47-187 awm-relayer[6886]: {"level":"info","timestamp":"2024-04-05T14:15:08.171Z","logger":"awm-relayer","caller":"relayer/relayer.go:161","msg":"processed-missed-blocks set to false, starting processing from chain head","blockchainID":"2EfJg86if9Ka5Ag73JRfoqWz4EGuFwtemaNf4XiBBpUW4YngS6"}
Apr 05 14:15:08 ip-172-31-47-187 awm-relayer[6886]: {"level":"info","timestamp":"2024-04-05T14:15:08.172Z","logger":"awm-relayer","caller":"relayer/message_relayer.go:662","msg":"Updating latest processed block in database","relayerID":"0xea06381426934ec1800992f41615b9d362c727ad542f6351dbfa7ad2849a35bf","latestBlock":6}
Apr 05 14:15:08 ip-172-31-47-187 awm-relayer[6886]: {"level":"info","timestamp":"2024-04-05T14:15:08.173Z","logger":"awm-relayer","caller":"relayer/message_relayer.go:662","msg":"Updating latest processed block in database","relayerID":"0x175e14327136d57fe22d4bdd295ff14bea8a7d7ab1884c06a4d9119b9574b9b3","latestBlock":6}
Apr 05 14:15:08 ip-172-31-47-187 awm-relayer[6886]: {"level":"info","timestamp":"2024-04-05T14:15:08.173Z","logger":"awm-relayer","caller":"main/main.go:272","msg":"Created relayer","blockchainID":"2EfJg86if9Ka5Ag73JRfoqWz4EGuFwtemaNf4XiBBpUW4YngS6"}
Apr 05 14:15:08 ip-172-31-47-187 awm-relayer[6886]: {"level":"info","timestamp":"2024-04-05T14:15:08.173Z","logger":"awm-relayer","caller":"main/main.go:295","msg":"Relayer initialized. Listening for messages to relay.","originBlockchainID":"2EfJg86if9Ka5Ag73JRfoqWz4EGuFwtemaNf4XiBBpUW4YngS6"}
Apr 05 14:15:08 ip-172-31-47-187 awm-relayer[6886]: {"level":"info","timestamp":"2024-04-05T14:15:08.178Z","logger":"awm-relayer","caller":"evm/subscriber.go:247","msg":"Successfully subscribed","blockchainID":"fqcM24LNb3kTV7KD1mAvUJXYy5XunwP8mrE44YuNwPjgZHY6p"}
Apr 05 14:15:08 ip-172-31-47-187 awm-relayer[6886]: {"level":"info","timestamp":"2024-04-05T14:15:08.178Z","logger":"awm-relayer","caller":"relayer/relayer.go:161","msg":"processed-missed-blocks set to false, starting processing from chain head","blockchainID":"fqcM24LNb3kTV7KD1mAvUJXYy5XunwP8mrE44YuNwPjgZHY6p"}
Apr 05 14:15:08 ip-172-31-47-187 awm-relayer[6886]: {"level":"info","timestamp":"2024-04-05T14:15:08.179Z","logger":"awm-relayer","caller":"relayer/message_relayer.go:662","msg":"Updating latest processed block in database","relayerID":"0xe584ccc0df44506255811f6b54375e46abd5db40a4c84fd9235a68f7b69c6f06","latestBlock":6}
Apr 05 14:15:08 ip-172-31-47-187 awm-relayer[6886]: {"level":"info","timestamp":"2024-04-05T14:15:08.179Z","logger":"awm-relayer","caller":"relayer/message_relayer.go:662","msg":"Updating latest processed block in database","relayerID":"0x70f14d33bde4716928c5c4723d3969942f9dfd1f282b64ffdf96f5ac65403814","latestBlock":6}
Apr 05 14:15:08 ip-172-31-47-187 awm-relayer[6886]: {"level":"info","timestamp":"2024-04-05T14:15:08.180Z","logger":"awm-relayer","caller":"main/main.go:272","msg":"Created relayer","blockchainID":"fqcM24LNb3kTV7KD1mAvUJXYy5XunwP8mrE44YuNwPjgZHY6p"}
Apr 05 14:15:08 ip-172-31-47-187 awm-relayer[6886]: {"level":"info","timestamp":"2024-04-05T14:15:08.180Z","logger":"awm-relayer","caller":"main/main.go:295","msg":"Relayer initialized. Listening for messages to relay.","originBlockchainID":"fqcM24LNb3kTV7KD1mAvUJXYy5XunwP8mrE44YuNwPjgZHY6p"}
```
Deploying the Second Avalanche L1[](#deploying-the-second-avalanche-l1 "Direct link to heading")
-------------------------------------------------------------------------------------
Let's use the `devnet wiz` command again to deploy ``.
When deploying Avalanche L1 ``, the two ICM contracts will not be deployed to C-Chain in Local Network as they have already been deployed when we deployed the first Avalanche L1.
```
avalanche node devnet wiz --default-validator-params
Adding Avalanche L1 into existing devnet ...
...
Deploying [chain2] to Cluster
...
Stopping AWM Relayer Service
Setting the nodes as Avalanche L1 trackers
...
Setting up ICM contracts on Avalanche L1
Teleporter Messenger successfully deployed to Avalanche L1 (0x253b2784c75e510dD0fF1da844684a1aC0aa5fcf)
Teleporter Registry successfully deployed to Avalanche L1 (0xb623C4495220C603D0A939D32478F55891a61750)
Teleporter Messenger has already been deployed to c-chain
Starting AWM Relayer Service
setting AWM Relayer on host i-0f1815c016b555fcc to relay L1 chain2
updating configuration file ~/.avalanche-cli/nodes/i-0f1815c016b555fcc/services/awm-relayer/awm-relayer-config.json
Devnet is now validating Avalanche L1 chain2
Avalanche L1 RPC URL: http://67.202.23.231:9650/ext/bc/7gKt6evRnkA2uVHRfmk9WrH3dYZH9gEVVxDAknwtjvtaV3XuQ/rpc
✓ Cluster information YAML file can be found at ~/.avalanche-cli/nodes/inventories//clusterInfo.yaml at local host
```
Verify ICM Contracts Are Successfully Set Up[](#verify-teleporter-is-successfully-set-up "Direct link to heading")
---------------------------------------------------------------------------------------------------------------
To verify that ICM contracts are successfully set up, let's send a couple of cross messages:
```
avalanche teleporter msg C-Chain chain1 "Hello World" --cluster
Delivering message "this is a message" to source Avalanche L1 "C-Chain" (2EfJg86if9Ka5Ag73JRfoqWz4EGuFwtemaNf4XiBBpUW4YngS6)
Waiting for message to be received at destination Avalanche L1 "chain1" (fqcM24LNb3kTV7KD1mAvUJXYy5XunwP8mrE44YuNwPjgZHY6p)
Message successfully Teleported!
```
```
avalanche teleporter msg chain2 chain1 "Hello World" --cluster
Delivering message "this is a message" to source Avalanche L1 "chain2" (29WP91AG7MqPUFEW2YwtKnsnzVrRsqcWUpoaoSV1Q9DboXGf4q)
Waiting for message to be received at destination Avalanche L1 "chain1" (fqcM24LNb3kTV7KD1mAvUJXYy5XunwP8mrE44YuNwPjgZHY6p)
Message successfully Teleported!
```
You have sent your first ICM message in the Devnet!
Obtaining Information on ICM Contract Deploys[](#obtaining-information-on-teleporter-deploys "Direct link to heading")
---------------------------------------------------------------------------------------------------------------------
### Obtaining Avalanche L1 Information[](#obtaining-avalanche-l1-information "Direct link to heading")
By executing `blockchain describe` on an ICM contract-enabled Avalanche L1, the following relevant information can be found:
- Blockchain RPC URL
- Blockchain ID in cb58 format
- Blockchain ID in plain hex format
- Teleporter Messenger address
- Teleporter Registry address
Let's get the information for ``:
```
avalanche blockchain describe
_____ _ _ _
| __ \ | | (_) |
| | | | ___| |_ __ _ _| |___
| | | |/ _ \ __/ _ | | / __|
| |__| | __/ || (_| | | \__ \
|_____/ \___|\__\__,_|_|_|___/
+--------------------------------+----------------------------------------------------------------------------------------+
| PARAMETER | VALUE |
+--------------------------------+----------------------------------------------------------------------------------------+
| Blockchain Name | Avalanche L1 |
+--------------------------------+----------------------------------------------------------------------------------------+
| ChainID | 1 |
+--------------------------------+----------------------------------------------------------------------------------------+
| Token Name | TOKEN1 Token |
+--------------------------------+----------------------------------------------------------------------------------------+
| Token Symbol | TOKEN1 |
+--------------------------------+----------------------------------------------------------------------------------------+
| VM Version | v0.6.3 |
+--------------------------------+----------------------------------------------------------------------------------------+
| VM ID | srEXiWaHjFEgKSgK2zBgnWQUVEy2MZA7UUqjqmBSS7MZYSCQ5 |
+--------------------------------+----------------------------------------------------------------------------------------+
| Cluster SubnetID | giY8tswWgZmcAWzPkoNrmjjrykited7GJ9799SsFzTiq5a1ML |
+--------------------------------+----------------------------------------------------------------------------------------+
| Cluster RPC URL | http://67.202.23.231:9650/ext/bc/fqcM24LNb3kTV7KD1mAvUJXYy5XunwP8mrE44YuNwPjgZHY6p/rpc |
+--------------------------------+----------------------------------------------------------------------------------------+
| Cluster | fqcM24LNb3kTV7KD1mAvUJXYy5XunwP8mrE44YuNwPjgZHY6p |
| BlockchainID | |
+ +----------------------------------------------------------------------------------------+
| | 0x582fc7bd55472606c260668213bf1b6d291df776c9edf7e042980a84cce7418a |
| | |
+--------------------------------+----------------------------------------------------------------------------------------+
| Cluster Teleporter| 0x253b2784c75e510dD0fF1da844684a1aC0aa5fcf |
| Messenger Address | |
+--------------------------------+----------------------------------------------------------------------------------------+
| Cluster Teleporter| 0xb623C4495220C603D0A939D32478F55891a61750 |
| Registry Address | |
+--------------------------------+----------------------------------------------------------------------------------------+
...
```
### Obtaining C-Chain Information[](#obtaining-c-chain-information "Direct link to heading")
Similar information can be found for C-Chain by using `primary describe`:
```
avalanche primary describe --cluster
_____ _____ _ _ _____
/ ____| / ____| | (_) | __ \
| | ______| | | |__ __ _ _ _ __ | |__) |_ _ _ __ __ _ _ __ ___ ___
| | |______| | | '_ \ / _ | | '_ \ | ___/ _ | '__/ _ | '_ _ \/ __|
| |____ | |____| | | | (_| | | | | | | | | (_| | | | (_| | | | | | \__ \
\_____| \_____|_| |_|\__,_|_|_| |_| |_| \__,_|_| \__,_|_| |_| |_|___/
+------------------------------+--------------------------------------------------------------------+
| PARAMETER | VALUE |
+------------------------------+--------------------------------------------------------------------+
| RPC URL | http://67.202.23.231:9650/ext/bc/C/rpc |
+------------------------------+--------------------------------------------------------------------+
| EVM Chain ID | 43112 |
+------------------------------+--------------------------------------------------------------------+
| TOKEN SYMBOL | AVAX |
+------------------------------+--------------------------------------------------------------------+
| Address | 0x8db97C7cEcE249c2b98bDC0226Cc4C2A57BF52FC |
+------------------------------+--------------------------------------------------------------------+
| Balance | 49999489.815751426 |
+------------------------------+--------------------------------------------------------------------+
| Private Key | 56289e99c94b6912bfc12adc093c9b51124f0dc54ac7a766b2bc5ccf558d8027 |
+------------------------------+--------------------------------------------------------------------+
| BlockchainID | 2EfJg86if9Ka5Ag73JRfoqWz4EGuFwtemaNf4XiBBpUW4YngS6 |
+ +--------------------------------------------------------------------+
| | 0xa2b6b947cf2b9bf6df03c8caab08e38ab951d8b120b9c37265d9be01d86bb170 |
+------------------------------+--------------------------------------------------------------------+
| ICM Messenger Address | 0x253b2784c75e510dD0fF1da844684a1aC0aa5fcf |
+------------------------------+--------------------------------------------------------------------+
| ICM Registry Address | 0x5DB9A7629912EBF95876228C24A848de0bfB43A9 |
+------------------------------+--------------------------------------------------------------------+
```
Controlling Relayer Execution[](#controlling-relayer-execution "Direct link to heading")
-----------------------------------------------------------------------------------------
CLI provides two commands to remotely control Relayer execution:
```
avalanche interchain relayer stop --cluster
✓ Remote AWM Relayer on i-0f1815c016b555fcc successfully stopped
```
```
avalanche interchain relayer start --cluster
✓ Remote AWM Relayer on i-0f1815c016b555fcc successfully started
```
# ICM Contracts Avalanche L1s on Local Network (/docs/cross-chain/icm-contracts/icm-contracts-on-local-network)
This how-to guide focuses on deploying ICM contract-enabled Avalanche L1s to a local Avalanche network.
After this tutorial, you would have created and deployed two Avalanche L1s to the local network and have enabled them to cross-communicate with each other and with the local C-Chain (through ICM contracts and the underlying Warp technology.)
Note that currently only [Subnet-EVM](https://github.com/ava-labs/subnet-evm) and [Subnet-EVM-Based](/docs/avalanche-l1s/evm-configuration/evm-l1-customization) virtual machines support ICM contracts.
## Prerequisites
- [Avalanche-CLI installed](/docs/tooling/avalanche-cli)
## Create Avalanche L1 Configurations
Let's create an Avalanche L1 called `` with the latest Subnet-EVM version, a chain ID of 1, TOKEN1 as the token name, and with default Subnet-EVM parameters (more information regarding Avalanche L1 creation can be found [here](/docs/tooling/avalanche-cli#create-your-avalanche-l1-configuration)):
```
avalanche blockchain create --evm --latest\
--evm-chain-id 1 --evm-token TOKEN1 --evm-defaults
creating genesis for
configuring airdrop to stored key "subnet__airdrop" with address 0x0EF8151A3e6ad1d4e17C8ED4128b20EB5edc58B1
loading stored key "cli-teleporter-deployer" for teleporter deploys
(evm address, genesis balance) = (0xE932784f56774879e03F3624fbeC6261154ec711, 600000000000000000000)
using latest teleporter version (v1.0.0)
✓ Successfully created Avalanche L1 configuration
```
Notice that by default, ICM contracts are enabled and a stored key is created to fund ICM contract related operations (that is deploy ICM smart contracts, fund ICM Relayer).
To disable ICM contracts in your Avalanche L1, use the flag `--teleporter=false` when creating the Avalanche L1.
To disable Relayer in your Avalanche L1, use the flag `--relayer=false` when creating the Avalanche L1.
Now let's create a second Avalanche L1 called ``, with similar settings:
```
avalanche blockchain create --evm --latest\
creating genesis for
configuring airdrop to stored key "subnet__airdrop" with address 0x0EF815FFFF6ad1d4e17C8ED4128b20EB5edAABBB
loading stored key "cli-teleporter-deployer" for teleporter deploys
(evm address, genesis balance) = (0xE932784f56774879e03F3624fbeC6261154ec711, 600000000000000000000)
using latest teleporter version (v1.0.0)
✓ Successfully created Avalanche L1 configuration
```
## Deploy the Avalanche L1s to Local Network
Let's deploy ``:
```
avalanche blockchain deploy --local
Deploying [] to Local Network
Backend controller started, pid: 149427, output at: ~/.avalanche-cli/runs/server_20240229_165923/avalanche-cli-backend.log
Booting Network. Wait until healthy...
Node logs directory: ~/.avalanche-cli/runs/network_20240229_165923/node/logs
Network ready to use.
Deploying Blockchain. Wait until network acknowledges...
Teleporter Messenger successfully deployed to c-chain (0xF7cBd95f1355f0d8d659864b92e2e9fbfaB786f7)
Teleporter Registry successfully deployed to c-chain (0x17aB05351fC94a1a67Bf3f56DdbB941aE6c63E25)
Teleporter Messenger successfully deployed to (0xF7cBd95f1355f0d8d659864b92e2e9fbfaB786f7)
Teleporter Registry successfully deployed to (0x9EDc4cB4E781413b1b82CC3A92a60131FC111F58)
Using latest awm-relayer version (v1.1.0)
Executing AWM-Relayer...
Blockchain ready to use. Local network node endpoints:
+-------+-----------+------------------------------------------------------------------------------------+--------------------------------------------+
| NODE | VM | URL | ALIAS URL |
+-------+-----------+------------------------------------------------------------------------------------+--------------------------------------------+
| node1 | | http://127.0.0.1:9650/ext/bc/MzN4AbtFzQ3eKqPhFaDpwCMJmagciWSCgghkZx6YeC6jRdvb6/rpc | http://127.0.0.1:9650/ext/bc//rpc |
+-------+-----------+------------------------------------------------------------------------------------+--------------------------------------------+
| node2 | | http://127.0.0.1:9652/ext/bc/MzN4AbtFzQ3eKqPhFaDpwCMJmagciWSCgghkZx6YeC6jRdvb6/rpc | http://127.0.0.1:9652/ext/bc//rpc |
+-------+-----------+------------------------------------------------------------------------------------+--------------------------------------------+
| node3 | | http://127.0.0.1:9654/ext/bc/MzN4AbtFzQ3eKqPhFaDpwCMJmagciWSCgghkZx6YeC6jRdvb6/rpc | http://127.0.0.1:9654/ext/bc//rpc |
+-------+-----------+------------------------------------------------------------------------------------+--------------------------------------------+
| node4 | | http://127.0.0.1:9656/ext/bc/MzN4AbtFzQ3eKqPhFaDpwCMJmagciWSCgghkZx6YeC6jRdvb6/rpc | http://127.0.0.1:9656/ext/bc//rpc |
+-------+-----------+------------------------------------------------------------------------------------+--------------------------------------------+
| node5 | | http://127.0.0.1:9658/ext/bc/MzN4AbtFzQ3eKqPhFaDpwCMJmagciWSCgghkZx6YeC6jRdvb6/rpc | http://127.0.0.1:9658/ext/bc//rpc |
+-------+-----------+------------------------------------------------------------------------------------+--------------------------------------------+
Browser Extension connection details (any node URL from above works):
RPC URL: http://127.0.0.1:9650/ext/bc/MzN4AbtFzQ3eKqPhFaDpwCMJmagciWSCgghkZx6YeC6jRdvb6/rpc
Funded address: 0x0EF8151A3e6ad1d4e17C8ED4128b20EB5edc58B1 with 1000000 (10^18) - private key: 16289399c9466912ffffffdc093c9b51124f0dc54ac7a766b2bc5ccf558d8eee
Network name:
Chain ID: 1
Currency Symbol: TOKEN1
```
Notice some details here:
- Two smart contracts are deployed to each Avalanche L1: Teleporter Messenger and Teleporter Registry
- Both ICM smart contracts are also deployed to `C-Chain` in the Local Network
- [AWM ICM Relayer](https://github.com/ava-labs/icm-services/tree/main/relayer) is installed, configured and executed in background (A Relayer [listens](/docs/cross-chain/teleporter/overview#data-flow) for new messages being generated on a source Avalanche L1 and sends them to the destination Avalanche L1.)
CLI configures the Relayer to enable every Avalanche L1 to send messages to all other Avalanche L1s. If you add more Avalanche L1s, the Relayer will be automatically reconfigured.
When deploying Avalanche L1 ``, the two ICM contracts will not be deployed to C-Chain in Local Network as they have already been deployed when we deployed the first Avalanche L1.
```
avalanche blockchain deploy --local
Deploying [] to Local Network
Deploying Blockchain. Wait until network acknowledges...
Teleporter Messenger has already been deployed to c-chain
Teleporter Messenger successfully deployed to (0xF7cBd95f1355f0d8d659864b92e2e9fbfaB786f7)
Teleporter Registry successfully deployed to (0x9EDc4cB4E781413b1b82CC3A92a60131FC111F58)
Using latest awm-relayer version (v1.1.0)
Executing AWM-Relayer...
Blockchain ready to use. Local network node endpoints:
+-------+-----------+-------------------------------------------------------------------------------------+--------------------------------------------+
| NODE | VM | URL | ALIAS URL |
+-------+-----------+-------------------------------------------------------------------------------------+--------------------------------------------+
| node1 | | http://127.0.0.1:9650/ext/bc/2tVGwEQmeXtdnFURW1YSq5Yf4jbJPfTBfVcu68KWHdHe5e5gX5/rpc | http://127.0.0.1:9650/ext/bc//rpc |
+-------+-----------+-------------------------------------------------------------------------------------+--------------------------------------------+
| node1 | | http://127.0.0.1:9650/ext/bc/MzN4AbtFzQ3eKqPhFaDpwCMJmagciWSCgghkZx6YeC6jRdvb6/rpc | http://127.0.0.1:9650/ext/bc//rpc |
+-------+-----------+-------------------------------------------------------------------------------------+--------------------------------------------+
| node2 | | http://127.0.0.1:9652/ext/bc/2tVGwEQmeXtdnFURW1YSq5Yf4jbJPfTBfVcu68KWHdHe5e5gX5/rpc | http://127.0.0.1:9652/ext/bc/